Attention: Here be dragons
This is the latest
(unstable) version of this documentation, which may document features
not available in or compatible with released stable versions of Godot.
Checking the stable version of the documentation...
节点与场景实例
本指南将介绍如何获取节点、创建节点、将节点添加为子项、使用代码实例化场景。
获取节点
你可以通过调用 Node.get_node() 方法来获取节点的引用。子节点必须在场景树中才能成功。在父节点的 _ready() 函数中获取就可以保证这一点。
If, for example, you have a scene tree like this, and you want to get a reference to the Sprite2D and Camera2D nodes to access them in your script.
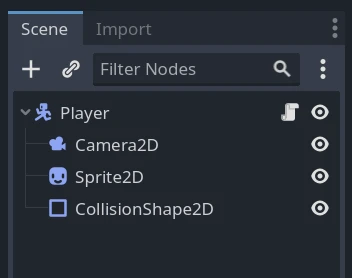
那么,你可以使用如下代码。
var sprite2d
var camera2d

func _ready():
    sprite2d = get_node("Sprite2D")
    camera2d = get_node("Camera2D")
private Sprite2D _sprite2D;
private Camera2D _camera2D;

public override void _Ready()
{
    base._Ready();

    _sprite2D = GetNode<Sprite2D>("Sprite2D");
    _camera2D = GetNode<Camera2D>("Camera2D");
}
Note that you get nodes using their name, not their type. Above, "Sprite2D" and "Camera2D" are the nodes' names in the scene.
If you rename the Sprite2D node as Skin in the Scene dock, you have to change the
line that gets the node to get_node("Skin") in the script.
节点路径
获取节点的引用时,并不仅限于直接子节点。get_node() 函数支持使用路径,有点类似文件浏览器里的路径。可以用斜杠分隔节点。
在下面这个实例场景中,脚本是附加在 UserInterface 节点上的。
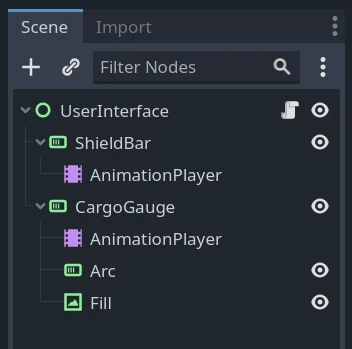
To get the AnimationPlayer node, you would use the following code.
var animation_player

func _ready():
    animation_player = get_node("ShieldBar/AnimationPlayer")
private AnimationPlayer _animationPlayer;

public override void _Ready()
{
    base._Ready();

    _animationPlayer = GetNode<AnimationPlayer>("ShieldBar/AnimationPlayer");
}
备注
和文件路径一样,你可以使用“..”来获取父节点。最佳实践是不要这么做,避免破坏封装。你还可以让路径以斜杠开头,这样的路径是绝对路径,最上层的节点就是“/root”,即程序的预定义根视口。
语法糖
You can use two shorthands to shorten your code in GDScript. Firstly, putting the
@onready annotation before a member variable makes it initialize right before
the _ready() callback.
@onready var sprite2d = get_node("Sprite2D")
还有一个 get_node() 的速记法:美元符号“$”。可以把它放在想要获取的名称或者节点路径之前。
@onready var sprite2d = $Sprite2D
@onready var animation_player = $ShieldBar/AnimationPlayer
创建节点
要通过代码创建节点,请像其他任何基于类的数据类型一样,调用其 new() 方法。
你可以将新创建的节点的引用保存在一个变量中,然后调用 add_child() 将其添加为脚本所在节点的子项。
var sprite2d

func _ready():
    var sprite2d = Sprite2D.new() # Create a new Sprite2D.
    add_child(sprite2d) # Add it as a child of this node.
private Sprite2D _sprite2D;

public override void _Ready()
{
    base._Ready();

    _sprite2D = new Sprite2D(); // Create a new Sprite2D.
    AddChild(_sprite2D); // Add it as a child of this node.
}
要删除节点、将其从内容中释放,你可以调用其 queue_free() 方法。这样该节点的删除任务就会被添加到队列中,在当前帧完成处理后就会执行。删除时,引擎会把该节点从场景中删除,然后释放对象内存中的对象。
sprite2d.queue_free()
_sprite2D.QueueFree();
Before calling sprite2d.queue_free(), the remote scene tree looks like this.
在引擎释放节点后,远程场景树就不会再现实这个精灵了。
你也可以调用 free() 来立即删除该节点。调用时需要小心,因为所有对它的引用都会立即变成 null。除非你知道自己在干什么,否则我们建议使用 queue_free()。
释放节点时也会释放它的所有子项。多亏如此,只需删除最顶端的父节点,就可以删除整个场景树分支了。
实例化场景
场景就是模板,你可以用来来创建任意数量的复制品。这样的操作叫作实例化(instancing),在代码中进行实例化总共分两步:
Loading the scene from the local drive.
创建加载到的 PackedScene 资源的实例。
var scene = load("res://my_scene.tscn")
var scene = GD.Load<PackedScene>("res://MyScene.tscn");
预加载场景可以提升用户体验,因为加载操作发生在编译器读取脚本时,而非运行时。这个特性是 GDScript 独有的。
var scene = preload("res://my_scene.tscn")
At that point, scene is a packed scene resource, not a node. To create the
actual node, you need to call PackedScene.instantiate(). It returns a tree of nodes that you can use
as a child of your current node.
var instance = scene.instantiate()
add_child(instance)
var instance = scene.Instantiate();
AddChild(instance);
此两步过程的优点在于,打包的场景可以保持加载状态并可以随时使用。例如,你就可以快速地对许多敌人或子弹进行实例化。