Attention: Here be dragons
This is the latest
(unstable) version of this documentation, which may document features
not available in or compatible with released stable versions of Godot.
Checking the stable version of the documentation...
使用代码移动玩家
该轮到编写代码了!我们将使用先前创建的输入动作来移动角色。
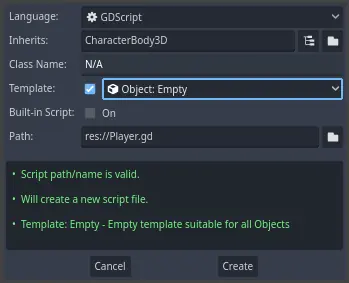
Right-click the Player node and select Attach Script to add a new script to
it. In the popup, set the Template to Empty before pressing the Create
button.
先定义类的属性。我们将定义移动速率(标量)、重力加速度,以及一个我们将用来移动角色的速度(向量)。
extends CharacterBody3D

# How fast the player moves in meters per second.
@export var speed = 14
# The downward acceleration when in the air, in meters per second squared.
@export var fall_acceleration = 75

var target_velocity = Vector3.ZERO
using Godot;

public partial class Player : CharacterBody3D
{
    // Don't forget to rebuild the project so the editor knows about the new export variable.

    // How fast the player moves in meters per second.
    [Export]
    public int Speed { get; set; } = 14;
    // The downward acceleration when in the air, in meters per second squared.
    [Export]
    public int FallAcceleration { get; set; } = 75;

    private Vector3 _targetVelocity = Vector3.Zero;
}
These are common properties for a moving body. The target_velocity is a 3D vector
combining a speed with a direction. Here, we define it as a property because
we want to update and reuse its value across frames.
备注
这些值与二维代码完全不同,因为距离以米为单位。在 2D 中,一千个单位(像素)可能只对应于屏幕宽度的一半,而在 3D 中,它是一千米。
Let's code the movement. We start by calculating the input direction vector
using the global Input object, in _physics_process().
func _physics_process(delta):
    # We create a local variable to store the input direction.
    var direction = Vector3.ZERO

    # We check for each move input and update the direction accordingly.
    if Input.is_action_pressed("move_right"):
        direction.x += 1
    if Input.is_action_pressed("move_left"):
        direction.x -= 1
    if Input.is_action_pressed("move_back"):
        # Notice how we are working with the vector's x and z axes.
        # In 3D, the XZ plane is the ground plane.
        direction.z += 1
    if Input.is_action_pressed("move_forward"):
        direction.z -= 1
public override void _PhysicsProcess(double delta)
{
    // We create a local variable to store the input direction.
    var direction = Vector3.Zero;

    // We check for each move input and update the direction accordingly.
    if (Input.IsActionPressed("move_right"))
    {
        direction.X += 1.0f;
    }
    if (Input.IsActionPressed("move_left"))
    {
        direction.X -= 1.0f;
    }
    if (Input.IsActionPressed("move_back"))
    {
        // Notice how we are working with the vector's X and Z axes.
        // In 3D, the XZ plane is the ground plane.
        direction.Z += 1.0f;
    }
    if (Input.IsActionPressed("move_forward"))
    {
        direction.Z -= 1.0f;
    }
}
在这里,我们将使用 _physics_process() 虚函数进行所有计算。与 _process() 一样,它允许您每帧更新节点,但它是专门为物理相关代码设计的,例如运动学物体或刚体。
参见
要了解更多关于 _process() 和 _physics_process() 之间的区别,见 空闲处理与物理处理。
我们首先将一个 direction 变量初始化为 Vector3.ZERO。然后,我们检查玩家是否正在按下一个或多个 move_* 输入,并相应地更新矢量的 x 和 z 分量。它们对应于地平面的轴。
这四个条件给了我们八个可能性和八个可能的方向。
In case the player presses, say, both W and D simultaneously, the vector will
have a length of about 1.4. But if they press a single key, it will have a
length of 1. We want the vector's length to be consistent, and not move faster diagonally. To do so, we can
call its normalize() method.
#func _physics_process(delta):
    #...

    if direction != Vector3.ZERO:
        direction = direction.normalized()
        $Pivot.look_at(position + direction, Vector3.UP)
public override void _PhysicsProcess(double delta)
{
    // ...

    if (direction != Vector3.Zero)
    {
        direction = direction.Normalized();
        GetNode<Node3D>("Pivot").LookAt(Position + direction, Vector3.Up);
    }
}
在这里,我们只在方向的长度大于零的情况下对向量进行归一化,因为玩家正在按某个方向键。
In this case, we also get the Pivot node and call its look_at() method.
This method takes a position in space to look at in global coordinates and the
up direction. In this case, we can use the Vector3.UP constant.
备注
A node's local coordinates, like position, are relative to their
parent. Global coordinates, like global_position are relative to the world's main axes you can see
in the viewport instead.
In 3D, the property that contains a node's position is position. By
adding the direction to it, we get a position to look at that's one meter
away from the Player.
Then, we update the velocity. We have to calculate the ground velocity and the
fall speed separately. Be sure to go back one tab so the lines are inside the
_physics_process() function but outside the condition we just wrote above.
func _physics_process(delta):
    #...
    if direction != Vector3.ZERO:
        #...

    # Ground Velocity
    target_velocity.x = direction.x * speed
    target_velocity.z = direction.z * speed

    # Vertical Velocity
    if not is_on_floor(): # If in the air, fall towards the floor. Literally gravity
        target_velocity.y = target_velocity.y - (fall_acceleration * delta)

    # Moving the Character
    velocity = target_velocity
    move_and_slide()
public override void _PhysicsProcess(double delta)
{
    // ...
    if (direction != Vector3.Zero)
    {
        // ...
    }

    // Ground velocity
    _targetVelocity.X = direction.X * Speed;
    _targetVelocity.Z = direction.Z * Speed;

    // Vertical velocity
    if (!IsOnFloor()) // If in the air, fall towards the floor. Literally gravity
    {
        _targetVelocity.Y -= FallAcceleration * (float)delta;
    }

    // Moving the character
    Velocity = _targetVelocity;
    MoveAndSlide();
}
The CharacterBody3D.is_on_floor() function returns true if the body collided with the floor in this frame. That's why
we apply gravity to the Player only while it is in the air.
For the vertical velocity, we subtract the fall acceleration multiplied by the delta time every frame. This line of code will cause our character to fall in every frame, as long it is not on or collides with the floor.
物理引擎只有在运动和碰撞发生的情况下才能检测到在某一帧中与墙壁、地板或其他物体的相互作用。我们将在后面使用这个属性来编写跳跃的代码。
On the last line, we call CharacterBody3D.move_and_slide() which is a powerful
method of the CharacterBody3D class that allows you to move a character
smoothly. If it hits a wall midway through a motion, the engine will try to
smooth it out for you. It uses the velocity value native to the CharacterBody3D
这就是你在地面上移动角色所需的所有代码。
下面是供参考的完整 Player.gd 代码。
extends CharacterBody3D

# How fast the player moves in meters per second.
@export var speed = 14
# The downward acceleration when in the air, in meters per second squared.
@export var fall_acceleration = 75

var target_velocity = Vector3.ZERO


func _physics_process(delta):
    var direction = Vector3.ZERO

    if Input.is_action_pressed("move_right"):
        direction.x += 1
    if Input.is_action_pressed("move_left"):
        direction.x -= 1
    if Input.is_action_pressed("move_back"):
        direction.z += 1
    if Input.is_action_pressed("move_forward"):
        direction.z -= 1

    if direction != Vector3.ZERO:
        direction = direction.normalized()
        $Pivot.look_at(position + direction, Vector3.UP)

    # Ground Velocity
    target_velocity.x = direction.x * speed
    target_velocity.z = direction.z * speed

    # Vertical Velocity
    if not is_on_floor(): # If in the air, fall towards the floor. Literally gravity
        target_velocity.y = target_velocity.y - (fall_acceleration * delta)

    # Moving the Character
    velocity = target_velocity
    move_and_slide()
using Godot;

public partial class Player : CharacterBody3D
{
    // How fast the player moves in meters per second.
    [Export]
    public int Speed { get; set; } = 14;
    // The downward acceleration when in the air, in meters per second squared.
    [Export]
    public int FallAcceleration { get; set; } = 75;

    private Vector3 _targetVelocity = Vector3.Zero;

    public override void _PhysicsProcess(double delta)
    {
        var direction = Vector3.Zero;

        if (Input.IsActionPressed("move_right"))
        {
            direction.X += 1.0f;
        }
        if (Input.IsActionPressed("move_left"))
        {
            direction.X -= 1.0f;
        }
        if (Input.IsActionPressed("move_back"))
        {
            direction.Z += 1.0f;
        }
        if (Input.IsActionPressed("move_forward"))
        {
            direction.Z -= 1.0f;
        }

        if (direction != Vector3.Zero)
        {
            direction = direction.Normalized();
            GetNode<Node3D>("Pivot").LookAt(Position + direction, Vector3.Up);
        }

        // Ground velocity
        _targetVelocity.X = direction.X * Speed;
        _targetVelocity.Z = direction.Z * Speed;

        // Vertical velocity
        if (!IsOnFloor()) // If in the air, fall towards the floor. Literally gravity
        {
            _targetVelocity.Y -= FallAcceleration * (float)delta;
        }

        // Moving the character
        Velocity = _targetVelocity;
        MoveAndSlide();
    }
}
测试玩家的移动
We're going to put our player in the Main scene to test it. To do so, we need
to instantiate the player and then add a camera. Unlike in 2D, in 3D, you won't
see anything if your viewport doesn't have a camera pointing at something.
Save your Player scene and open the Main scene. You can click on the Main
tab at the top of the editor to do so.

If you closed the scene before, head to the FileSystem dock and double-click
main.tscn to re-open it.
To instantiate the Player, right-click on the Main node and select Instance
Child Scene.
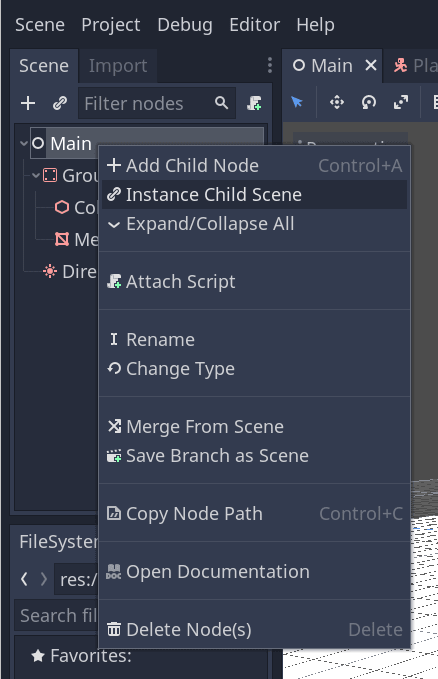
In the popup, double-click player.tscn. The character should appear in the
center of the viewport.
添加摄像机
Let's add the camera next. Like we did with our Player's Pivot, we're
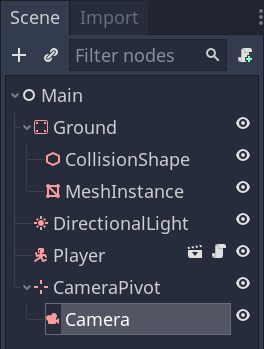
going to create a basic rig. Right-click on the Main node again and select
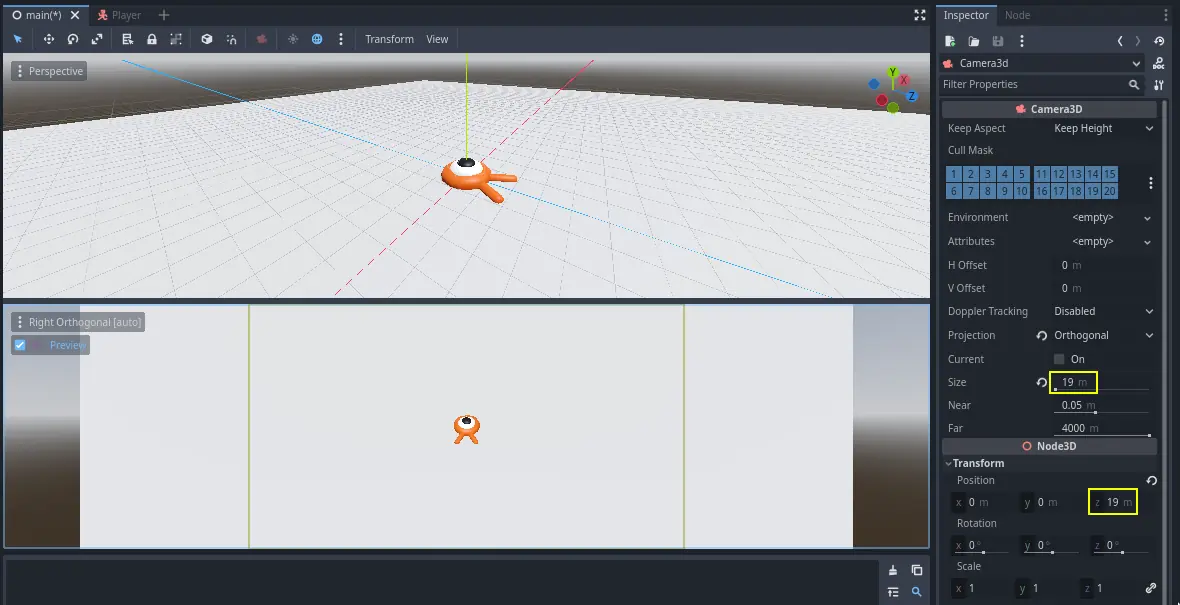
Add Child Node. Create a new Marker3D, and name it CameraPivot. Select CameraPivot and add a child node Camera3D to it. Your scene tree should look like this.
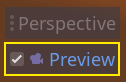
请注意在选中 Camera 时,左上角会出现一个预览复选框。你可以单击预览游戏中的摄像机投影视角。

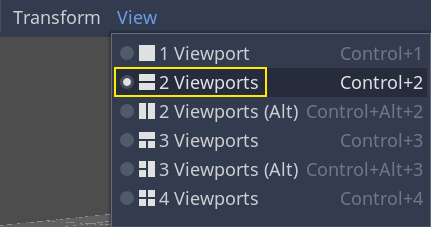
我们要使用 Pivot 来旋转摄像机,让他像被吊车吊起来一样。让我们先拆分 3D 视图,以便在进行自由移动的同时观察摄像机拍摄到的内容。
在视口上方的工具栏中,单击视图,然后单击2 个视口。你也可以按 Ctrl + 2(macOS 上则为 Cmd + 2)。
On the bottom view, select your Camera3D and turn on camera Preview by clicking the checkbox.
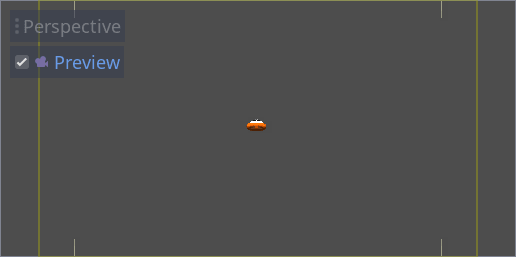
在上面那个视图中,将摄像机沿 Z 轴(蓝色)移动 19 个单位。
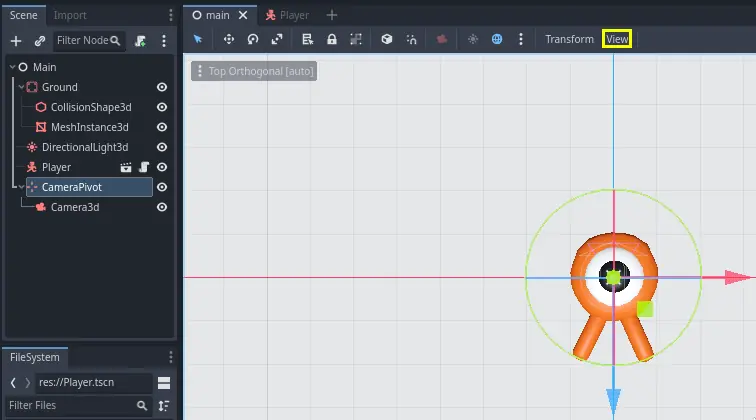
Here's where the magic happens. Select the CameraPivot and rotate it -45
degrees around the X axis (using the red circle). You'll see the camera move as
if it was attached to a crane.
你可以按 F6 运行场景,然后按方向键来移动角色。
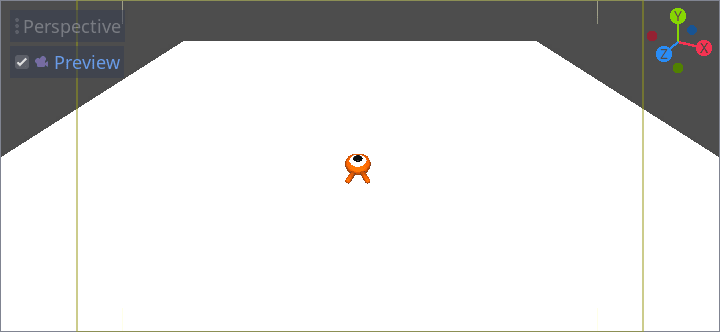
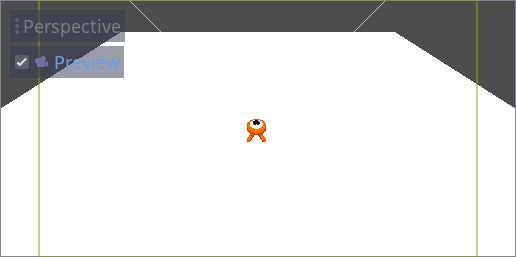
因为透视投影的缘故,我们会在角色的周围看到一些空白区域。在这个游戏中,我们要使用的是正交投影,从而更好地展示游戏区域,让玩家更易于识别距离。
再次选中 Camera,然后在检查器 中将 Projection(投影)设为 Orthogonal(正交)、将 Size(大小)设为 19。角色现在看起来应该更加扁平,背景应该被地面充满。
备注
When using an orthogonal camera in Godot 4, directional shadow quality is dependent on the camera's Far value. The higher the Far value, the further away the camera will be able to see. However, higher Far values also decrease shadow quality as the shadow rendering has to cover a greater distance.
If directional shadows look too blurry after switching to an orthogonal
camera, decrease the camera's Far property to a lower value such as
100. Don't decrease this Far property too much, or objects in the
distance will start disappearing.
Test your scene and you should be able to move in all 8 directions and not glitch through the floor!
Ultimately, we have both player movement and the view in place. Next, we will work on the monsters.