Attention: Here be dragons
This is the latest
(unstable) version of this documentation, which may document features
not available in or compatible with released stable versions of Godot.
Checking the stable version of the documentation...
3D 渲染的局限性
前言
出于对性能的要求, 实时渲染引擎有很多局限性.Godot的渲染器也不例外. 为了更有效地工作, 你需要了解这些局限性.
纹理尺寸限制
在台式机和笔记本电脑上,旧设备可能不支持大于 8192×8192 的纹理。你可以在 GPUinfo.org 上检查你的目标 GPU 的限制。
移动端GPU通常仅支持小于4096×4096的纹理. 此外, 一些移动端GPU不支持对非二的幂次大小的纹理进行重复(repeat)操作. 因此, 如果你想让你的纹理在所有平台上正确显示, 你应该避免使用比4096×4096大的纹理, 如果纹理需要重复, 应该使用两倍的大小.
To limit the size of a specific texture that may be too large to render, you can
set the Process > Size Limit import option to a value greater than 0.
This will reduce the texture's dimensions on import (preserving aspect ratio)
without affecting the source file.
带状颜色
When using the Forward+ or Forward Mobile rendering methods, Godot's 3D engine renders internally in HDR. However, the rendering output will be tonemapped to a low dynamic range so it can be displayed on the screen. This can result in visible banding, especially when using untextured materials. For performance reasons, color precision is also lower when using the Forward Mobile rendering method compared to Forward+.
When using the Compatibility rendering method, HDR is not used and the color precision is the lowest of all rendering methods. This also applies to 2D rendering, where banding may be visible when using smooth gradient textures.
有两个主要的方法来缓解条带:
If using the Forward+ or Forward Mobile rendering methods, enable Use Debanding in the advanced Project Settings. This applies a fullscreen debanding shader as a post-processing effect and is very cheap.
Alternatively, bake some noise into your textures. This is mainly effective in 2D, e.g. for vignetting effects. In 3D, you can also use a custom debanding shader to be applied on your materials. This technique works even if your project is rendered with low color precision, which means it will work when using the Mobile and Compatibility rendering methods.
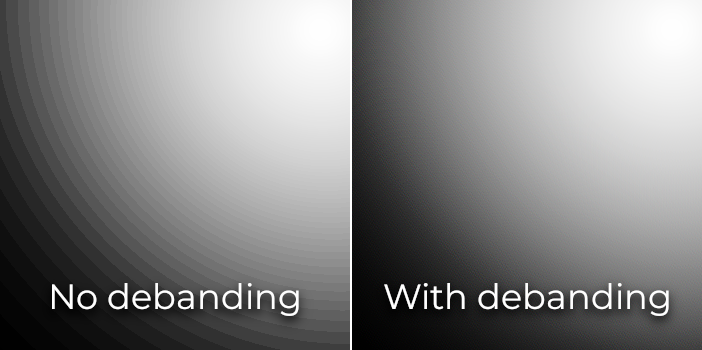
Color banding comparison (contrast increased for more visibility)
参见
See Banding in Games: A Noisy Rant (PDF) for more details about banding and ways to combat it.
深度缓冲精度
为了在 3D 空间中排序对象,渲染引擎使用了深度缓冲区(也称为 Z 缓冲区)。这个缓冲区具有有限的精度:在桌面平台上是 24 位,在移动平台上有时是 16 位(出于性能原因)。如果两个不同的对象最终具有相同的缓冲值,那么就会发生 Z 冲突(Z-fighting),此时移动或旋转相机,将观察到纹理来回闪烁。
为了使深度缓冲在渲染区域上更精确,你应该增加摄像机节点的 Near 属性。但是要小心,如果你设置得太高,玩家就会看穿附近的几何体。同时,还应该减少摄像机节点的 Far 属性到你用例允许的最低值,尽管它不会像 Near 属性那样影响精度。
如果你只需要当玩家能够看到很远的地方时才提供高精度, 你可以根据游戏条件动态改变它. 例如, 如果玩家进入飞机, Near 属性可以暂时增加, 以避免远处的z冲突现象(z-fighting). 当玩家离开飞机时, 它便会被减少.
根据场景和玩家视野条件, 你还可以在玩家不会看出差异的情况下将产生z冲突的对象移得更远.
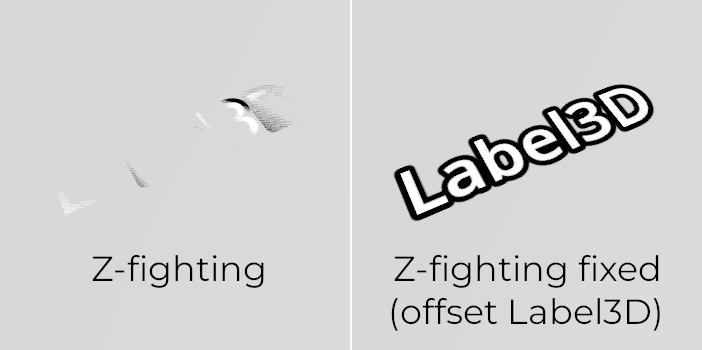
Z-fighting comparison (before and after tweaking the scene by offsetting the Label3D away from the floor)
透明度排序
In Godot, transparent materials are drawn after opaque materials. Transparent objects are sorted back to front before being drawn based on the Node3D's position, not the vertex position in world space. Due to this, overlapping objects may often be sorted out of order. To fix improperly sorted objects, tweak the material's Render Priority property or the node's Sorting Offset. Render Priority will force specific materials to appear in front of or behind other transparent materials, while Sorting Offset will move the object forward or backward for the purpose of sorting. Even then, these may not always be sufficient.
一些渲染引擎会使用顺序无关的透明技术来缓解这个问题,但这类技术对于 GPU 而言开销很大。Godot 目前没有提供这个功能,但仍然有几种方法可以避免这个问题:
Only make materials transparent if you actually need it. If a material only has a small transparent part, consider splitting it into a separate material. This will allow the opaque part to cast shadows and will also improve performance.
If your texture mostly has fully opaque and fully transparent areas, you can use alpha testing instead of alpha blending. This transparency mode is faster to render and doesn't suffer from transparency issues. Enable Transparency > Transparency to Alpha Scissor in StandardMaterial3D, and adjust Transparency > Alpha Scissor Threshold accordingly if needed. Note that MSAA will not antialias the texture's edges unless alpha antialiasing is enabled in the material's properties. However, FXAA, TAA and supersampling will be able to antialias the texture's edges regardless of whether alpha antialiasing is enabled on the material.
If you need to render semi-transparent areas of the texture, alpha scissor isn't suitable. Instead, setting the StandardMaterial3D's Transparency > Transparency property to Depth Pre-Pass can sometimes work (at a performance cost). You can also try the Alpha Hash mode.
If you want a material to fade with distance, use the StandardMaterial3D distance fade mode Pixel Dither or Object Dither instead of PixelAlpha. This will make the material opaque, which also speeds up rendering.

Transparency sorting comparison (alpha-blended materials on the left, alpha scissor materials on the right)
多采样抗锯齿
参见
Antialiasing is explained in detail on the 3D antialiasing page.
多重样本抗锯齿(MSAA)指的是在渲染对象时在多边形的边上取多个覆盖样本(coverage samples), 但它不会增加用于渲染场景的颜色样本数量. 下面是它在实践中的作用和局限性:
网格的边缘将被很好地平滑(就像超采样一样).
使用alpha测试(1位透明度)的透明材质无法被平滑.
镜面反射锯齿问题(即出现在反射表面上的“火花”(sparkle))无法解决。
有几种方法可以解决这一限制, 这取决于您的绩效预算:
To make specular aliasing less noticeable, open the Project Settings and enable Rendering > Quality > Screen Space Filters > Screen Space Roughness Limiter. This filter has a moderate cost on performance, so it should only be enabled if you actually need it.
Enable fast approximate antialiasing (FXAA) in addition to (or instead of) MSAA. Since FXAA is a screen-space antialiasing method, it will smooth out anything. As a downside, FXAA also makes the scene appear blurrier, especially at resolutions below 1440p. FXAA also lacks temporal information, which means its impact on specular aliasing is limited.
Enable temporal antialiasing (TAA) in addition to (or instead of) MSAA. Since TAA is a screen-space antialiasing method, it will smooth out anything. As a downside, TAA also makes the scene appear blurrier, especially at resolutions below 1440p. TAA provides superior quality compared to FXAA and can effectively combat specular aliasing. However, TAA has a greater performance cost compared to FXAA, and TAA can introduce ghosting artifacts with fast movement.
Render the scene at a higher resolution by increasing the Scaling 3D > Scale project setting above
1.0. This technique is called supersample antialiasing (SSAA) and is very slow. Its use is generally only recommended for offline rendering.