Attention: Here be dragons
This is the latest
(unstable) version of this documentation, which may document features
not available in or compatible with released stable versions of Godot.
Checking the stable version of the documentation...
2D 中的自定义绘图
前言
Godot has nodes to draw sprites, polygons, particles, and all sorts of stuff. For most cases, this is enough. If there's no node to draw something specific you need, you can make any 2D node (for example, Control or Node2D based) draw custom commands.
2D 节点中的自定义绘制非常有用。下面是一些用例:
绘制现有节点类型无法完成的形状或逻辑,例如带有轨迹或特殊动态多边形的图像。
与节点不太兼容的呈现方式,比如俄罗斯方块的棋盘。(俄罗斯方块的例子使用的是自定义绘制函数来绘制方块。)
绘制大量简单的对象。自定义绘制避免了使用大量节点的开销,能降低内存占用,并提高性能。
制作自定义的 UI 控件,以满足很多可用的控件之外的特别需求。
绘制
添加一个脚本到任何 CanvasItem 的派生节点,如 Control 或 Node2D。然后重载 _draw() 函数。
extends Node2D

func _draw():
    # Your draw commands here
    pass
public override void _Draw()
{
    // Your draw commands here
}
绘制命令在 CanvasItem 的类参考中有所描述,数量很多。
更新
_draw() 函数只调用一次, 然后绘制命令被缓存并记住, 因此不需要进一步调用.
If re-drawing is required because a state or something else changed,
call CanvasItem.queue_redraw()
in that same node and a new _draw() call will happen.
这是一个更复杂的示例,一个被修改就会重新绘制的纹理变量:
extends Node2D

export (Texture) var texture setget _set_texture

func _set_texture(value):
    # If the texture variable is modified externally,
    # this callback is called.
    texture = value  # Texture was changed.
    queue_redraw()  # Trigger a redraw of the node.

func _draw():
    draw_texture(texture, Vector2())
using Godot;

public partial class MyNode2D : Node2D
{
    private Texture _texture;
    public Texture Texture
    {
        get
        {
            return _texture;
        }

        set
        {
            _texture = value;
            QueueRedraw();
        }
    }

    public override void _Draw()
    {
        DrawTexture(_texture, new Vector2());
    }
}
In some cases, it may be desired to draw every frame. For this,
call queue_redraw() from the _process() callback, like this:
extends Node2D

func _draw():
    # Your draw commands here
    pass

func _process(delta):
    queue_redraw()
using Godot;

public partial class CustomNode2D : Node2D
{
    public override void _Draw()
    {
        // Your draw commands here
    }

    public override void _Process(double delta)
    {
        QueueRedraw();
    }
}
坐标
The drawing API uses the CanvasItem's coordinate system, not necessarily pixel coordinates. Which means it uses the coordinate space created after applying the CanvasItem's transform. Additionally, you can apply a custom transform on top of it by using draw_set_transform or draw_set_transform_matrix.
When using draw_line, you should consider the width of the line.
When using a width that is an odd size, the position should be shifted
by 0.5 to keep the line centered as shown below.
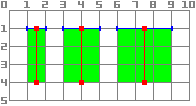
func _draw():
    draw_line(Vector2(1.5, 1.0), Vector2(1.5, 4.0), Color.GREEN, 1.0)
    draw_line(Vector2(4.0, 1.0), Vector2(4.0, 4.0), Color.GREEN, 2.0)
    draw_line(Vector2(7.5, 1.0), Vector2(7.5, 4.0), Color.GREEN, 3.0)
public override void _Draw()
{
    DrawLine(new Vector2(1.5f, 1.0f), new Vector2(1.5f, 4.0f), Colors.Green, 1.0f);
    DrawLine(new Vector2(4.0f, 1.0f), new Vector2(4.0f, 4.0f), Colors.Green, 2.0f);
    DrawLine(new Vector2(7.5f, 1.0f), new Vector2(7.5f, 4.0f), Colors.Green, 3.0f);
}
The same applies to the draw_rect method with filled = false.
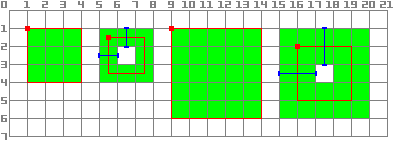
func _draw():
    draw_rect(Rect2(1.0, 1.0, 3.0, 3.0), Color.GREEN)
    draw_rect(Rect2(5.5, 1.5, 2.0, 2.0), Color.GREEN, false, 1.0)
    draw_rect(Rect2(9.0, 1.0, 5.0, 5.0), Color.GREEN)
    draw_rect(Rect2(16.0, 2.0, 3.0, 3.0), Color.GREEN, false, 2.0)
public override void _Draw()
{
    DrawRect(new Rect2(1.0f, 1.0f, 3.0f, 3.0f), Colors.Green);
    DrawRect(new Rect2(5.5f, 1.5f, 2.0f, 2.0f), Colors.Green, false, 1.0f);
    DrawRect(new Rect2(9.0f, 1.0f, 5.0f, 5.0f), Colors.Green);
    DrawRect(new Rect2(16.0f, 2.0f, 3.0f, 3.0f), Colors.Green, false, 2.0f);
}
示例:绘制圆弧
我们现在将使用 Godot 引擎的自定义绘图功能来绘制 Godot 未提供函数的内容。比如,Godot 提供了 draw_circle() 函数,它可以绘制一个完整的圆。但是,画一个圆的一部分怎么说?你必须编写一个函数来执行此操作,自己绘制它。
弧函数
弧由其所在的圆的参数定义. 即: 中心位置和半径. 弧本身由开始的角度和停止的角度来定义. 这些是我们必须为绘图提供的4个参数. 我们还将提供颜色值, 因此我们可以根据需要绘制不同颜色的圆弧.
基本上, 在屏幕上绘制形状需要将其分解为一定量首位相接的点. 你可以预见到, 点越多, 它就越平滑, 但处理开销就越大. 一般来说, 如果你的形状很大(或者在3D场景中靠近相机), 则需要绘制更多的点才不会看起来像是有棱角的. 相反, 如果你的形状很小(或在3D场景里远离相机), 你可以减少其点数以节省处理成本. 这称为 多层次细节(Level of Detail, LoD) . 在我们的示例中, 无论半径如何, 我们都只使用固定数量的点.
func draw_circle_arc(center, radius, angle_from, angle_to, color):
    var nb_points = 32
    var points_arc = PackedVector2Array()

    for i in range(nb_points + 1):
        var angle_point = deg_to_rad(angle_from + i * (angle_to-angle_from) / nb_points - 90)
        points_arc.push_back(center + Vector2(cos(angle_point), sin(angle_point)) * radius)

    for index_point in range(nb_points):
        draw_line(points_arc[index_point], points_arc[index_point + 1], color)
public void DrawCircleArc(Vector2 center, float radius, float angleFrom, float angleTo, Color color)
{
    int nbPoints = 32;
    var pointsArc = new Vector2[nbPoints + 1];

    for (int i = 0; i <= nbPoints; i++)
    {
        float anglePoint = Mathf.DegToRad(angleFrom + i * (angleTo - angleFrom) / nbPoints - 90f);
        pointsArc[i] = center + new Vector2(Mathf.Cos(anglePoint), Mathf.Sin(anglePoint)) * radius;
    }

    for (int i = 0; i < nbPoints - 1; i++)
    {
        DrawLine(pointsArc[i], pointsArc[i + 1], color);
    }
}
Remember the number of points our shape has to be decomposed into? We fixed this
number in the nb_points variable to a value of 32. Then, we initialize an empty
PackedVector2Array, which is simply an array of Vector2s.
下一步包括计算构成弧的这32个点的实际位置. 这是在第一个for循环中完成的: 我们迭代我们想要计算位置的点的数量, 后面+1来包括最后一个点. 我们首先确定起点和终点之间每个点的角度.
The reason why each angle is decreased by 90° is that we will compute 2D positions
out of each angle using trigonometry (you know, cosine and sine stuff...). However,
cos() and sin() use radians, not degrees. The angle of 0° (0 radian)
starts at 3 o'clock, although we want to start counting at 12 o'clock. So we decrease
each angle by 90° in order to start counting from 12 o'clock.
The actual position of a point located on a circle at angle angle (in radians)
is given by Vector2(cos(angle), sin(angle)). Since cos() and sin() return values
between -1 and 1, the position is located on a circle of radius 1. To have this
position on our support circle, which has a radius of radius, we simply need to
multiply the position by radius. Finally, we need to position our support circle
at the center position, which is performed by adding it to our Vector2 value.
Finally, we insert the point in the PackedVector2Array which was previously defined.
现在, 我们需要实际绘制我们的点. 你可以想象, 我们不会简单地画出我们的32个点: 我们需要绘制每一点之间的所有内容. 我们可以使用前面的方法自己计算每个点, 然后逐个绘制. 但这太复杂和低效了(除非确实需要). 因此, 我们只需在每对点之间绘制线条. 除非我们的辅助圆的半径很大, 否则一对点之间每条线的长度永远不会长到足以看到它们. 如果发生这种情况, 我们只需要增加点的个数就可以了.
在屏幕上绘制弧形
我们现在有一个在屏幕上绘制内容的函数; 是时候在 _draw() 函数中调用它了:
func _draw():
    var center = Vector2(200, 200)
    var radius = 80
    var angle_from = 75
    var angle_to = 195
    var color = Color(1.0, 0.0, 0.0)
    draw_circle_arc(center, radius, angle_from, angle_to, color)
public override void _Draw()
{
    var center = new Vector2(200, 200);
    float radius = 80;
    float angleFrom = 75;
    float angleTo = 195;
    var color = new Color(1, 0, 0);
    DrawCircleArc(center, radius, angleFrom, angleTo, color);
}
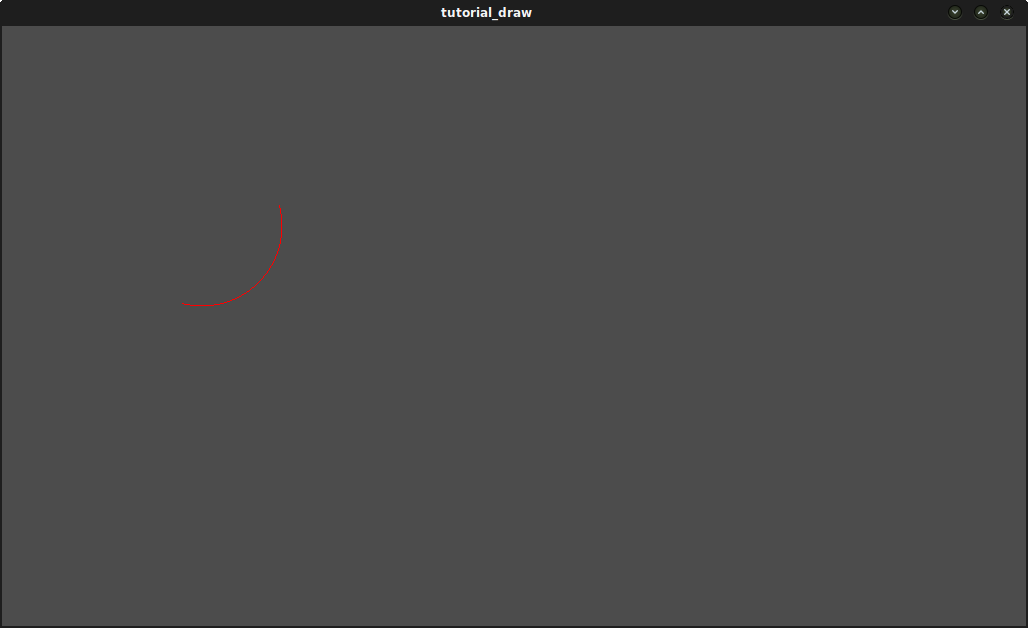
结果:
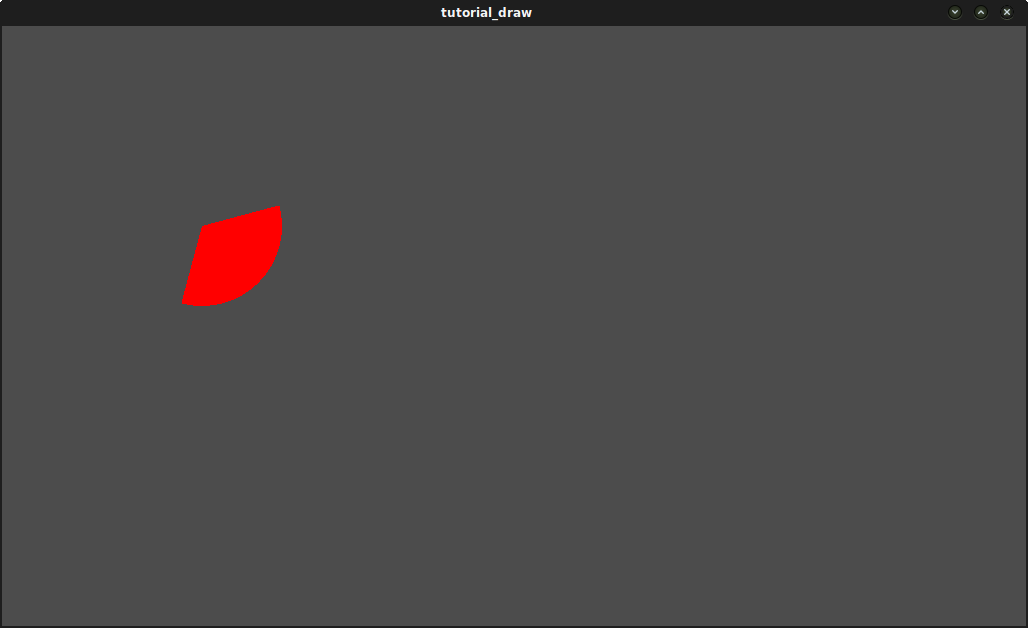
弧多边形函数
我们可以更进一步, 不仅仅绘制一个由弧定义的扇形的边缘, 还可以绘制其形体. 该方法与以前完全相同, 只是我们绘制的是多边形而不是线条:
func draw_circle_arc_poly(center, radius, angle_from, angle_to, color):
    var nb_points = 32
    var points_arc = PackedVector2Array()
    points_arc.push_back(center)
    var colors = PackedColorArray([color])

    for i in range(nb_points + 1):
        var angle_point = deg_to_rad(angle_from + i * (angle_to - angle_from) / nb_points - 90)
        points_arc.push_back(center + Vector2(cos(angle_point), sin(angle_point)) * radius)
    draw_polygon(points_arc, colors)
public void DrawCircleArcPoly(Vector2 center, float radius, float angleFrom, float angleTo, Color color)
{
    int nbPoints = 32;
    var pointsArc = new Vector2[nbPoints + 2];
    pointsArc[0] = center;
    var colors = new Color[] { color };

    for (int i = 0; i <= nbPoints; i++)
    {
        float anglePoint = Mathf.DegToRad(angleFrom + i * (angleTo - angleFrom) / nbPoints - 90);
        pointsArc[i + 1] = center + new Vector2(Mathf.Cos(anglePoint), Mathf.Sin(anglePoint)) * radius;
    }

    DrawPolygon(pointsArc, colors);
}
动态自定义绘图
好吧, 我们现在能够在屏幕上绘制自定义内容. 然而, 它是静态的; 我们让这个形状围绕中心转动吧. 这样做的方法就是随着时间的推移改变angle_from和angle_to值. 对于我们的示例, 我们将简单地将它们递增50. 此增量值必须保持不变, 否则旋转速度将相应地改变.
首先, 我们必须在我们的angle_from和angle_to变量变成全局变量, 放在脚本顶部. 另请注意, 您可以将它们存储在其他节点中并使用 get_node() 访问它们.
extends Node2D

var rotation_angle = 50
var angle_from = 75
var angle_to = 195
using Godot;

public partial class MyNode2D : Node2D
{
    private float _rotationAngle = 50;
    private float _angleFrom = 75;
    private float _angleTo = 195;
}
我们在_process(delta)函数中更改这些值.
我们也在这里增加angle_from和angle_to值. 但是, 我们不能忘记将结果 wrap() 在0到360°之间! 也就是说, 如果角度是361°, 那么它实际上是1°. 如果您不包装这些值, 脚本将正常工作, 但角度值将随着时间的推移变得越来越大, 直到它们达到Godot可以管理的最大整数值(2^31 - 1). 当发生这种情况时,Godot可能会崩溃或产生意外行为.
Finally, we must not forget to call the queue_redraw() function, which automatically
calls _draw(). This way, you can control when you want to refresh the frame.
func _process(delta):
    angle_from += rotation_angle
    angle_to += rotation_angle

    # We only wrap angles when both of them are bigger than 360.
    if angle_from > 360 and angle_to > 360:
        angle_from = wrapf(angle_from, 0, 360)
        angle_to = wrapf(angle_to, 0, 360)
    queue_redraw()
public override void _Process(double delta)
{
    _angleFrom += _rotationAngle;
    _angleTo += _rotationAngle;

    // We only wrap angles when both of them are bigger than 360.
    if (_angleFrom > 360 && _angleTo > 360)
    {
        _angleFrom = Mathf.Wrap(_angleFrom, 0, 360);
        _angleTo = Mathf.Wrap(_angleTo, 0, 360);
    }
    QueueRedraw();
}
另外, 不要忘记修改 _draw() 函数来使用这些变量:
func _draw():
   var center = Vector2(200, 200)
   var radius = 80
   var color = Color(1.0, 0.0, 0.0)

   draw_circle_arc( center, radius, angle_from, angle_to, color )
public override void _Draw()
{
    var center = new Vector2(200, 200);
    float radius = 80;
    var color = new Color(1, 0, 0);

    DrawCircleArc(center, radius, _angleFrom, _angleTo, color);
}
我们运行吧! 它工作正常, 但弧线旋转快得疯掉了! 怎么了?
原因是你的GPU实际上正在尽可能快地显示帧. 我们需要以这个速度为基准 "标准化" 绘图的速度. 为了实现这个效果, 我们必须使用 _process() 函数的 delta 参数. delta 包含最后两个渲染帧之间经过的时间. 它通常很小(约0.0003秒, 但这取决于你的硬件). 因此, 使用 delta 来控制绘图可确保程序在每个人的硬件上以相同的速度运行.
在我们的示例中, 我们只需要在 _process() 函数中将 rotation_angle 变量乘以 delta . 这样, 我们的2个角度会以一个小得多的值递增, 值的大小直接取决于渲染速度.
func _process(delta):
    angle_from += rotation_angle * delta
    angle_to += rotation_angle * delta

    # We only wrap angles when both of them are bigger than 360.
    if angle_from > 360 and angle_to > 360:
        angle_from = wrapf(angle_from, 0, 360)
        angle_to = wrapf(angle_to, 0, 360)
    queue_redraw()
public override void _Process(double delta)
{
    _angleFrom += _rotationAngle * (float)delta;
    _angleTo += _rotationAngle * (float)delta;

    // We only wrap angles when both of them are bigger than 360.
    if (_angleFrom > 360 && _angleTo > 360)
    {
        _angleFrom = Wrap(_angleFrom, 0, 360);
        _angleTo = Wrap(_angleTo, 0, 360);
    }
    QueueRedraw();
}
让我们再运行一次! 这次, 旋转显示正常!
抗锯齿绘图
Godot offers method parameters in draw_line
to enable antialiasing, but not all custom drawing methods offer this antialiased
parameter.
For custom drawing methods that don't provide an antialiased parameter,
you can enable 2D MSAA instead, which affects rendering in the entire viewport.
This provides high-quality antialiasing, but a higher performance cost and only
on specific elements. See 2D antialiasing for more information.
工具
在编辑器中运行节点时,可能也会用到绘图。可以用于某些特性或行为的预览或可视化。详情请参阅 在编辑器中运行代码。