Attention: Here be dragons
This is the latest
(unstable) version of this documentation, which may document features
not available in or compatible with released stable versions of Godot.
Checking the stable version of the documentation...
为 Android 平台编译
参见
这个页面描述的是如何从源码编译 Android 导出模板二进制。如果你想要找的是导出项目到 Android,请阅读 为 Android 导出。
注意
对于大多数情况, 使用内置部署程序和导出模板就足够了. 手动编译Android APK对于部署程序的自定义版本或自定义程序包最有用.
此外, 在尝试构建自定义导出模板之前, 您仍然需要按照 为 Android 导出 教程中提到的步骤进行操作.
需求
要在Windows, Linux或macOS下进行编译, 需要以下内容:
SCons 3.0+ 构建系统.
Android SDK (命令行工具就足够了).
所需的 SDK 组件将被自动安装。
- On Linux,
do not use an Android SDK provided by your distribution's repositories as it will often be outdated.
Gradle(如果缺少,将自动下载并安装)。
JDK 11(OpenJDK 或 Oracle JDK)。
您可以从 ojdkbuild 下载一个版本.
设置构建系统
设置环境变量
ANDROID_SDK_ROOT指向 Android SDK. 如果你下载了Android命令行工具, 这将是您提取ZIP存档内容的文件夹.在此文件夹中安装必要的SDK组件:
通过运行以下命令接受SDK组件许可证, 其中
android_sdk_path是android SDK的路径, 然后用y回答所有提示:
cmdline-tools/latest/bin/sdkmanager --sdk_root=<android_sdk_path> --licenses
运行以下命令完成安装, 其中
android_sdk_path是Android SDK的路径.
cmdline-tools/latest/bin/sdkmanager --sdk_root=<android_sdk_path> "platform-tools" "build-tools;30.0.3" "platforms;android-29" "cmdline-tools;latest" "cmake;3.10.2.4988404"
参见
要在Windows上设置环境变量, 按 Windows + R, 输入 "control system" , 然后在左侧窗格中点击 Advanced system settings , 然后在出现的窗口中点击 Environment .
参见
要在Linux或macOS上设置环境变量, 使用 export ANDROID_SDK_ROOT=/path/to/android-sdk , 其中 /path/to/android-sdk 指向SDK目录的根目录.
构建导出模板
Godot需要两个Android导出模板: 优化的 "发布" 模板(android_release.apk)和调试模板(android_debug.apk). 由于Google将要求所有APK从2019年8月开始包含ARMv8(64位)库, 因此以下命令将构建包含ARMv7和ARMv8库的APK.
编译标准导出模板的方法是在Godot根目录下调用SCons, 参数如下:
发布模板(在导出时未选中 "启用调试" 的情况下使用)
scons platform=android target=template_release arch=armv7
scons platform=android target=template_release arch=arm64v8
cd platform/android/java
# On Windows
.\gradlew generateGodotTemplates
# On Linux and macOS
./gradlew generateGodotTemplates
生成的APK将位于 bin/android_release.apk.
调试模板(用于在导出时选中 "启用调试" 的情况下使用)
scons platform=android target=template_debug arch=armv7
scons platform=android target=template_debug arch=arm64v8
cd platform/android/java
# On Windows
.\gradlew generateGodotTemplates
# On Linux and macOS
./gradlew generateGodotTemplates
生成的APK将位于 bin/android_debug.apk.
参见
If you want to enable Vulkan validation layers, see Vulkan validation layers on Android.
添加对 x86 设备的支持
If you also want to include support for x86 and x86-64 devices, run the SCons
command a third and fourth time with the arch=x86_32, and
arch=x86_64 arguments before building the APK with Gradle. For
example, for the release template:
scons platform=android target=template_release arch=armv7
scons platform=android target=template_release arch=arm64v8
scons platform=android target=template_release arch=x86
scons platform=android target=template_release arch=x86_64
cd platform/android/java
# On Windows
.\gradlew generateGodotTemplates
# On Linux and macOS
./gradlew generateGodotTemplates
这将创建一个适用于所有平台的胖二进制文件. 导出项目的最终APK大小取决于您在导出时选择支持的平台;换句话说, 未使用的平台将从APK中删除.
清理生成的导出模板
您可以使用以下命令删除生成的导出模板:
cd platform/android/java
# On Windows
.\gradlew cleanGodotTemplates
# On Linux and macOS
./gradlew cleanGodotTemplates
使用导出模板
作为Android的导出模板,Godot需根据与编辑器相同的版本/提交编译发布版和调试版APK. 如果您使用官方二进制文件作为编辑器, 请确保安装匹配的导出模板, 或者从相同版本构建自己的模板.
导出游戏时,Godot将打开APK, 更改其中的一些内容并添加文件.
安装模板
新编译的模板(android_debug.apk 和 android_release.apk)必须使用各自的名称复制到Godot的模板文件夹中. 模板文件夹可以位于:
Windows:
%APPDATA%\Godot\export_templates\<version>\Linux:
$HOME/.local/share/godot/export_templates/<version>/macOS:
$HOME/Library/Application Support/Godot/export_templates/<version>/
<version> 的格式为 major.minor[.patch].status , 使用Godot源代码库中 version.py 的值(例如 3.0.5.stable 或 3.1.dev). 您还需要将此相同的版本字符串写入到导出模板旁边的 version.txt 文件中.
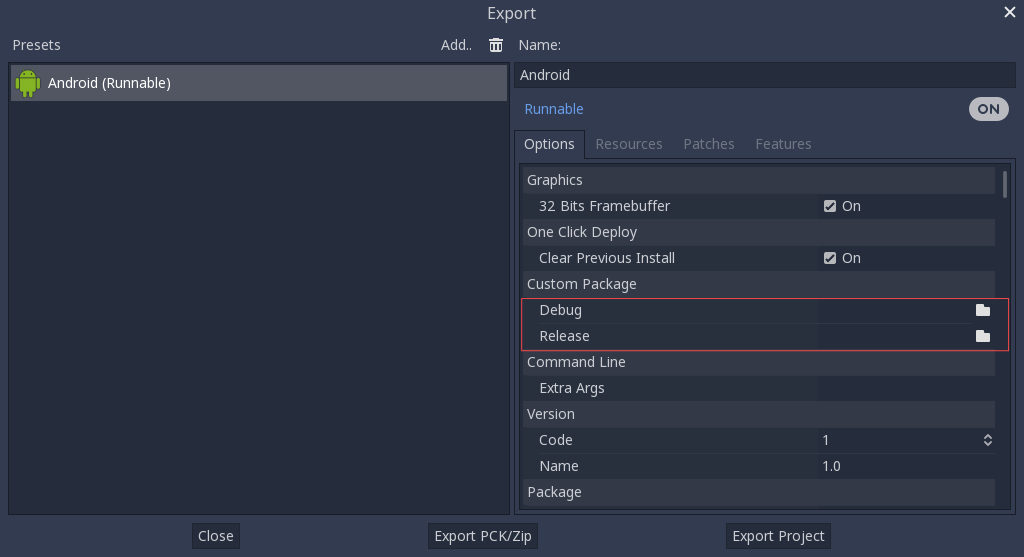
但是, 如果要编写自定义模块或自定义C++代码, 则可能需要在此处将APK配置为自定义导出模板:

你甚至不需要复制它们, 只需引用在Godot源文件夹的 bin\ 目录中生成的文件, 因此下次构建时, 将自动引用自定义模板.
Building the Godot editor
Compiling the editor is done by calling SCons from the Godot root directory with the following arguments:
scons platform=android arch=armv7 production=yes target=editor
scons platform=android arch=arm64v8 production=yes target=editor
scons platform=android arch=x86 production=yes target=editor
scons platform=android arch=x86_64 production=yes target=editor
cd platform/android/java
# On Windows
.\gradlew generateGodotEditor
# On Linux and macOS
./gradlew generateGodotEditor
The resulting APK will be located at bin/android_editor.apk.
Removing the Editor templates
You can use the following commands to remove the generated editor templates:
 cd platform/android/java
 # On Windows
.\gradlew cleanGodotEditor
# On Linux and macOS
./gradlew cleanGodotEditor
Installing the Godot editor
With an Android device with Developer Options enabled, connect the Android device to your computer via its charging cable to a USB/USB-C port. Open up a Terminal/Command Prompt and run the following commands from the root directory with the following arguments:
adb install ./bin/android_editor.apk
故障排除
平台未在 SCons 中出现
仔细检查你是否已经设置了 ANDROID_SDK_ROOT 环境变量. 这是使平台出现在SCons检测到的平台列表中的必要条件. 参见 Setting up the buildsystem 获得更多信息.
应用程序未安装
Android可能会抱怨该应用程序未正确安装. 如果是这样的话:
检查是否正确生成了调试密钥库。
检查jarsigner可执行文件是否来自JDK 8.
如果仍然失败, 请打开命令行并运行 logcat:
adb logcat
然后在安装应用程序时检查输出;错误消息应该在此处显示. 如果无法解决, 请寻求帮助.
应用程序秒退
如果应用程序运行但秒退, 则可能是以下原因之一:
确保使用与你的编辑器版本匹配的导出模板;如果你使用的是新版Godot, 则还 必须 更新模板.
libgodot_android.sois not inlibs/<arch>/where<arch>is the device's architecture.设备的体系结构与导出的体系结构不匹配. 确保您的模板是针对该设备的体系结构构建的, 并且导出设置包括对该体系结构的支持.
无论如何, adb logcat 也应显示错误原因.