Attention: Here be dragons
This is the latest
(unstable) version of this documentation, which may document features
not available in or compatible with released stable versions of Godot.
Checking the stable version of the documentation...
创建玩家场景
项目设置到位后,我们可以开始处理玩家控制的角色。
第一个场景, 我们会定义 Player 对象. 单独创建Player场景的好处之一是, 在游戏的其他部分做出来之前, 我们就可以对其进行单独测试.
节点结构
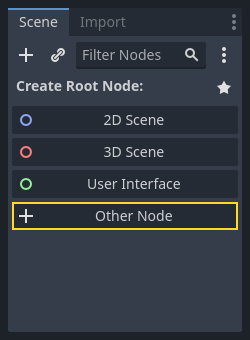
首先,我们需要为玩家对象选择一个根节点。一般而言,场景的根节点应该反映对象所需的功能——对象是什么。单击“其他节点”按钮并将 Area2D 节点添加到场景中。
Godot 将在场景树中的节点旁边显示警告图标。你现在可以忽略它。我们稍后再谈。
使用 Area2D 可以检测到与玩家重叠或进入玩家内的物体. 通过双击节点名称将其名称更改为 Player. 我们已经设置好了场景的根节点, 现在可以向该角色中添加其他节点来增加功能.
Before we add any children to the Player node, we want to make sure we don't
accidentally move or resize them by clicking on them. Select the node and click
the icon to the right of the lock. Its tooltip says "Make selected node's
children not selectable."

保存场景。点击“场景 -> 保存”,或者在 Windows/Linux 平台上按下 Ctrl+S,在 macOS 上按下 Cmd+S。
备注
对于此项目,我们将遵循 Godot 的命名约定。
GDScript:类(节点)使用 PascalCase(大驼峰命名法),变量和函数使用 snake_case(蛇形命名法),常量使用 ALL_CAPS(全大写)(请参阅 GDScript 风格指南)。
C#:类、导出变量和方法使用 PascalCase(大驼峰命名法),私有字段使用 _camelCase(前缀下划线的小驼峰命名法),局部变量和参数使用 camelCase(小驼峰命名法)(请参阅 C# 风格指南)。连接信号时,请务必准确键入方法名称。
精灵动画
Click on the Player node and add (Ctrl + A) a child node AnimatedSprite2D. The AnimatedSprite2D will handle the
appearance and animations for our player. Notice that there is a warning symbol
next to the node. An AnimatedSprite2D requires a SpriteFrames resource, which is a list of the animations it can
display. To create one, find the Sprite Frames property under the Animation tab in the Inspector and click
"[empty]" -> "New SpriteFrames". Click again to open the "SpriteFrames" panel:
On the left is a list of animations. Click the "default" one and rename it to
"walk". Then click the "Add Animation" button to create a second animation named
"up". Find the player images in the "FileSystem" tab - they're in the art
folder you unzipped earlier. Drag the two images for each animation, named
playerGrey_up[1/2] and playerGrey_walk[1/2], into the "Animation Frames"
side of the panel for the corresponding animation:
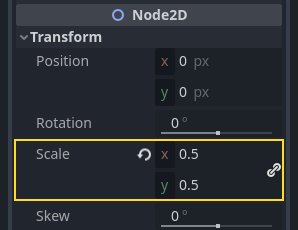
The player images are a bit too large for the game window, so we need to scale
them down. Click on the AnimatedSprite2D node and set the Scale property
to (0.5, 0.5). You can find it in the Inspector under the Node2D
heading.
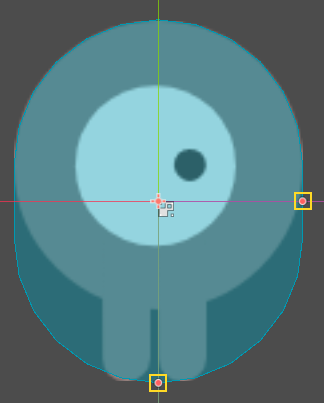
Finally, add a CollisionShape2D as a child of
Player. This will determine the player's "hitbox", or the bounds of its
collision area. For this character, a CapsuleShape2D node gives the best
fit, so next to "Shape" in the Inspector, click "[empty]" -> "New
CapsuleShape2D". Using the two size handles, resize the shape to cover the
sprite:
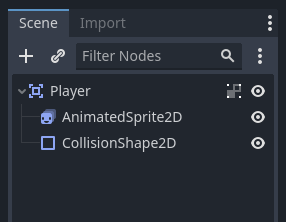
完成后, 你的 Player 场景看起来应该像这样:
修改完成后请确保再次保存场景.
在下一部分中,我们将向玩家节点添加一个脚本,以移动它并为其添加动画效果。然后,我们将设置碰撞检测,以了解玩家何时被某些东西击中。