Attention: Here be dragons
This is the latest
(unstable) version of this documentation, which may document features
not available in or compatible with released stable versions of Godot.
Checking the stable version of the documentation...
设计小怪场景
在这一部分中,我们要为怪物编写代码,我们后续会称之为“mob”(小怪)。在下一节课中,我们会在游戏区域周围随机生成它们。
Let's design the monsters themselves in a new scene. The node structure is going
to be similar to the player.tscn scene.
Create a scene with, once again, a CharacterBody3D node as its root. Name it
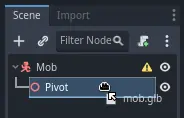
Mob. Add a child node Node3D, name it Pivot. And drag and drop
the file mob.glb from the FileSystem dock onto the Pivot to add the
monster's 3D model to the scene.
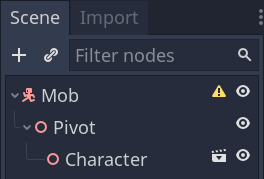
You can rename the newly created mob node
into Character.
We need a collision shape for our body to work. Right-click on the Mob node,
the scene's root, and click Add Child Node.
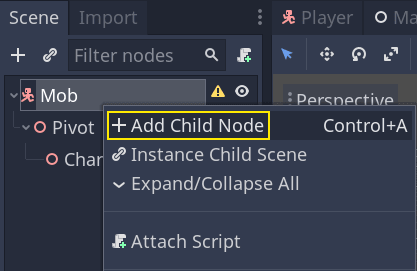
Add a CollisionShape3D.
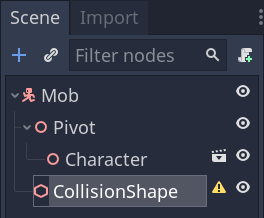
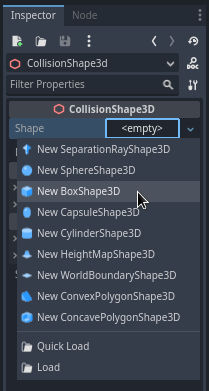
In the Inspector, assign a BoxShape3D to the Shape property.
我们要调整一下它的大小,来更好地框住 3D 模型。可以单击并拖动橙色的小点来进行。
碰撞盒应该接触地面,并且比模型稍微瘦一点点。即便玩家的球体只接触了这个碰撞盒的角落,物理引擎也会判定发生了碰撞。如果盒子比 3D 模型要大一点,你可能距离怪物还有一定的距离就死了,玩家就会觉得不公平。
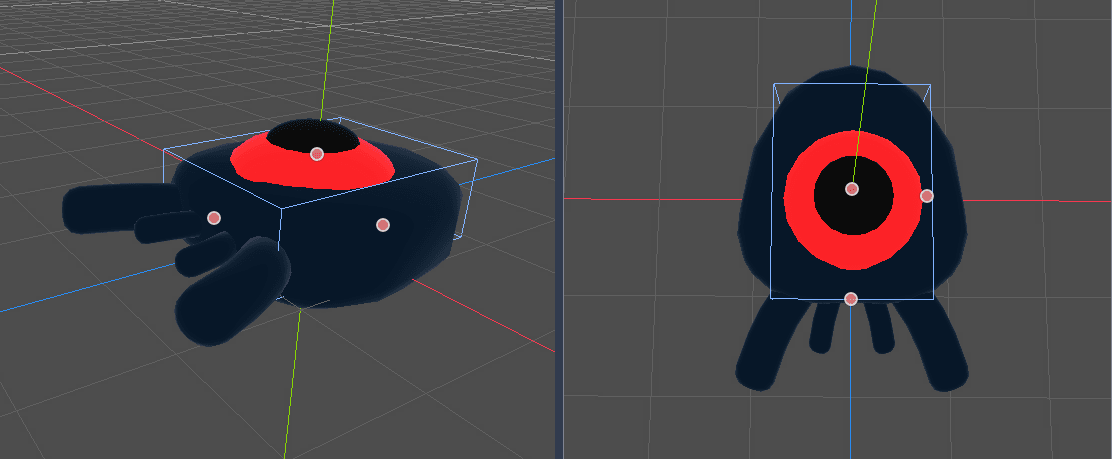
请注意,我的盒子要比怪物稍高。在这个游戏里是没问题的,因为我们是从游戏场景的上方用固定角度观察的。碰撞形状不必精确匹配模型。决定碰撞形状形式和大小的关键是你在试玩游戏时的手感。
移除离屏的怪物
We're going to spawn monsters at regular time intervals in the game level. If we're not careful, their count could increase to infinity, and we don't want that. Each mob instance has both a memory and a processing cost, and we don't want to pay for it when the mob is outside the screen.
Once a monster leaves the screen, we don't need it anymore, so we should delete it. Godot has a node that detects when objects leave the screen, VisibleOnScreenNotifier3D, and we're going to use it to destroy our mobs.
备注
When you keep instancing an object, there's a technique you can use to avoid the cost of creating and destroying instances all the time called pooling. It consists of pre-creating an array of objects and reusing them over and over.
When working with GDScript, you don't need to worry about this. The main reason to use pools is to avoid freezes with garbage-collected languages like C# or Lua. GDScript uses a different technique to manage memory, reference counting, which doesn't have that caveat. You can learn more about that here: 内存管理.
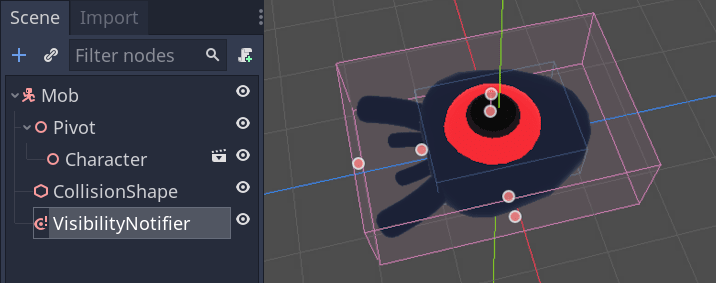
Select the Mob node and add a child node VisibleOnScreenNotifier3D. Another
box, pink this time, appears. When this box completely leaves the screen, the
node will emit a signal.
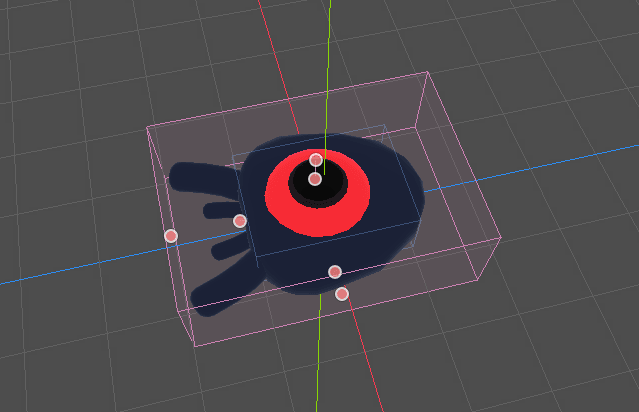
使用橙色的点来调整大小,让它覆盖住整个 3D 模型。
为小怪的移动编写代码
Let's implement the monster's motion. We're going to do this in two steps.
First, we'll write a script on the Mob that defines a function to initialize
the monster. We'll then code the randomized spawn mechanism in the main.tscn scene
and call the function from there.
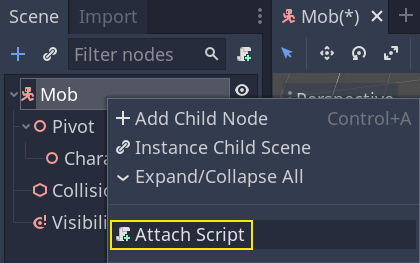
Attach a script to the Mob.
Here's the movement code to start with. We define two properties, min_speed
and max_speed, to define a random speed range, which we will later use to define CharacterBody3D.velocity.
extends CharacterBody3D

# Minimum speed of the mob in meters per second.
@export var min_speed = 10
# Maximum speed of the mob in meters per second.
@export var max_speed = 18


func _physics_process(_delta):
    move_and_slide()
using Godot;

public partial class Mob : CharacterBody3D
{
    // Don't forget to rebuild the project so the editor knows about the new export variable.

    // Minimum speed of the mob in meters per second
    [Export]
    public int MinSpeed { get; set; } = 10;
    // Maximum speed of the mob in meters per second
    [Export]
    public int MaxSpeed { get; set; } = 18;

    public override void _PhysicsProcess(double delta)
    {
        MoveAndSlide();
    }
}
Similarly to the player, we move the mob every frame by calling the function
CharacterBody3D.move_and_slide(). This time, we don't update
the velocity every frame; we want the monster to move at a constant speed
and leave the screen, even if it were to hit an obstacle.
We need to define another function to calculate the CharacterBody3D.velocity. This
function will turn the monster towards the player and randomize both its angle
of motion and its velocity.
The function will take a start_position,the mob's spawn position, and the
player_position as its arguments.
We position the mob at start_position and turn it towards the player using
the look_at_from_position() method, and randomize the angle by rotating a
random amount around the Y axis. Below, randf_range() outputs a random value
between -PI / 4 radians and PI / 4 radians.
# This function will be called from the Main scene.
func initialize(start_position, player_position):
    # We position the mob by placing it at start_position
    # and rotate it towards player_position, so it looks at the player.
    look_at_from_position(start_position, player_position, Vector3.UP)
    # Rotate this mob randomly within range of -90 and +90 degrees,
    # so that it doesn't move directly towards the player.
    rotate_y(randf_range(-PI / 4, PI / 4))
// This function will be called from the Main scene.
public void Initialize(Vector3 startPosition, Vector3 playerPosition)
{
    // We position the mob by placing it at startPosition
    // and rotate it towards playerPosition, so it looks at the player.
    LookAtFromPosition(startPosition, playerPosition, Vector3.Up);
    // Rotate this mob randomly within range of -90 and +90 degrees,
    // so that it doesn't move directly towards the player.
    RotateY((float)GD.RandRange(-Mathf.Pi / 4.0, Mathf.Pi / 4.0));
}
We got a random position, now we need a random_speed. randi_range() will be useful as it gives random int values, and we will use min_speed and max_speed.
random_speed is just an integer, and we just use it to multiply our CharacterBody3D.velocity. After random_speed is applied, we rotate CharacterBody3D.velocity Vector3 towards the player.
func initialize(start_position, player_position):
    # ...

    # We calculate a random speed (integer)
    var random_speed = randi_range(min_speed, max_speed)
    # We calculate a forward velocity that represents the speed.
    velocity = Vector3.FORWARD * random_speed
    # We then rotate the velocity vector based on the mob's Y rotation
    # in order to move in the direction the mob is looking.
    velocity = velocity.rotated(Vector3.UP, rotation.y)
public void Initialize(Vector3 startPosition, Vector3 playerPosition)
{
    // ...

    // We calculate a random speed (integer).
    int randomSpeed = GD.RandRange(MinSpeed, MaxSpeed);
    // We calculate a forward velocity that represents the speed.
    Velocity = Vector3.Forward * randomSpeed;
    // We then rotate the velocity vector based on the mob's Y rotation
    // in order to move in the direction the mob is looking.
    Velocity = Velocity.Rotated(Vector3.Up, Rotation.Y);
}
离开屏幕
We still have to destroy the mobs when they leave the screen. To do so, we'll
connect our VisibleOnScreenNotifier3D node's screen_exited signal to the Mob.
单击编辑器顶部的 3D 标签回到 3D 视口。你也可以按 Ctrl + F2(macOS 上则是 Alt + 2)。

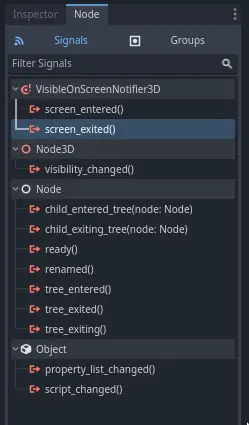
Select the VisibleOnScreenNotifier3D node and on the right side of the interface,
navigate to the Node dock. Double-click the screen_exited() signal.
Connect the signal to the Mob
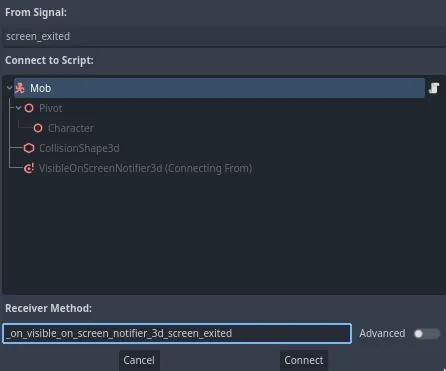
This will take you back to the script editor and add a new function for you,
_on_visible_on_screen_notifier_3d_screen_exited(). From it, call the queue_free()
method. This function destroy the instance it's called on.
func _on_visible_on_screen_notifier_3d_screen_exited():
    queue_free()
// We also specified this function name in PascalCase in the editor's connection window
private void OnVisibilityNotifierScreenExited()
{
    QueueFree();
}
我们的怪物已经准备好进入游戏了!在下一部分,你将在游戏关卡中生成怪物。
这是仅供参考的完整 Mob.gd 脚本。
extends CharacterBody3D

# Minimum speed of the mob in meters per second.
@export var min_speed = 10
# Maximum speed of the mob in meters per second.
@export var max_speed = 18

func _physics_process(_delta):
    move_and_slide()

# This function will be called from the Main scene.
func initialize(start_position, player_position):
    # We position the mob by placing it at start_position
    # and rotate it towards player_position, so it looks at the player.
    look_at_from_position(start_position, player_position, Vector3.UP)
    # Rotate this mob randomly within range of -90 and +90 degrees,
    # so that it doesn't move directly towards the player.
    rotate_y(randf_range(-PI / 4, PI / 4))

    # We calculate a random speed (integer)
    var random_speed = randi_range(min_speed, max_speed)
    # We calculate a forward velocity that represents the speed.
    velocity = Vector3.FORWARD * random_speed
    # We then rotate the velocity vector based on the mob's Y rotation
    # in order to move in the direction the mob is looking.
    velocity = velocity.rotated(Vector3.UP, rotation.y)

func _on_visible_on_screen_notifier_3d_screen_exited():
    queue_free()
using Godot;

public partial class Mob : CharacterBody3D
{
    // Minimum speed of the mob in meters per second.
    [Export]
    public int MinSpeed { get; set; } = 10;
    // Maximum speed of the mob in meters per second.
    [Export]
    public int MaxSpeed { get; set; } = 18;

    public override void _PhysicsProcess(double delta)
    {
        MoveAndSlide();
    }

    // This function will be called from the Main scene.
    public void Initialize(Vector3 startPosition, Vector3 playerPosition)
    {
        // We position the mob by placing it at startPosition
        // and rotate it towards playerPosition, so it looks at the player.
        LookAtFromPosition(startPosition, playerPosition, Vector3.Up);
        // Rotate this mob randomly within range of -90 and +90 degrees,
        // so that it doesn't move directly towards the player.
        RotateY((float)GD.RandRange(-Mathf.Pi / 4.0, Mathf.Pi / 4.0));

        // We calculate a random speed (integer).
        int randomSpeed = GD.RandRange(MinSpeed, MaxSpeed);
        // We calculate a forward velocity that represents the speed.
        Velocity = Vector3.Forward * randomSpeed;
        // We then rotate the velocity vector based on the mob's Y rotation
        // in order to move in the direction the mob is looking.
        Velocity = Velocity.Rotated(Vector3.Up, Rotation.Y);
    }

    // We also specified this function name in PascalCase in the editor's connection window
    private void OnVisibilityNotifierScreenExited()
    {
        QueueFree();
    }
}