Attention: Here be dragons
This is the latest
(unstable) version of this documentation, which may document features
not available in or compatible with released stable versions of Godot.
Checking the stable version of the documentation...
2D 运动概述
前言
每个初学者都问过“我该如何移动我的游戏角色呢?”根据你正在制作的游戏的风格,可能有特殊的需求,但一般来说,大多数 2D 游戏的运动都基于一组不太多的操作之上。
We'll use CharacterBody2D for these examples, but the principles will apply to other node types (Area2D, RigidBody2D) as well.
场景布置
Each example below uses the same scene setup. Start with a CharacterBody2D with two
children: Sprite2D and CollisionShape2D. You can use the Godot icon ("icon.png")
for the Sprite2D's texture or use any other 2D image you have.
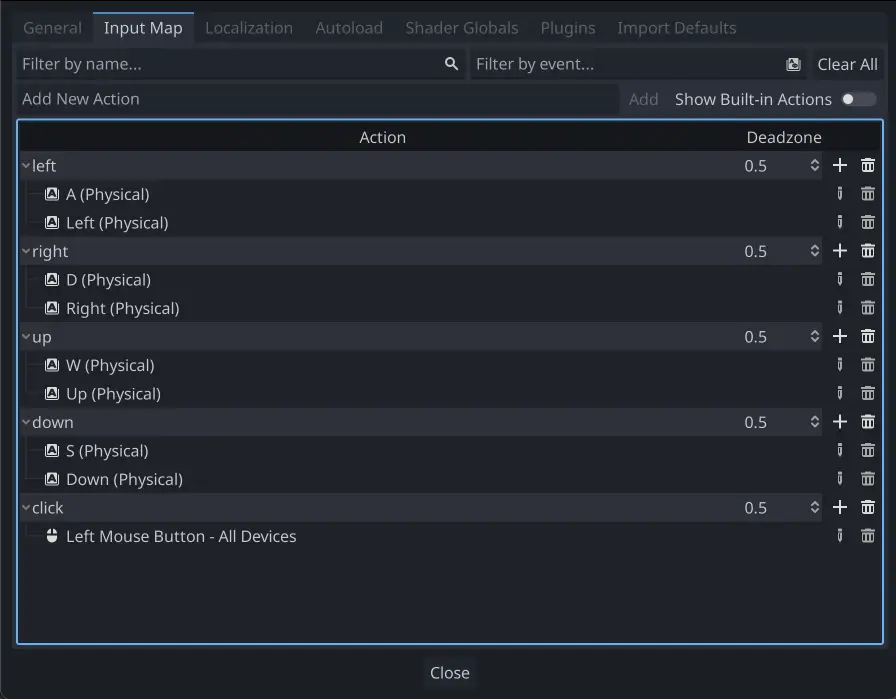
打开项目 -> 项目设置并选择“输入映射”选项卡。添加以下输入操作(相关详细信息请参阅 InputEvent):
八向移动
在这种情况下, 您希望用户按下四个方向键(上/左/下/右或W / A / S / D)并沿所选方向移动. "8向移动" 意味着游戏角色可以通过同时按下两个键实现斜向移动.

Add a script to the character body and add the following code:
extends CharacterBody2D

@export var speed = 400

func get_input():
    var input_direction = Input.get_vector("left", "right", "up", "down")
    velocity = input_direction * speed

func _physics_process(delta):
    get_input()
    move_and_slide()
using Godot;

public partial class Movement : CharacterBody2D
{
    [Export]
    public int Speed { get; set; } = 400;

    public void GetInput()
    {

        Vector2 inputDirection = Input.GetVector("left", "right", "up", "down");
        Velocity = inputDirection * Speed;
    }

    public override void _PhysicsProcess(double delta)
    {
        GetInput();
        MoveAndSlide();
    }
}
In the get_input() function, we use Input get_vector() to check for the
four key events and sum return a direction vector.
We can then set our velocity by multiplying this direction vector, which has a
length of 1, by our desired speed.
小技巧
如果你之前从未接触过向量数学, 或者需要复习, 你可以在 向量数学 看到Godot中向量用法的解释.
备注
如果在你按下键时上面的代码不起任何作用, 请仔细检查你是否按照本教程的 场景布置 部分所描述的正确设置了输入操作.
旋转+移动
这种类型的运动有时被称为 "Asteroids式运动", 因为它类似于经典街机游戏Asteroids的工作方式. 按左/右旋转角色, 而按上/下使得角色在面向的方向上向前或向后.

extends CharacterBody2D

@export var speed = 400
@export var rotation_speed = 1.5

var rotation_direction = 0

func get_input():
    rotation_direction = Input.get_axis("left", "right")
    velocity = transform.x * Input.get_axis("down", "up") * speed

func _physics_process(delta):
    get_input()
    rotation += rotation_direction * rotation_speed * delta
    move_and_slide()
using Godot;

public partial class Movement : CharacterBody2D
{
    [Export]
    public int Speed { get; set; } = 400;

    [Export]
    public float RotationSpeed { get; set; } = 1.5f;

    private int _rotationDirection;

    public void GetInput()
    {
        _rotationDirection = Input.GetAxis("left", "right");
        Velocity = Transform.X * Input.GetAxis("down", "up") * Speed;
    }

    public override void _PhysicsProcess(double delta)
    {
        GetInput();
        Rotation += _rotationDirection * RotationSpeed * (float)delta;
        MoveAndSlide();
    }
}
Here we've added two variables to track our rotation direction and speed.
The rotation is applied directly to the body's rotation property.
To set the velocity, we use the body's transform.x which is a vector pointing
in the body's "forward" direction, and multiply that by the speed.
旋转+移动(鼠标)
这种运动方式是前一种运动方式的变体。这次,方向由鼠标位置而不是键盘设置。角色将始终“看向”鼠标指针。前进/后退输入保持不变。
extends CharacterBody2D

@export var speed = 400

func get_input():
    look_at(get_global_mouse_position())
    velocity = transform.x * Input.get_axis("down", "up") * speed

func _physics_process(delta):
    get_input()
    move_and_slide()
using Godot;

public partial class Movement : CharacterBody2D
{
    [Export]
    public int Speed { get; set; } = 400;

    public void GetInput()
    {
        LookAt(GetGlobalMousePosition());
        Velocity = Transform.X * Input.GetAxis("down", "up") * Speed;
    }

    public override void _PhysicsProcess(double delta)
    {
        GetInput();
        MoveAndSlide();
    }
}
Here we're using the Node2D look_at() method to
point the player towards the mouse's position. Without this function, you
could get the same effect by setting the angle like this:
rotation = get_global_mouse_position().angle_to_point(position)
var rotation = GetGlobalMousePosition().AngleToPoint(Position);
点击并移动
最后一个示例仅使用鼠标来控制角色. 单击屏幕将使游戏角色移动到目标位置.

extends CharacterBody2D

@export var speed = 400

var target = position

func _input(event):
    if event.is_action_pressed("click"):
        target = get_global_mouse_position()

func _physics_process(delta):
    velocity = position.direction_to(target) * speed
    # look_at(target)
    if position.distance_to(target) > 10:
        move_and_slide()
using Godot;

public partial class Movement : CharacterBody2D
{
    [Export]
    public int Speed { get; set; } = 400;

    private Vector2 _target;

    public override void _Input(InputEvent @event)
    {
        if (@event.IsActionPressed("click"))
        {
            _target = GetGlobalMousePosition();
        }
    }

    public override void _PhysicsProcess(double delta)
    {
        Velocity = Position.DirectionTo(_target) * Speed;
        // LookAt(target);
        if (Position.DistanceTo(_target) > 10)
        {
            MoveAndSlide();
        }
    }
}
注意我们在移动之前做的 distance_to() 检查. 如果没有这个检查, 物体在到达目标位置时会 "抖动", 因为它稍微移过该位置时就会试图向后移动, 只是每次移动步长都会有点远从而导致来回重复移动.
如果你喜欢, 取消注释的 rotation 代码可以使物体转向其运动方向.
小技巧
该技术也可以用到“跟随”的游戏角色中。target 目标位置可以是任何你想移动到的对象的位置。
总结
你可能觉得这些代码示例可以作为你自己的项目的一个有用的出发点. 请随意使用它们并试验它们, 看看你能做些什么.
You can download this sample project here: 2d_movement_starter.zip