Attention: Here be dragons
This is the latest
(unstable) version of this documentation, which may document features
not available in or compatible with released stable versions of Godot.
Checking the stable version of the documentation...
使用 3D 变换
前言
如果您以前从未制作过3D游戏, 那么一开始在三维环境中进行旋转可能会让人感到困惑. 从2D来的人, 自然的思维方式就是类似于 "噢, 它就像2D旋转一样, 只是现在旋转发生在X,Y和Z轴上" .
起初这似乎很简单。对于简单的游戏,这种思维方式甚至可能足够了。不幸的是,这往往是不正确的。
三维角度通常被称为“欧拉角”。
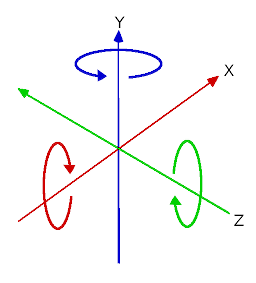
欧拉角是由数学家莱昂哈德·欧拉在 1700 年代初引入的。

这种代表三维旋转的方式在当时是开创性的, 但在游戏开发中使用时有一些缺点(这毕竟是一个戴着滑稽帽子的家伙想出来的). 本文的主旨是解释其原因, 并概述在编写3D游戏时处理变换的最佳做法.
欧拉角的问题
虽然看起来很直观, 每个轴都有一个旋转, 但事实是它就是不实用.
轴顺序
这样的主要原因是没有一种 单一 的从角度构建方向的方法. 没有一个标准的数学函数可以将所有角度放在一起并产生实际的3D旋转. 从角度产生方向的唯一方法是以 任意顺序 按角度旋转物体角度.
这可以通过先旋转 X , 然后 Y , 然后旋转 Z 来完成. 或者, 你可以先以旋转 Y , 然后旋转 Z , 最后旋转 X . 怎样都行, 但根据顺序不同, 对象的最终方向 不一定是相同的 . 事实上, 这意味着有多种方法可以从3个不同的角度构建方向, 具体取决于 旋转的顺序 .
下图是一个万向结(来自维基百科), 它有可视化的旋转轴(以XYZ顺序). 如你所见, 每个轴的方向取决于前一个轴的旋转方向:
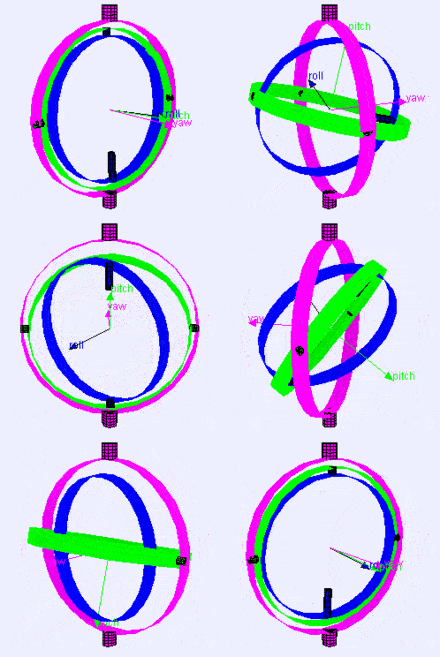
你可能想知道这是如何影响你的. 我们来看一个实际的示例:
想象一下, 你正在做一个第一人称控制器(例如FPS游戏). 向左和向右移动鼠标可以控制与地面平行的视角, 同时上下移动可以调整游戏角色上下的视野.
为了实现希望的效果, 必须先在 Y 轴上应用旋转(在这种情况下为 "up(向上)", 因为Godot中Y轴指向正上方(" Y-Up" 方向)), 然后在 X 轴上旋转.
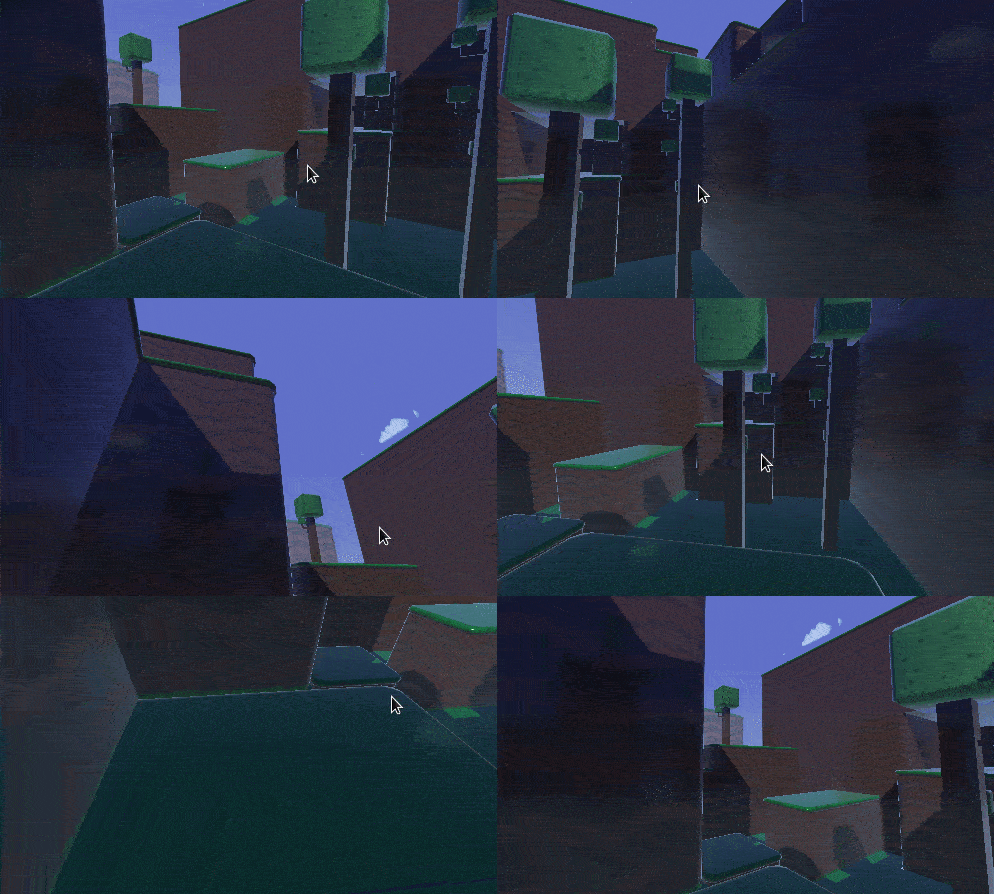
如果我们首先在 X 轴上应用旋转, 然后再在 Y 轴上应用旋转, 则效果会不理想:
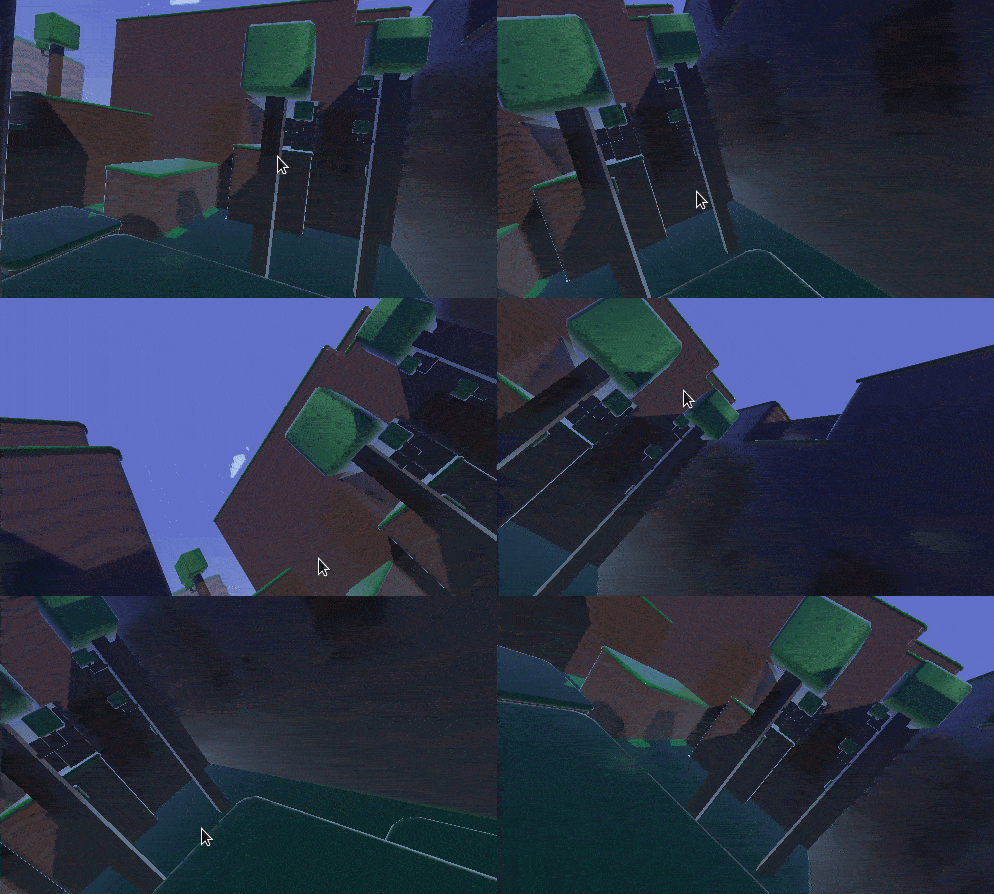
根据所需的游戏类型或效果, 您想要应用轴旋转的顺序可能会有所不同. 因此, 在X,Y和Z中应用旋转是不够的: 您还需要 旋转顺序 .
插值
使用欧拉角的另一个问题是插值. 设想您想在两个不同的相机或敌人位置(包括旋转)之间转换. 解决这个问题的一个合乎逻辑的方法是从一个位置插值到下一个位置. 人们会期望它看起来像这样:
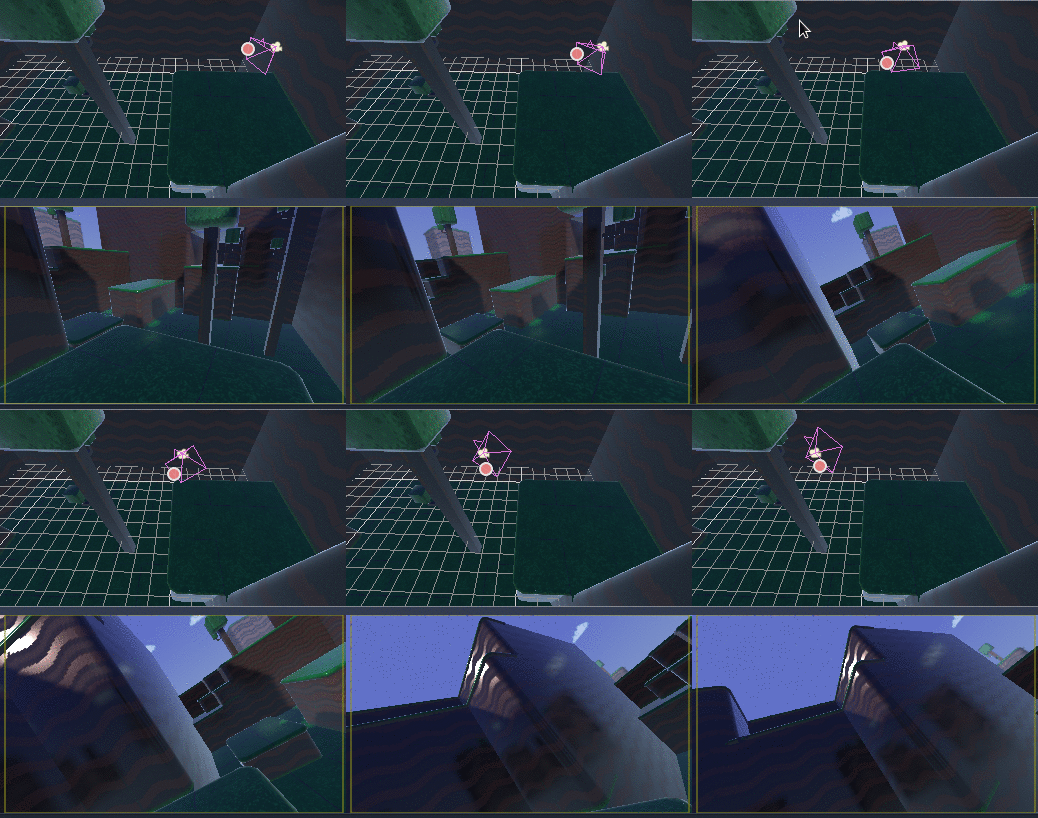
但是, 在使用角度时, 这并不总是有预期的效果:
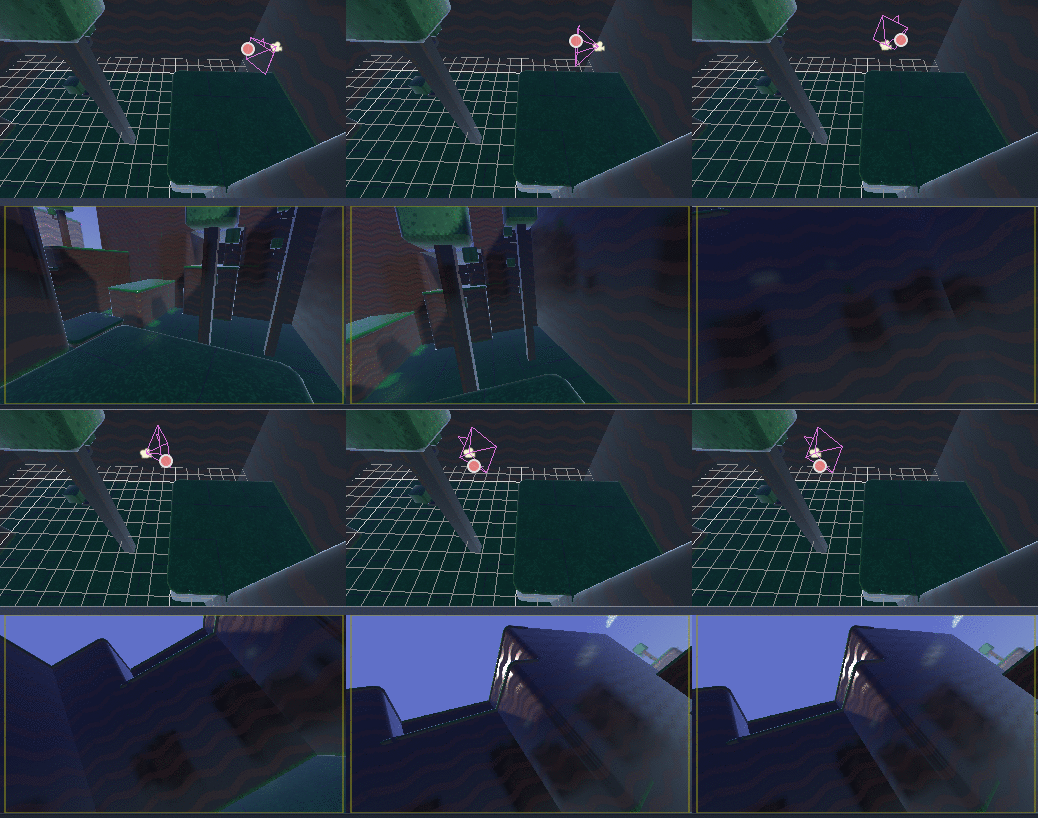
相机实际上旋转去了相反的方向!
这可能有几个原因:
旋转不会线性映射到方向, 因此它们插值并不总是会形成最短路径(即从
270到0的度数与从270开始到360的度数不同, 即使角度是相同的)."万向节锁死" 正在发挥作用(第一个和最后一个旋转的轴对齐, 因此失去了一个自由度). 请参阅 维基百科关于Gimbal Lock 的页面 以了解这个问题的详细解释.
对欧拉角说不
The result of all this is that you should not use the rotation property of Node3D nodes in Godot for games. It's there to be used mainly in the editor, for coherence with the 2D engine, and for simple rotations (generally just one axis, or even two in limited cases). As much as you may be tempted, don't use it.
相反, 有一个更好的方法来解决你的旋转问题.
变换的介绍
Godot uses the Transform3D datatype for orientations. Each Node3D node contains a transform property which is relative to the parent's transform, if the parent is a Node3D-derived type.
也可以通过 global_transform 属性访问世界坐标变换.
变换拥有一个基 Basis(transform.basis 子属性),它由三个 Vector3 向量组成。这些向量可以通过 transform.basis 属性访问,也可以使用 transform.basis.x、transform.basis.y、transform.basis.z 直接访问。每个向量指向它的轴被旋转的方向,因此它们可以有效地描述节点的总旋转。比例(只要它三个轴长度是一致的)也可以从轴的长度推断出来。一个基也可以被解释为一个 3x3 矩阵并像 transform.basis[x][y] 这样使用。
默认的基(未经修改)类似于:
var basis = Basis()
# Contains the following default values:
basis.x = Vector3(1, 0, 0) # Vector pointing along the X axis
basis.y = Vector3(0, 1, 0) # Vector pointing along the Y axis
basis.z = Vector3(0, 0, 1) # Vector pointing along the Z axis
// Due to technical limitations on structs in C# the default
// constructor will contain zero values for all fields.
var defaultBasis = new Basis();
GD.Print(defaultBasis); // prints: ((0, 0, 0), (0, 0, 0), (0, 0, 0))

// Instead we can use the Identity property.
var identityBasis = Basis.Identity;
GD.Print(identityBasis.X); // prints: (1, 0, 0)
GD.Print(identityBasis.Y); // prints: (0, 1, 0)
GD.Print(identityBasis.Z); // prints: (0, 0, 1)

// The Identity basis is equivalent to:
var basis = new Basis(Vector3.Right, Vector3.Up, Vector3.Back);
GD.Print(basis); // prints: ((1, 0, 0), (0, 1, 0), (0, 0, 1))
这也类似于一个 3x3 单位矩阵。
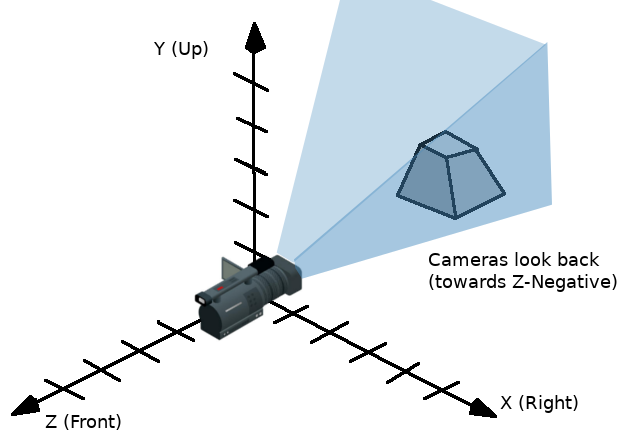
遵循OpenGL惯例, X 是 右 轴, Y 是 上 轴, Z 是 前 轴.
变换除了基以外还有一个原点。这是一个 Vector3,用于指定该变换距离实际原点 (0, 0, 0) 有多远。变换是基与原点的组合,可以有效地表示空间中特定的平移、旋转和缩放。
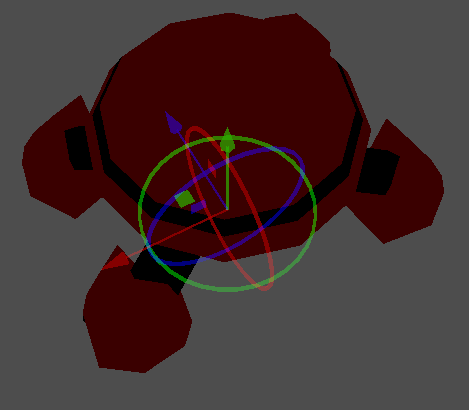
可视化变换的一种方法是在“本地空间”模式下查看该对象的 3D 小工具。

小工具的箭头显示的是基的 X、Y、Z 轴(分别为红色、绿色、蓝色),小工具的中心位于该对象的原点。
有关向量和变换在数学方面的更多信息, 请阅读 向量数学 教程.
操作变换
当然, 变换并不像角度那样容易控制, 并且有它自己的问题.
可以对变换进行旋转,方法是将基与另一个基相乘(称作累加),或者使用其旋转方法。
var axis = Vector3(1, 0, 0) # Or Vector3.RIGHT
var rotation_amount = 0.1
# Rotate the transform around the X axis by 0.1 radians.
transform.basis = Basis(axis, rotation_amount) * transform.basis
# shortened
transform.basis = transform.basis.rotated(axis, rotation_amount)
Vector3 axis = new Vector3(1, 0, 0); // Or Vector3.Right
float rotationAmount = 0.1f;
// Rotate the transform around the X axis by 0.1 radians.
transform.Basis = new Basis(axis, rotationAmount) * transform.Basis;
// shortened
transform.Basis = transform.Basis.Rotated(axis, rotationAmount);
A method in Node3D simplifies this:
# Rotate the transform around the X axis by 0.1 radians.
rotate(Vector3(1, 0, 0), 0.1)
# shortened
rotate_x(0.1)
// Rotate the transform around the X axis by 0.1 radians.
Rotate(new Vector3(1, 0, 0), 0.1f);
// shortened
RotateX(0.1f);
这会相对于父节点来旋转节点.
要相对于对象空间旋转(节点自己的变换), 请使用下面的方法:
# Rotate around the object's local X axis by 0.1 radians.
rotate_object_local(Vector3(1, 0, 0), 0.1)
// Rotate around the object's local X axis by 0.1 radians.
RotateObjectLocal(new Vector3(1, 0, 0), 0.1f);
精度误差
对变换执行连续的操作将导致由于浮点错误导致的精度损失. 这意味着每个轴的比例可能不再精确地为 1.0 , 并且它们可能不完全相互为 90 度.
如果一个变换每帧旋转一次, 它最终会随着时间的推移开始变形. 这是不可避免的.
有两种不同的方法来处理这个问题. 首先是在一段时间后对变换进行 正交归一化(orthonormalize) 处理(如果每帧修改一次, 则可能每帧一次):
transform = transform.orthonormalized()
transform = transform.Orthonormalized();
这将使所有的轴再次拥有有 1.0 的长度并且彼此成 90 度角. 但是, 应用于变换的任何缩放都将丢失.
It is recommended you not scale nodes that are going to be manipulated; scale their children nodes instead (such as MeshInstance3D). If you absolutely must scale the node, then re-apply it at the end:
transform = transform.orthonormalized()
transform = transform.scaled(scale)
transform = transform.Orthonormalized();
transform = transform.Scaled(scale);
获取信息
现在你可能在想: "好吧, 但是我怎么从变换中获得角度?" . 答案又一次是: 没有必要. 你必须尽最大努力停止用角度思考.
想象一下, 你需要朝你的游戏角色面对的方向射击子弹. 只需使用向前的轴(通常为 Z 或 -Z ).
bullet.transform = transform
bullet.speed = transform.basis.z * BULLET_SPEED
bullet.Transform = transform;
bullet.LinearVelocity = transform.Basis.Z * BulletSpeed;
敌人在看着游戏角色吗? 为此判断你可以使用点积(请参阅 向量数学 教程以获取对点积的解释):
# Get the direction vector from player to enemy
var direction = enemy.transform.origin - player.transform.origin
if direction.dot(enemy.transform.basis.z) > 0:
    enemy.im_watching_you(player)
// Get the direction vector from player to enemy
Vector3 direction = enemy.Transform.Origin - player.Transform.Origin;
if (direction.Dot(enemy.Transform.Basis.Z) > 0)
{
    enemy.ImWatchingYou(player);
}
向左平移:
# Remember that +X is right
if Input.is_action_pressed("strafe_left"):
    translate_object_local(-transform.basis.x)
// Remember that +X is right
if (Input.IsActionPressed("strafe_left"))
{
    TranslateObjectLocal(-Transform.Basis.X);
}
跳跃:
# Keep in mind Y is up-axis
if Input.is_action_just_pressed("jump"):
    velocity.y = JUMP_SPEED

move_and_slide()
// Keep in mind Y is up-axis
if (Input.IsActionJustPressed("jump"))
    velocity.Y = JumpSpeed;

MoveAndSlide();
所有常见的行为和逻辑都可以用向量来完成.
设置信息
当然, 有些情况下你想要将一些信息赋予到变换上. 想象一下第一人称控制器或环绕旋转的摄像机. 那些肯定是用角度来完成的, 因为你 确实希望 变换以特定的顺序进行.
对于这种情况, 请保证角度/旋转在变换 外部 , 并每帧设置他们. 不要尝试获取并重新使用它们, 因为变换是不该这么用的.
环顾四周,FPS风格的示例:
# accumulators
var rot_x = 0
var rot_y = 0

func _input(event):
    if event is InputEventMouseMotion and event.button_mask & 1:
        # modify accumulated mouse rotation
        rot_x += event.relative.x * LOOKAROUND_SPEED
        rot_y += event.relative.y * LOOKAROUND_SPEED
        transform.basis = Basis() # reset rotation
        rotate_object_local(Vector3(0, 1, 0), rot_x) # first rotate in Y
        rotate_object_local(Vector3(1, 0, 0), rot_y) # then rotate in X
// accumulators
private float _rotationX = 0f;
private float _rotationY = 0f;

public override void _Input(InputEvent @event)
{
    if (@event is InputEventMouseMotion mouseMotion)
    {
        // modify accumulated mouse rotation
        _rotationX += mouseMotion.Relative.X * LookAroundSpeed;
        _rotationY += mouseMotion.Relative.Y * LookAroundSpeed;

        // reset rotation
        Transform3D transform = Transform;
        transform.Basis = Basis.Identity;
        Transform = transform;

        RotateObjectLocal(Vector3.Up, _rotationX); // first rotate about Y
        RotateObjectLocal(Vector3.Right, _rotationY); // then rotate about X
    }
}
如您所见, 在这种情况下, 保持外部旋转更为简单, 然后使用变换作为 最后的 方向.
用四元数插值
用四元数能有效率地完成两个变换之间的插值. 有关四元数如何工作的更多信息可以在互联网上的其他地方找到. 在实际应用中, 了解它们的主要用途是做最短路插值就足够了. 同样, 如果你有两个旋转, 四元数将平滑地使用最近的轴在它们之间进行插值.
将旋转转换为四元数很简单.
# Convert basis to quaternion, keep in mind scale is lost
var a = Quaternion(transform.basis)
var b = Quaternion(transform2.basis)
# Interpolate using spherical-linear interpolation (SLERP).
var c = a.slerp(b,0.5) # find halfway point between a and b
# Apply back
transform.basis = Basis(c)
// Convert basis to quaternion, keep in mind scale is lost
var a = transform.Basis.GetQuaternion();
var b = transform2.Basis.GetQuaternion();
// Interpolate using spherical-linear interpolation (SLERP).
var c = a.Slerp(b, 0.5f); // find halfway point between a and b
// Apply back
transform.Basis = new Basis(c);
The Quaternion type reference has more information on the datatype (it can also do transform accumulation, transform points, etc., though this is used less often). If you interpolate or apply operations to quaternions many times, keep in mind they need to be eventually normalized. Otherwise, they will also suffer from numerical precision errors.
四元数在处理相机/路径/等东西的移动轨迹时很有用. 插值的结果总会是正确且平滑的.
变换是你的朋友
对于大多数初学者来说, 习惯于使用变换可能需要一些时间. 但是, 一旦你习惯了它们, 你会欣赏他们的简单而有力.
不要犹豫, 在Godot的任何 线上社区 网站上寻求帮助, 一旦你变得足够自信, 请帮助其他人!