Attention: Here be dragons
This is the latest
(unstable) version of this documentation, which may document features
not available in or compatible with released stable versions of Godot.
Checking the stable version of the documentation...
Standard Material 3D and ORM Material 3D
前言
StandardMaterial3D and ORMMaterial3D (Occlusion, Roughness, Metallic)
are default 3D materials that aim to provide most of the features artists look
for in a material, without the need for writing shader code. However, they can
be converted to shader code if additional functionality is needed.
This tutorial explains the parameters present in both materials.
There are 4 ways to add these materials to an object. A material can be added in the Material property of the mesh. It can be added in the Material property of the node using the mesh (such as a MeshInstance3D node), the Material Override property of the node using the mesh, and the Material Overlay.
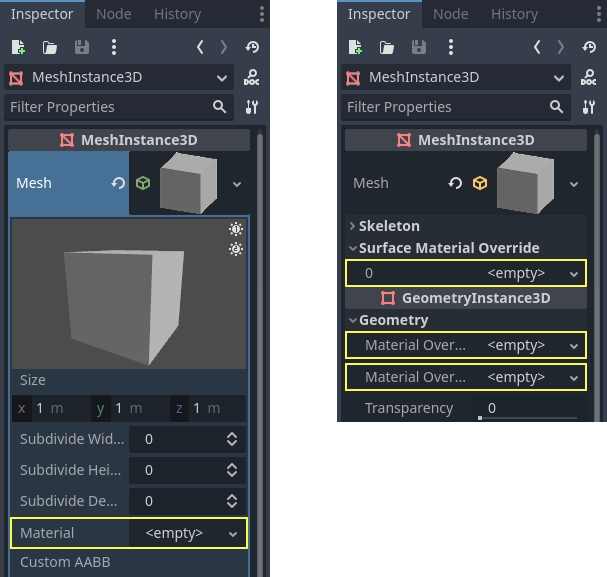
如果你把材质加到网格本身上, 每次那个网格被使用的时候都会有那个材质. 如果你用网格向一个节点添加材质, 那个材质仅会被那个节点使用, 也会覆盖网格的材质属性. 如果材质被添加到了节点的 Material Override(材质覆盖) 属性上, 它仅会被那个节点使用, 它也会覆盖那个节点的常规材质属性和网格的材质属性.
Material Overlay(材质覆盖层)属性会在该网格所使用的当前材质上方再渲染一个材质。例如,可以用来在网格上放置半透明护盾效果。
BaseMaterial 3D settings
StandardMaterial3D has many settings that determine the look of a material. All of these are under the BaseMaterial3D category
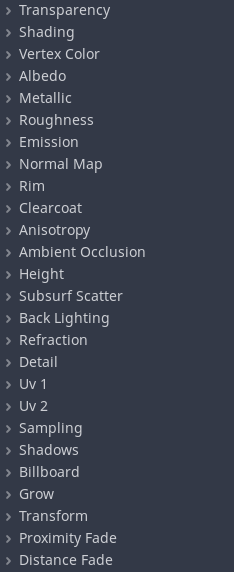
ORM materials are almost exactly the same with one difference. Instead of separate settings and textures for occlusion, roughness, and metallic, there is a single ORM texture. The different color channels of that texture are used for each parameter. Programs such as Substance Painter and Armor Paint will give you the option to export in this format, for these two programs it's with the export preset for unreal engine, which also uses ORM textures.
Transparency
在Godot中, 除非特别配置, 否则材质不透明. 这背后的主要原因是透明材质使用一种不同的渲染技术(从后到前排序并按顺序渲染).
这种技术效率较低(会发生许多状态变化), 并且使得材质无法用于许多需要完全不透明几何形状的处理中/处理后效果(例如SSAO,SSR等).
因此, 除非另有说明, 否则Godot中的材质是不透明的. 启用透明度的主要设置是:
Transparency (this one)
混合模式设置为“Mix”(混合)以外的模式
启用距离或接近淡入淡出
When transparency other than 0 or 1 is not needed, it's possible to
set a threshold to prevent the object from rendering semi-transparent pixels
using the alpha scissor option.
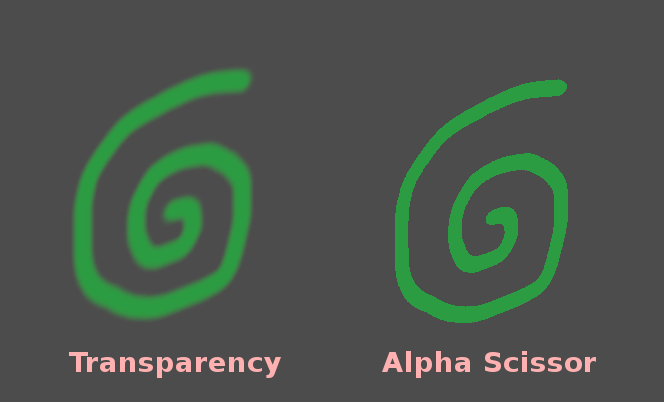
This renders the object via the opaque pipeline when opaque pre-pass is on, which is faster and allows it to use mid- and post-process effects such as SSAO, SSR, etc.
Blend Mode(混合模式)
控制材质的混合模式。请记住,Mix 以外的任何模式都会强制对象通过透明管道。
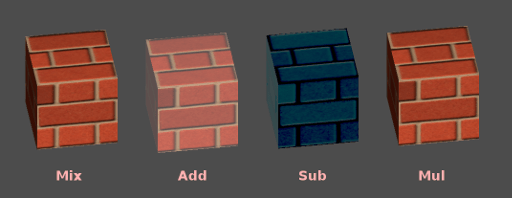
Mix:(混合)默认混合模式,Alpha 控制对象可见的程度。
Add: The final color of the object is added to the color of the screen, nice for flares or some fire-like effects.
Sub: The final color of the object is subtracted from the color of the screen.
Mul: The final color of the object is multiplied with the color of the screen.
Cull Mode(剔除模式)
确定渲染背面时不绘制对象的哪一侧:
Back: 当不可见时, 对象的背面被剔除(默认).
Front: 当不可见时, 物体的正面被剔除.
Disabled: 用于双面对象(不进行剔除).
备注
默认情况下,Blender 在材质上禁用背面剔除,导出材质时匹配其在 Blender 中的渲染方式。这意味着 Godot 中的材质会将其剔除模式设置为 Disabled。这会降低性能,因为背面将被渲染,即使它们不可见。要解决此问题,请在 Blender 的材质选项卡中启用 Backface Culling ,然后再次将场景导出为 glTF。
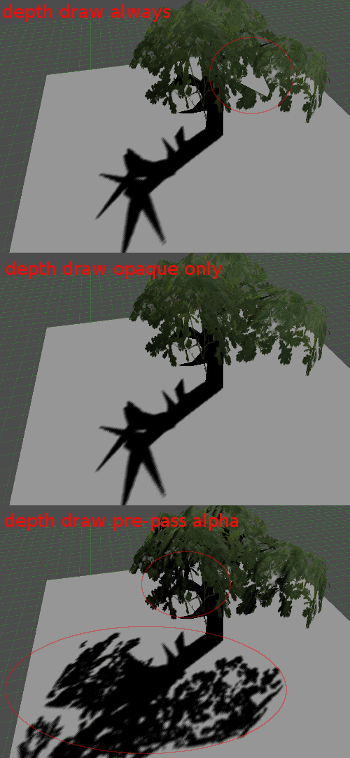
Depth Draw Mode(深度绘制模式)
指定何时必须进行深度渲染.
Opaque Only(仅限不透明, 默认): 仅为不透明对象绘制深度.
Always(始终): 为不透明和透明对象深度绘制.
Never: No depth draw takes place (do not confuse this with the No Depth Test option below).
Depth Pre-Pass(深度预通过): 对于透明物体, 首先使用不透明部分进行不透明的通过, 然后在上方绘制透明度. 将此选项与透明草或树叶一起使用.
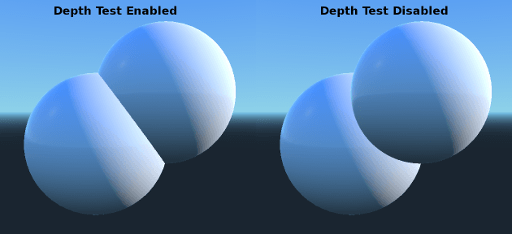
No Depth Test(无深度测试)
为了使近距离物体出现在远处的物体上, 进行深度测试. 禁用它会导致对象出现在其他所有内容之上(或之下).
禁用此选项对于在世界空间中绘制指标最有意义, 并且与Material的 Render Priority 属性一起效果很好(请参阅本页底部).
着色
Shading mode
由于depth pre-pass (深度预通过),Godot的每像素成本或多或少是一致的. 所有照明计算都是通过在每个像素上运行照明着色器来完成的.
由于这些计算成本很高, 因此在某些极端情况下可以大大降低性能, 例如绘制几层透明度(这在粒子系统中很常见). 在这些情况下, 切换到每顶点光照可能会有所帮助.
此外, 在低端或移动设备上, 切换到顶点照明可以显着提高渲染性能.
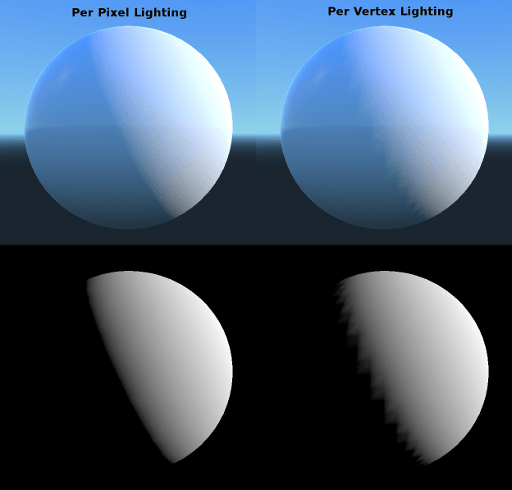
请记住,启用顶点照明时,只有平行光会产生阴影(出于性能原因)。
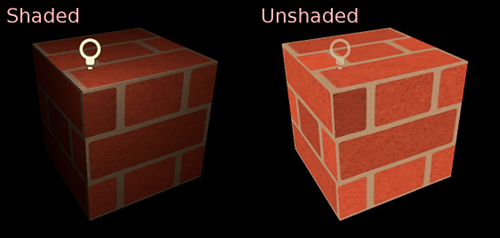
However, in some cases you might want to show just the albedo (color) and ignore the rest. To do this you can set the shading mode to unshaded
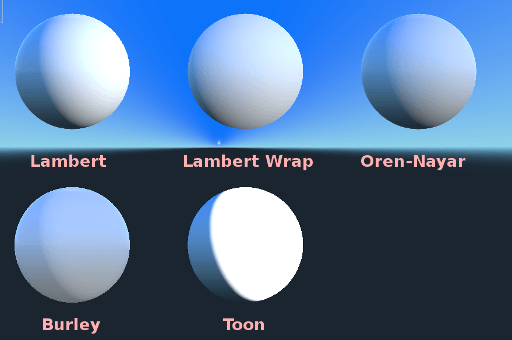
Diffuse Mode(漫反射模式)
指定击中对象时漫反射光散射所使用的算法. 默认为 Burley. 也有其他模式可用:
Burley:默认模式,原始的 Disney Principled PBS 漫反射算法。
Lambert:不受粗糙度的影响。
Lambert Wrap:当粗糙度增加时,将 Lambert 拓展至覆盖 90 度以上。适用于头发和模拟廉价的次表面散射。这种实现是节能的。
Oren Nayar:此实现旨在将微表面考虑在内(通过粗糙度)。适用于粘土类材质和某些类型的布料。
Toon: Provides a hard cut for lighting, with smoothing affected by roughness. It is recommended you disable sky contribution from your environment's ambient light settings or disable ambient light in the StandardMaterial3D to achieve a better effect.
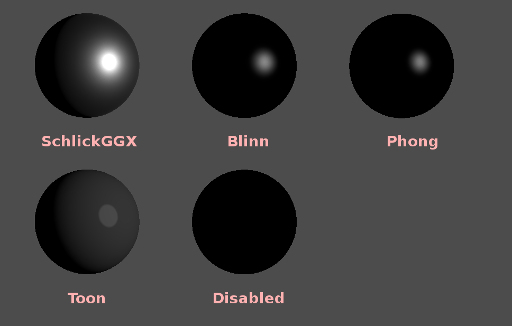
Specular Mode(镜面反射模式)
指定镜面反射斑点的呈现方式。镜面反射斑点是在对象中反射的光源的形状。
SchlickGGX: The most common blob used by PBR 3D engines nowadays.
Blinn: 在上一代引擎中很常见. 现在不值得使用, 但为了兼容性而留在这里.
** Phong:** 同上.
Toon: 创建一个toon blob, 根据粗糙度改变大小.
禁用: 有时候blob很烦人. 消失吧!
Disable Ambient Light(禁用环境光)
使物体不会接收任何会照亮它的环境光。
Disable Fog
Makes the object unaffected by depth-based or volumetric fog. This is useful for particles or other additively blended materials that would otherwise show the shape of the mesh (even in places where it would be invisible without the fog).
Vertex Color(顶点颜色)
此设置允许选择默认情况下如何处理来自 3D 建模应用程序的顶点颜色, 默认情况下, 它们会被忽略.

Use as Albedo(用作反照率)
选择此选项意味着用顶点颜色作为反射颜色.
Is sRGB(是sRGB)
Most 3D modeling software will likely export vertex colors as sRGB, so toggling this option on will help them look correct.
Albedo(反照率)
Albedo 是材质的基色, 所有其他设置都在其上运行. 设置为 Unshaded 时, 这是唯一可见的颜色. 在以前版本的Godot中, 这个通道被命名为 Diffuse . 名称的改变主要是因为在PBR(Physically Based Rendering, 基于物理渲染)中, 这种颜色影响的计算远不止漫射光照路径.
反照率颜色(Albedo Color)可以和纹理一起使用,因为它们会被相乘。
反照率颜色和纹理的 Alpha通道 也用于对象透明度. 如果你使用带 alpha通道 的颜色或纹理, 请确保启用透明度或 alpha scissoring 以使其正常工作.
Metallic(金属)
由于其简单性,Godot使用金属模型而不是别的模型. 此参数定义材质的反射程度. 反射越多, 漫射/环境光的影响越小, 反射的光越多. 这种模型被称为 "能量守恒(energy-conserving)".
Specular 参数是反射率的一般数量(与 Metallic 不同,能量不守恒,因此请将其保留为 0.5 并且除非你需要,否则不要碰它)。
最小的内部反射率是 0.04,因此不可能使材质完全不产生反射,就像在现实生活中一样。

Roughness(粗糙度)
粗糙度 会影响反射的发生方式. 值 0 使其成为完美的镜子, 而 1 的值完全模糊了反射(模拟自然微表面). 最常见的材质类型可以通过 Metallic 和 Roughness 的正确组合来实现.

Emission(发射)
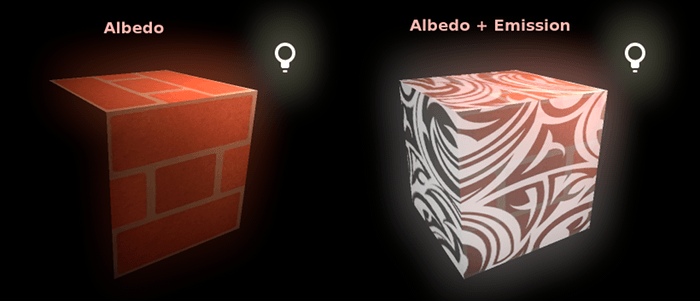
Emission specifies how much light is emitted by the material (keep in mind this does not include light surrounding geometry unless VoxelGI or SDFGI are used). This value is added to the resulting final image and is not affected by other lighting in the scene.
法线贴图
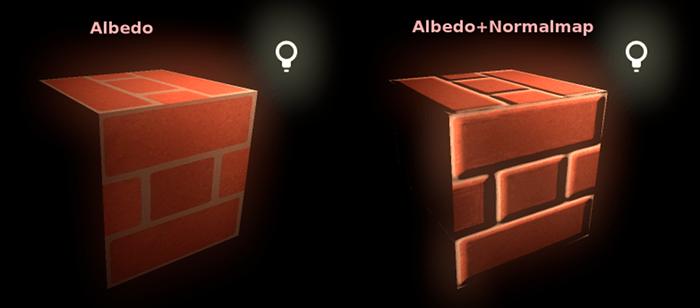
法线贴图允许你设置一个代表更精细形状细节的纹理, 这不会修改几何体, 只会修改光的入射角. 在Godot中, 为了更好的压缩和更广泛的兼容性, 只使用了法线贴图的红色和绿色通道.
备注
Godot 需要法线贴图使用 X+、Y+、Z+ 坐标,即 OpenGL 风格。如果你导入了用于其他引擎的材质,它可能使用的是 DirectX 风格,那么就需要对法线贴图的进行转换,翻转 Y 轴。
可以在 这里 找到关于法线贴图(包括常见引擎的坐标顺序表)的更多信息.
Rim(边缘)
一些织物具有小的微毛, 导致光在其周围散射. Godot使用 Rim 参数模拟它. 与仅使用发射通道的其他边缘照明实施方式不同, 这实际上考虑了光(没有光意味着没有边缘). 这使得效果显著地更加可信.
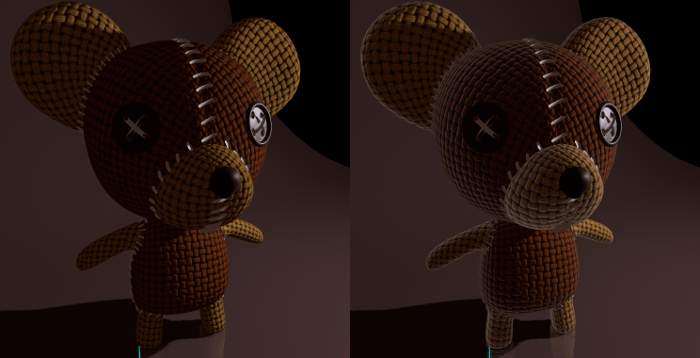
边缘大小取决于粗糙度, 并且有一个特殊参数来指定它必须如何着色. 如果 Tint 为 0, 则灯光的颜色用于边缘. 如果 Tint 是 1, 则使用材质的反照率. 使用中间的值通常效果最佳.
Clearcoat(清漆)
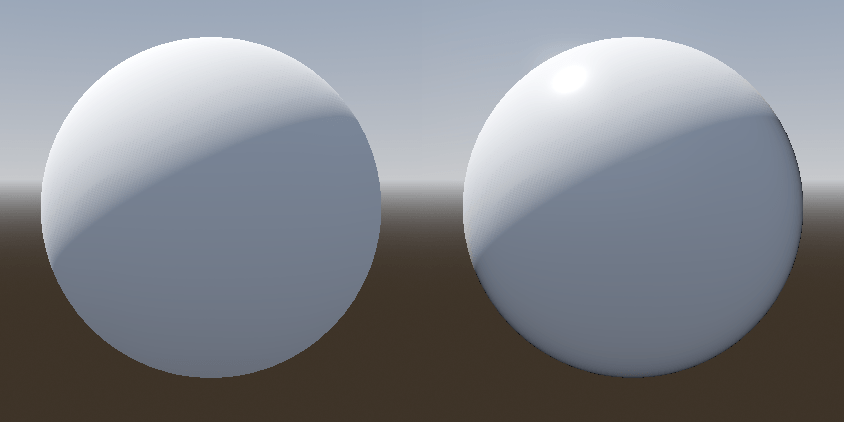
Clearcoat 参数用于为材质添加辅助的透明涂层。这在汽车油漆和玩具中很常见。在实践中,它是在现有材质之上添加的较小的镜面反射斑点。
Anisotropy(各向异性)
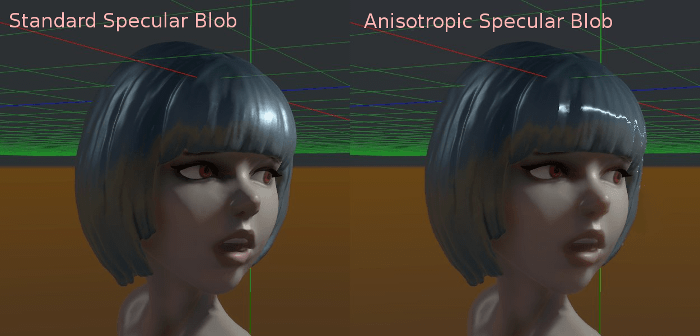
这会更改镜面反射斑点的形状并将其与切线空间对齐。各向异性通常与头发一起使用,或使诸如拉丝铝之类的材质更加逼真。与流向贴图结合使用时效果特别好。
Ambient Occlusion(环境光遮蔽)
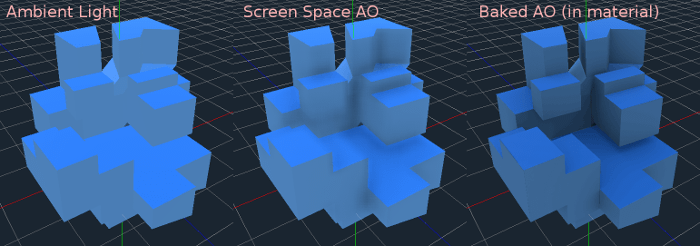
可以指定烘焙的环境遮挡贴图. 此贴图会影响有多少环境光到达物体每个表面(默认情况下它不会影响直接光). 虽然可以使用屏幕空间环境遮挡(Screen-Space Ambient Occlusion, SSAO)来生成环境遮挡, 但没有什么能比良好烘焙的AO贴图的质量更好. 建议尽可能烘焙环境遮挡.
Height
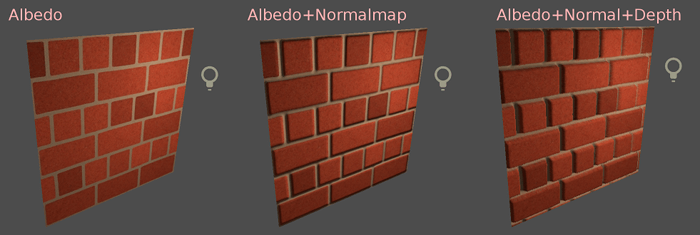
在材质上设置深度贴图会做一个ray-marching搜索, 以模拟沿视图方向的空穴的正确位移. 这不是真正增加的几何, 而是一种深度的幻觉. 它可能不适用于复杂的对象, 但它会为纹理产生逼真的深度效果. 为获得最佳效果,*Depth* 应与法线贴图一起使用.
Subsurface Scattering(次表面散射)
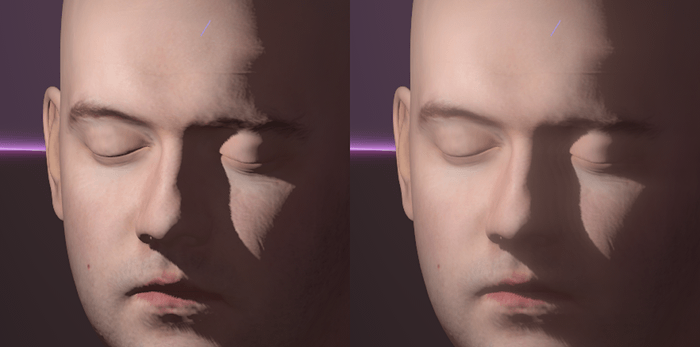
此效果模拟穿透物体表面, 散射然后散出的光. 创造逼真的皮肤, 大理石, 有色液体等有用.
Back Lighting
这可以控制有多少光从被点亮的一侧(正对灯光)传输到暗侧(背对灯光). 这适用于植物叶子, 草, 人耳等薄物体.
Refraction(折射)
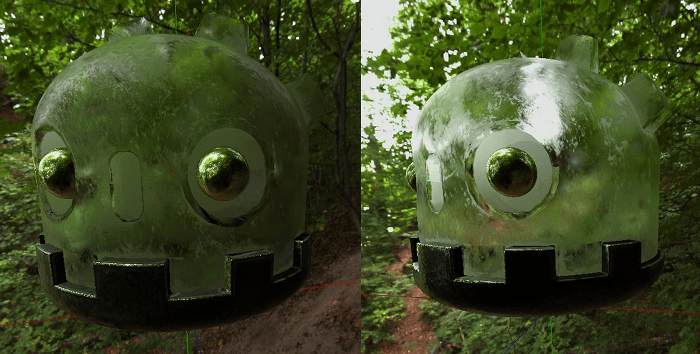
当启用折射时, 它会取代alpha混合, 而Godot会尝试从正在渲染的对象后面获取信息. 这允许以类似于现实生活中的折射的方式扭曲透明度.
Remember to use a transparent albedo texture (or reduce the albedo color's alpha channel) to make refraction visible, as refraction relies on transparency to have a visible effect.
A normal map can optionally be specified in the Refraction Texture property to allow distorting the refraction's direction on a per-pixel basis.
备注
Refraction is implemented as a screen-space effect and forces the material to be transparent. This makes the effect relatively fast, but this results in some limitations:
Transparency sorting issues may occur.
The refractive material cannot refract onto itself, or onto other transparent materials. A refractive material behind another transparent material will be invisible.
Off-screen objects cannot appear in the refraction. This is most noticeable with high refraction strength values.
Opaque materials in front of the refractive material will appear to have "refracted" edges, even though they shouldn't.
Detail(细节)
Godot允许使用辅助反射和法线贴图生成细节纹理, 可以通过多种方式进行混合. 通过将其与二级UV或三平面模式相结合, 可以实现许多有趣的纹理.
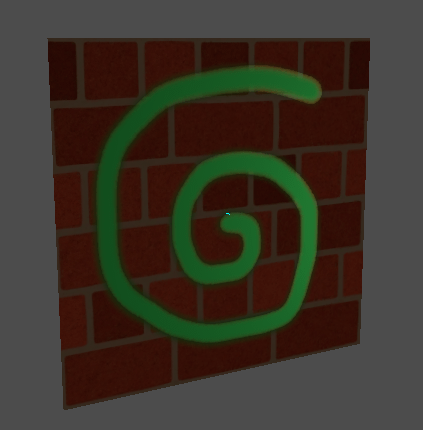
有几种设置可以控制细节的使用方式.
Mask(遮罩): 细节遮罩是一个黑白图像, 用来控制纹理的混合位置. 白色为细节纹理, 黑色为常规材质纹理, 不同深浅的灰色用于材质纹理和细节纹理的部分混合.
混合模式: 有四种模式控制纹理的混合方式.
融合: 合并两个纹理的像素值. 黑色时, 仅显示材质纹理;白色时, 仅显示细节纹理. 灰色的值在两者之间创建一个平滑的混合.
相加: 将一个纹理与另一个纹理的像素值相加. 与融合模式不同的是, 两个纹理在蒙板的白色部分而不是灰色部分完全混合. 原始纹理在黑色部分基本没有变化
相减: 将一个纹理的像素值与另一个纹理的像素值相减. 第二种纹理在蒙版的白色部分被完全减去, 在黑色部分只被减去一点, 灰色部分根据具体实际纹理减去不同的程度.
相乘: 将上方纹理中每个像素的 RGB 通道数与下方纹理中相应像素的值相乘.
Albedo: 在此处放置要混合的反射纹理. 如果此插槽中没有任何内容, 则默认情况下将其解释为纯白.
法线: 在此处放置需要混合的法线纹理. 如果这个槽中没有任何东西, 它将被解释为一个平坦的法线贴图. 即使材质未启用法线贴图也可以使用这个槽.
UV1和UV2
Godot每种材质支持两个UV通道. 二级UV通常可用于环境遮挡或发射(烘焙的光照). UV可以缩放和偏移, 这在使用重复纹理时很有用.
Triplanar Mapping(三平面映射)
UV1和UV2都支持三平面映射. 这是获得纹理坐标的另一种方法, 有时称为 "自动纹理". 纹理在X,Y和Z中采样, 并由法线混合. 可以在世界空间或对象空间中执行三平面映射.
在下图中,你可以看到所有图元如何与世界三平面共享相同的材质,因此砖纹理在它们之间平滑地继续。
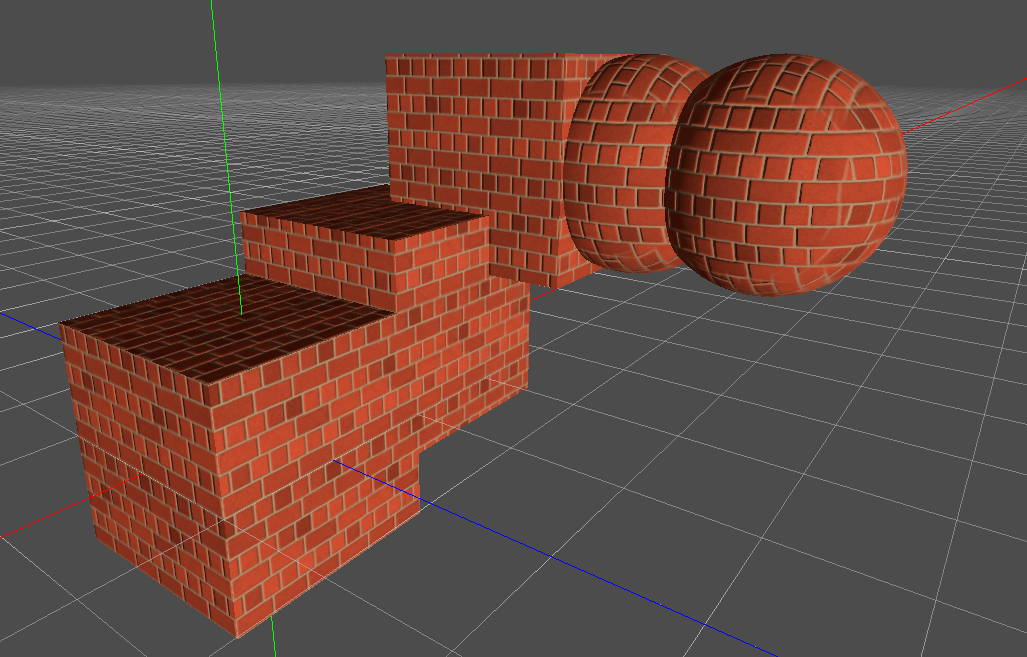
World Triplanar(世界三平面)
When using triplanar mapping, it is computed in object local space. This option makes it use world space instead.
Sampling
过滤器
The filtering method for the textures used by the material. See this page for a full list of options and their description.
重复
if the textures used by the material repeat, and how they repeat. See this page for a full list of options and their description.
阴影
Do Not Receive Shadows(不接受阴影)
使对象不会接收任何可能会被投射到其上的阴影.
Use Shadow to Opacity(使用阴影转为不透明度)
光照会改变alpha值, 阴影部分是不透明的, 而没有阴影的地方是透明的. 对于AR中将阴影堆叠到一个照相机反馈中很有用.
Billboard
Billboard Mode(广告牌模式)
为绘图材质启用广告牌模式. 这会控制物体面向摄像头的方式:
Disabled: 禁用广告牌模式.
Enabled: 启用广告牌模式, 对象的-Z轴将始终面向摄像机.
** Y-Billboard:** 物体的X轴会始终与相机对齐.
Particles: 最适合粒子系统, 因为它允许指定动画选项.
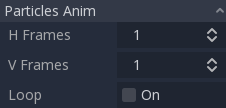
以上选项仅适用于Particle Billboard.
Billboard Keep Scale(广告牌保持缩放)
启用在广告牌模式下缩放网格.
Grow(增长)
沿法线指向的方向增长对象顶点:
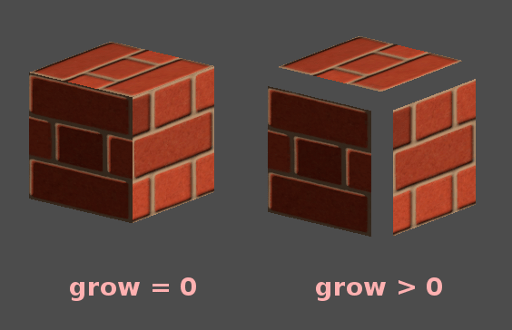
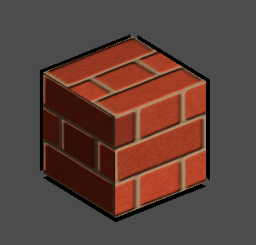
这通常用于创建廉价的轮廓. 添加第二个material pass, 使其变为黑色, 无阴影(unshaded), 反向剔除(Cull Front), 并添加一些增长:
变换
Fixed Size(固定大小)
这使得无论距离如何, 对象都以相同的大小呈现. 这主要用于指示物(无深度测试和高渲染优先级)和某些类型的广告牌.
Use Point Size(使用点大小)
This option is only effective when the geometry rendered is made of points (generally it's made of triangles when imported from 3D modeling software). If so, then those points can be resized (see below).
Point Size(点大小)
绘制点时,指定点的大小,单位为像素。
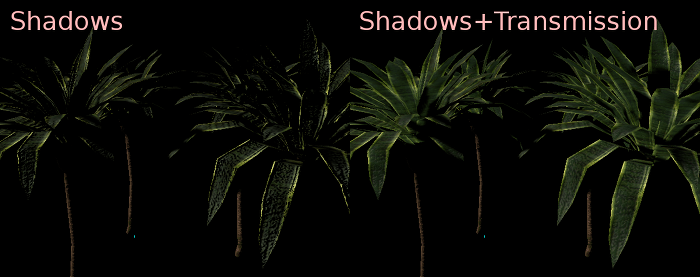
Transmission(传输)
这可以控制有多少光从被点亮的一侧(正对灯光)传输到暗侧(背对灯光). 这适用于植物叶子, 草, 人耳等薄物体.
Proximity and Distance Fade
Godot allows materials to fade by proximity to each other as well as depending on the distance from the viewer. Proximity fade is useful for effects such as soft particles or a mass of water with a smooth blending to the shores.
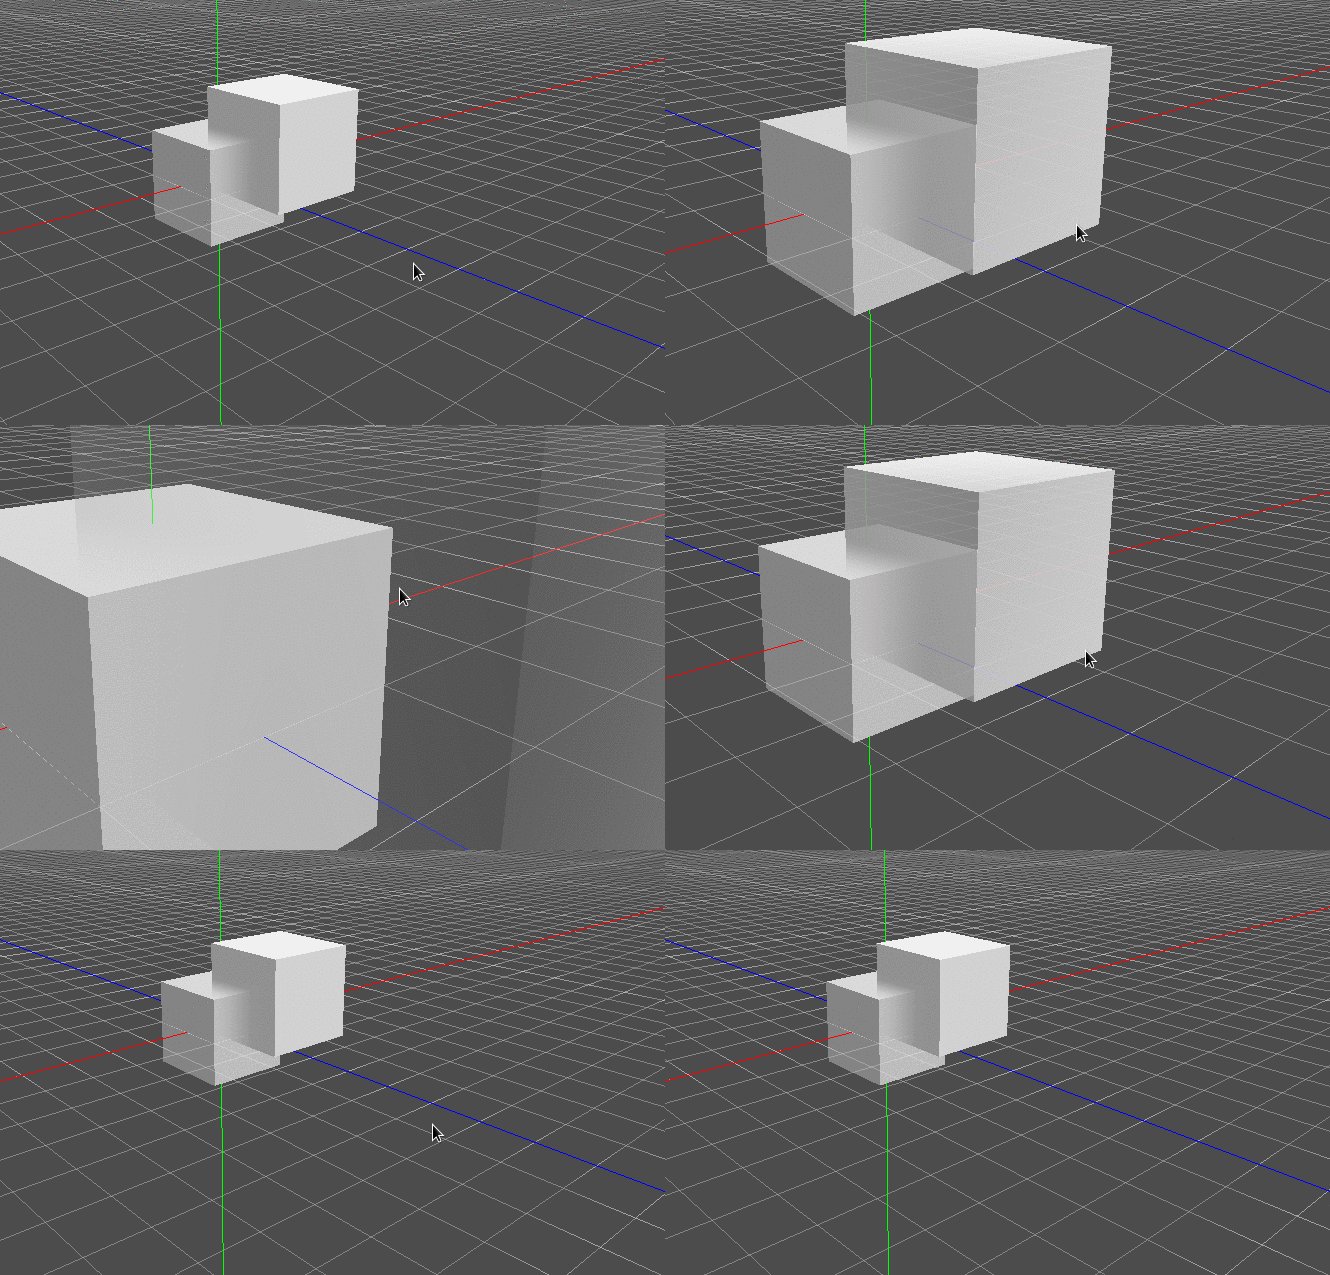
Distance fade is useful for light shafts or indicators that are only present after a given distance.
Keep in mind enabling proximity fade or distance fade with Pixel Alpha mode enables alpha blending. Alpha blending is more GPU-intensive and can cause transparency sorting issues. Alpha blending also disables many material features such as the ability to cast shadows. To hide a character when they get too close to the camera, consider using Pixel Dither or better, Object Dither (which is even faster than Pixel Dither).
Material Settings
Render priority(渲染优先级)
可以更改对象的渲染顺序, 尽管这对于透明对象有用(或执行深度绘制但没有颜色绘制的不透明对象, 例如地板上的裂缝).
Next Pass
Sets the material to be used for the next pass. This renders the object again with a different material.