Attention: Here be dragons
This is the latest
(unstable) version of this documentation, which may document features
not available in or compatible with released stable versions of Godot.
Checking the stable version of the documentation...
使用信号
在本课中,我们将介绍信号。它们是节点在发生特定事件时发出的消息,例如按下按钮。其他节点可以连接到该信号,并在事件发生时调用函数。
信号是 Godot 内置的委派机制,允许一个游戏对象对另一个游戏对象的变化做出反应,而无需相互引用。使用信号可以限制耦合,并保持代码的灵活性。
For example, you might have a life bar on the screen that represents the player's health. When the player takes damage or uses a healing potion, you want the bar to reflect the change. To do so, in Godot, you would use signals.
备注
正如引言中提到的,信号是 Godot 版本的观察者模式。您可以在此处了解有关它的更多信息:https://gameprogrammingpatterns.com/observer.html
现在,我们将使用信号来使上一节课(监听玩家的输入)中的 Godot 图标移动,并通过按下按钮来停止。
场景设置
To add a button to our game, we will create a new main scene which will include
both a Button and the sprite_2d.tscn scene we created in
the 创建第一个脚本 lesson.
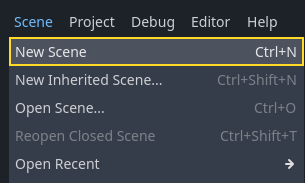
通过转到菜单“场景 -> 新建场景”来创建新场景。
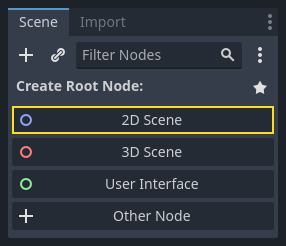
In the Scene dock, click the 2D Scene button. This will add a Node2D as our root.
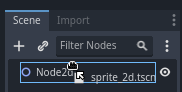
In the FileSystem dock, click and drag the sprite_2d.tscn file you saved
previously onto the Node2D to instantiate it.
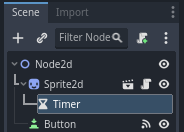
We want to add another node as a sibling of the Sprite2D. To do so, right-click on Node2D and select Add Child Node.
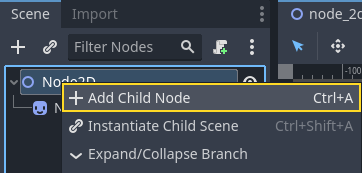
Search for the Button node and add it.
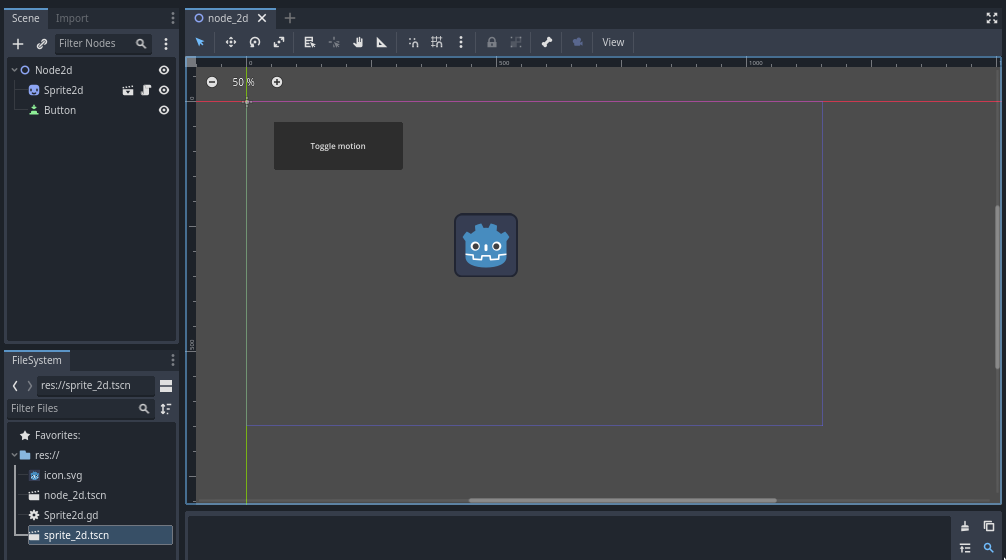
该节点默认比较小。在视口中,点击并拖拽该按钮右下角的手柄来调整大小。
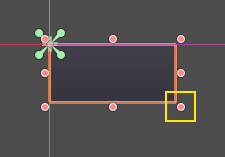
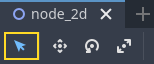
如果看不到手柄,请确保工具栏中的选择工具处于活动状态。
点击并拖拽按钮使其更接近精灵。
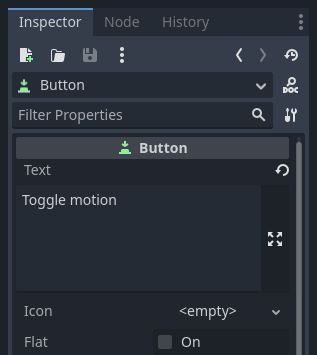
You can also write a label on the Button by editing its Text property in the
Inspector. Enter Toggle motion.
您的场景树和视口应该是类似这样的。
Save your newly created scene as node_2d.tscn, if you haven't already.
You can then run it with F6 (Cmd + R on macOS).
At the moment, the button will be visible, but nothing will happen if you
press it.
在编辑器中连接信号
Here, we want to connect the Button's "pressed" signal to our Sprite2D, and we want to call a new function that will toggle its motion on and off. We need to have a script attached to the Sprite2D node, which we do from the previous lesson.
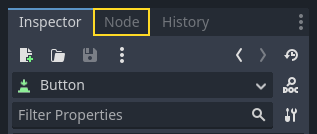
您可以在“节点”面板中连接信号。选择 Button 节点,然后在编辑器的右侧,单击检查器旁边名为“节点”的选项卡。
停靠栏显示所选节点上可用的信号列表。
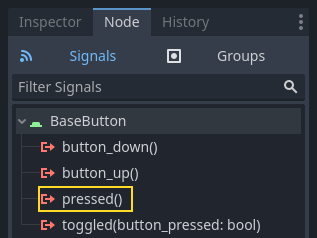
双击“pressed”信号,打开节点连接窗口。

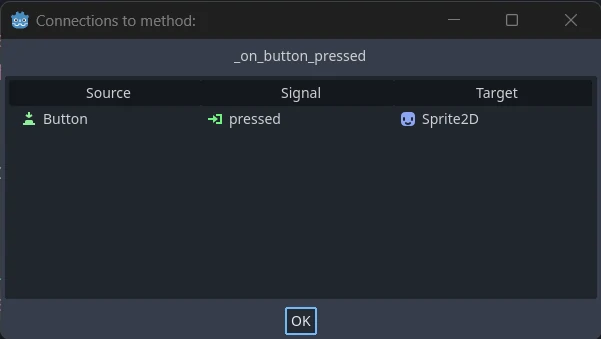
There, you can connect the signal to the Sprite2D node. The node needs a receiver method, a function that Godot will call when the Button emits the signal. The editor generates one for you. By convention, we name these callback methods "_on_node_name_signal_name". Here, it'll be "_on_button_pressed".
备注
通过编辑器的节点面板连接信号时,可以使用两种模式。简单的一个只允许您连接到附加了脚本的节点,并在它们上面创建一个新的回调函数。

您可以在高级视图中连接到任何节点和任何内置函数、向回调添加参数、设置选项。您可以单击窗口右下角的“高级”按钮来切换模式。
单击“连接”按钮以完成信号连接并跳转到脚本工作区。您应该会看到新方法,并在左边距中带有连接图标。
如果单击该图标,将弹出一个窗口并显示有关连接的信息。此功能仅在编辑器中连接节点时可用。
让我们用代码替换带有 pass 关键字的一行,以切换节点的运动。
Our Sprite2D moves thanks to code in the _process() function. Godot provides
a method to toggle processing on and off: Node.set_process(). Another method of the Node class,
is_processing(), returns true if idle processing is active. We can use
the not keyword to invert the value.
func _on_button_pressed():
    set_process(not is_processing())
private void OnButtonPressed()
{
    SetProcess(!IsProcessing());
}
此函数将切换处理,进而切换按下按钮时图标的移动。
在尝试游戏之前,我们需要简化 _process() 函数,以自动移动节点,而不是等待用户输入。将其替换为以下代码,这是我们在两课前看到的代码:
func _process(delta):
    rotation += angular_speed * delta
    var velocity = Vector2.UP.rotated(rotation) * speed
    position += velocity * delta
public override void _Process(double delta)
{
    Rotation += _angularSpeed * (float)delta;
    var velocity = Vector2.Up.Rotated(Rotation) * _speed;
    Position += velocity * (float)delta;
}
Your complete sprite_2d.gd code should look like the following.
extends Sprite2D

var speed = 400
var angular_speed = PI


func _process(delta):
    rotation += angular_speed * delta
    var velocity = Vector2.UP.rotated(rotation) * speed
    position += velocity * delta


func _on_button_pressed():
    set_process(not is_processing())
using Godot;

public partial class MySprite2D : Sprite2D
{
    private float _speed = 400;
    private float _angularSpeed = Mathf.Pi;

    public override void _Process(double delta)
    {
        Rotation += _angularSpeed * (float)delta;
        var velocity = Vector2.Up.Rotated(Rotation) * _speed;
        Position += velocity * (float)delta;
    }

    private void OnButtonPressed()
    {
        SetProcess(!IsProcessing());
    }
}
运行该场景,然后点击按钮,就可以看到精灵开始或停止运行。
用代码连接信号
您可以通过代码连接信号,而不是使用编辑器。这在脚本中创建节点或实例化场景时是必需的。
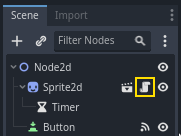
让我们在这里使用一个不同的节点。Godot 有一个 Timer 节点,可用于实现技能冷却时间、武器重装等。
回到 2D 工作区。你可以点击窗口顶部的“2D”文字,或者按 Ctrl + F1(macOS 上则是 Alt + 1)。
In the Scene dock, right-click on the Sprite2D node and add a new child node. Search for Timer and add the corresponding node. Your scene should now look like this.
With the Timer node selected, go to the Inspector and enable the Autostart property.

Click the script icon next to Sprite2D to jump back to the scripting workspace.
我们需要执行两个操作来通过代码连接节点:
Get a reference to the Timer from the Sprite2D.
Call the
connect()method on the Timer's "timeout" signal.
备注
To connect to a signal via code, you need to call the connect()
method of the signal you want to listen to. In this case, we want to
listen to the Timer's "timeout" signal.
我们想要在场景实例化时连接信号,那么就可以在 Node._ready() 中实现。引擎会在节点完全实例化后自动调用这个函数。
为了获取相对于当前节点的引用,我们使用方法 Node.get_node()。我们可以将引用存储在变量中。
func _ready():
    var timer = get_node("Timer")
public override void _Ready()
{
    var timer = GetNode<Timer>("Timer");
}
The function get_node() looks at the Sprite2D's children and gets nodes by
their name. For example, if you renamed the Timer node to "BlinkingTimer" in the
editor, you would have to change the call to get_node("BlinkingTimer").
We can now connect the Timer to the Sprite2D in the _ready() function.
func _ready():
    var timer = get_node("Timer")
    timer.timeout.connect(_on_timer_timeout)
public override void _Ready()
{
    var timer = GetNode<Timer>("Timer");
    timer.Timeout += OnTimerTimeout;
}
The line reads like so: we connect the Timer's "timeout" signal to the node to
which the script is attached. When the Timer emits timeout, we want to call
the function _on_timer_timeout(), that we need to define. Let's add it at the
bottom of our script and use it to toggle our sprite's visibility.
备注
By convention, we name these callback methods in GDScript as "_on_node_name_signal_name" and in C# as "OnNodeNameSignalName". Here, it'll be "_on_timer_timeout" for GDScript and OnTimerTimeout() for C#.
func _on_timer_timeout():
    visible = not visible
private void OnTimerTimeout()
{
    Visible = !Visible;
}
visible 属性是一个布尔值,用于控制节点的可见性。visible = not visible 行切换该值。如果 visible 是 true,它就会变成 false,反之亦然。
如果你现在运行场景,就会看到精灵在闪啊闪的,间隔为一秒。
完整脚本
That's it for our little moving and blinking Godot icon demo!
Here is the complete sprite_2d.gd file for reference.
extends Sprite2D

var speed = 400
var angular_speed = PI


func _ready():
    var timer = get_node("Timer")
    timer.timeout.connect(_on_timer_timeout)


func _process(delta):
    rotation += angular_speed * delta
    var velocity = Vector2.UP.rotated(rotation) * speed
    position += velocity * delta


func _on_button_pressed():
    set_process(not is_processing())


func _on_timer_timeout():
    visible = not visible
using Godot;

public partial class MySprite2D : Sprite2D
{
    private float _speed = 400;
    private float _angularSpeed = Mathf.Pi;

    public override void _Ready()
    {
        var timer = GetNode<Timer>("Timer");
        timer.Timeout += OnTimerTimeout;
    }

    public override void _Process(double delta)
    {
        Rotation += _angularSpeed * (float)delta;
        var velocity = Vector2.Up.Rotated(Rotation) * _speed;
        Position += velocity * (float)delta;
    }

    private void OnButtonPressed()
    {
        SetProcess(!IsProcessing());
    }

    private void OnTimerTimeout()
    {
        Visible = !Visible;
    }
}
自定义信号
备注
本节介绍的是如何定义并使用你自己的信号,不依赖之前课程所创建的项目。
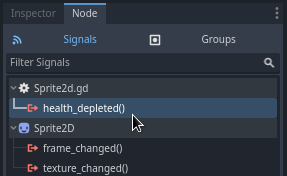
您可以在脚本中定义自定义信号。例如,假设您希望在玩家的生命值为零时通过屏幕显示游戏结束。为此,当他们的生命值达到 0 时,您可以定义一个名为“died”或“health_depleted”的信号。
extends Node2D

signal health_depleted

var health = 10
using Godot;

public partial class MyNode2D : Node2D
{
    [Signal]
    public delegate void HealthDepletedEventHandler();

    private int _health = 10;
}
备注
由于信号表示刚刚发生的事件,我们通常在其名称中使用过去时态的动作动词。
自定义信号的工作方式与内置信号相同:它们显示在“节点”选项卡中,您可以像连接其他信号一样连接到它们。
To emit a signal in your scripts, call emit() on the signal.
func take_damage(amount):
    health -= amount
    if health <= 0:
        health_depleted.emit()
public void TakeDamage(int amount)
{
    _health -= amount;

    if (_health <= 0)
    {
        EmitSignal(SignalName.HealthDepleted);
    }
}
信号还可以选择声明一个或多个参数。在括号之间指定参数的名称:
extends Node

signal health_changed(old_value, new_value)

var health = 10
using Godot;

public partial class MyNode : Node
{
    [Signal]
    public delegate void HealthChangedEventHandler(int oldValue, int newValue);

    private int _health = 10;
}
备注
这些信号参数显示在编辑器的节点停靠面板中,Godot 可以使用它们为您生成回调函数。但是,发出信号时仍然可以发出任意数量的参数;所以由你来决定是否发出正确的值。
To emit values along with the signal, add them as extra arguments to the
emit() function:
func take_damage(amount):
    var old_health = health
    health -= amount
    health_changed.emit(old_health, health)
public void TakeDamage(int amount)
{
    int oldHealth = _health;
    _health -= amount;
    EmitSignal(SignalName.HealthChanged, oldHealth, _health);
}
总结
Godot 中的任何节点都会在发生特定事件时发出信号,例如按下按钮。其他节点可以连接到单个信号并对所选事件做出反应。
信号有很多用途。有了它们,你可以对进入或退出游戏世界的节点、碰撞、角色进入或离开某个区域、界面元素的大小变化等等做出反应。
例如,代表金币的 Area2D 会在玩家的物理实体进入其碰撞形状时发出 body_entered 信号,让你知道玩家收集到了金币。
在下一节 您的第一个 2D 游戏 中,你将创建一个完整的 2D 游戏,使用目前为止学到的东西进行实战。