Attention: Here be dragons
This is the latest
(unstable) version of this documentation, which may document features
not available in or compatible with released stable versions of Godot.
Checking the stable version of the documentation...
创建第一个脚本
在本课中,你将用 GDScript 编写第一个脚本,使 Godot 图标转圈。正如我们在介绍中提到的,我们假设你有编程基础。方便起见,我们在单独的选项卡中包含了等价的 C# 代码。

参见
要了解更多关于GDScript、其关键字和语法的信息,请前往 GDScript 参考。
参见
要了解更多关于 C# 的信息,请前往 C# 基础页面。
项目设置
Please create a new project to start with a clean slate. Your project should contain one picture: the Godot icon, which we often use for prototyping in the community.
We need to create a Sprite2D node to display it in the game. In the Scene dock, click the Other Node button.
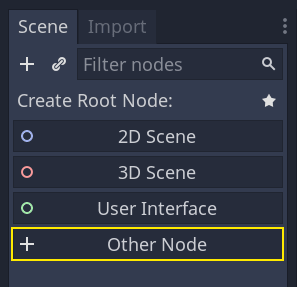
Type "Sprite2D" in the search bar to filter nodes and double-click on Sprite2D to create the node.
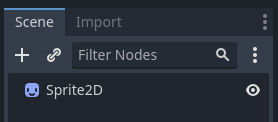
Your Scene tab should now only have a Sprite2D node.
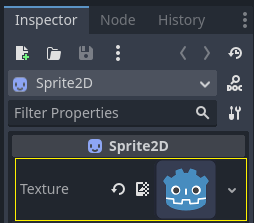
A Sprite2D node needs a texture to display. In the Inspector on the right, you
can see that the Texture property says "[empty]". To display the Godot icon,
click and drag the file icon.svg from the FileSystem dock onto the Texture
slot.
备注
You can create Sprite2D nodes automatically by dragging and dropping images on the viewport.
然后,点击并拖动视口中的图标,使其在游戏视图中居中。
新建脚本
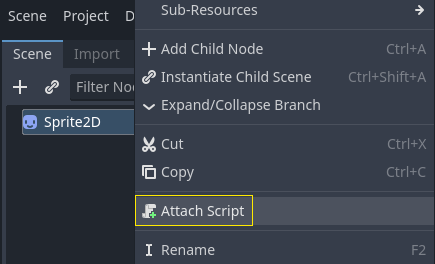
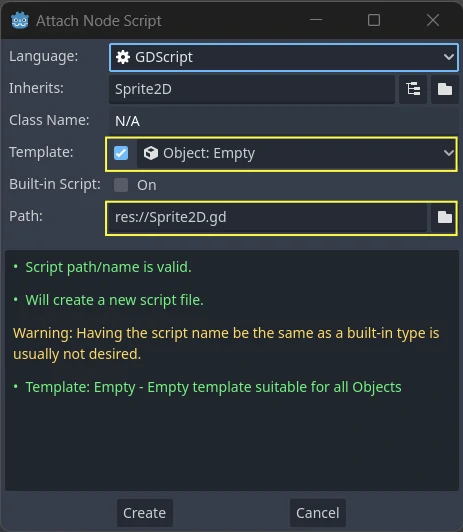
To create and attach a new script to our node, right-click on Sprite2D in the scene dock and select "Attach Script".
弹出“附加节点脚本”窗口。你可以选择脚本的语言和文件路径,以及其他选项。
Change the Template field from "Node: Default" to "Object: Empty" to start with a clean file. Leave the other options by default and click the Create button to create the script.
The Script workspace should appear with your new sprite_2d.gd file open and
the following line of code:
extends Sprite2D
using Godot;

public partial class MySprite2D : Sprite2D
{
}
Every GDScript file is implicitly a class. The extends keyword defines the
class this script inherits or extends. In this case, it's Sprite2D, meaning
our script will get access to all the properties and functions of the Sprite2D
node, including classes it extends, like Node2D, CanvasItem, and
Node.
备注
In GDScript, if you omit the line with the extends keyword, your
class will implicitly extend RefCounted, which
Godot uses to manage your application's memory.
继承的属性包括您可以在“检查器”面板中看到的属性,例如节点的 texture。
备注
“检查器”默认使用“Title Case”形式展示节点的属性,将单词的首字母大写、用空格分隔。在 GDScript 代码中,这些属性使用的是“snake_case”,全小写、单词之间使用下划线分隔。
You can hover over any property's name in the Inspector to see a description and its identifier in code.
你好,世界!
我们的脚本目前没有做任何事情。让我们开始打印文本“Hello, world!”到底部输出面板。
往脚本中添加以下代码:
func _init():
    print("Hello, world!")
public MySprite2D()
{
    GD.Print("Hello, world!");
}
让我们把它分解一下。 func 关键字定义了一个名为 _init 的新函数。这是类构造函数的一个特殊名称。如果你定义了这个函数,引擎会在内存中创建每个对象或节点时调用 _init() 。
备注
GDScript 是基于缩进的语言。行首的制表符是 print() 代码正常工作的必要条件。如果你省略了它或者没有正确缩进一行,编辑器将以红色高亮显示,并显示以下错误信息:“Indented block expected”(应有缩进块)。
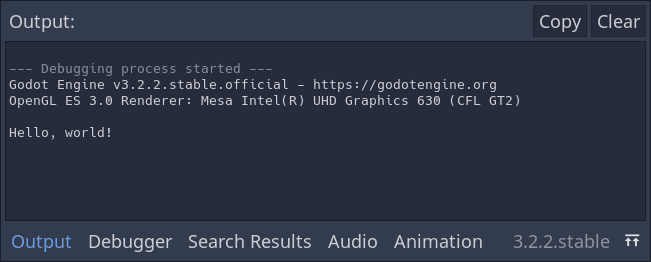
Save the scene as sprite_2d.tscn if you haven't already, then press F6 (Cmd + R on macOS)
to run it. Look at the Output bottom panel that expands.
It should display "Hello, world!".
Delete the _init() function, so you're only left with the line extends
Sprite2D.
四处旋转
It's time to make our node move and rotate. To do so, we're going to add two
member variables to our script: the movement speed in pixels per second and the
angular speed in radians per second. Add the following after the extends Sprite2D line.
var speed = 400
var angular_speed = PI
private int _speed = 400;
private float _angularSpeed = Mathf.Pi;
成员变量位于脚本的顶部,在“extends”之后、函数之前。附加了此脚本的每个节点实例都将具有自己的 speed 和 angular_speed 属性副本。
备注
与其他一些引擎一样,Godot 中的角度默认使用弧度为单位,但如果您更喜欢以度为单位计算角度,则可以使用内置函数和属性。
To move our icon, we need to update its position and rotation every frame in the
game loop. We can use the _process() virtual function of the Node class.
If you define it in any class that extends the Node class, like Sprite2D, Godot
will call the function every frame and pass it an argument named delta, the
time elapsed since the last frame.
备注
游戏的工作方式是每秒钟渲染许多图像,每幅图像称为一帧,而且是循环进行的。我们用每秒帧数(FPS)来衡量一个游戏产生图像的速度。大多数游戏的目标是60FPS,尽管你可能会发现在较慢的移动设备上的数字是30FPS,或者是虚拟现实游戏的90至240。
引擎和游戏开发者尽最大努力以恒定的时间间隔更新游戏世界和渲染图像,但在帧的渲染时间上总是存在着微小的变化。这就是为什么引擎为我们提供了这个delta时间值,使我们的运动与我们的帧速率无关。
在脚本的底部,定义该函数:
func _process(delta):
rotation += angular_speed * delta
public override void _Process(double delta)
{
Rotation += _angularSpeed * (float)delta;
}
func 关键字定义了一个新函数。在它之后,我们必须在括号里写上函数的名称和它所接受的参数。冒号结束定义,后面的缩进块是函数的内容或指令。
备注
请注意 _process() 和 _init() 一样都是以下划线开头的。按照约定,这是 Godot 的虚函数,也就是你可以覆盖的与引擎通信的内置函数。
The line inside the function, rotation += angular_speed * delta, increments
our sprite's rotation every frame. Here, rotation is a property inherited
from the class Node2D, which Sprite2D extends. It controls the rotation
of our node and works with radians.
小技巧
在代码编辑器中,你可以按住 ctrl 单击任何内置的属性或函数,如 position、rotation、_process 以在新标签页中打开相应的文档。
运行该场景,可以看到 Godot 的图标在原地转动。

备注
In C#, notice how the delta argument taken by _Process() is a
double. We therefore need to convert it to float when we apply
it to the rotation.
前进
Let's now make the node move. Add the following two lines inside of the _process()
function, ensuring the new lines are indented the same way as the rotation += angular_speed * delta line before
them.
var velocity = Vector2.UP.rotated(rotation) * speed
position += velocity * delta
var velocity = Vector2.Up.Rotated(Rotation) * _speed;
Position += velocity * (float)delta;
正如我们所看到的,var 关键字可以定义新变量。如果你把它放在脚本顶部,定义的就是类的属性。在函数内部,定义的则是局部变量:只在函数的作用域中存在。
We define a local variable named velocity, a 2D vector representing both a
direction and a speed. To make the node move forward, we start from the Vector2
class's constant Vector2.UP, a vector pointing up, and rotate it by calling the
rotated() method on any Vector2. This expression, Vector2.UP.rotated(rotation),
is a vector pointing forward relative to our icon. Multiplied by our speed
property, it gives us a velocity we can use to move the node forward.
我们在节点的 position 里加上 velocity * delta 来实现移动。位置本身是 Vector2 类型的,是 Godot 用于表示 2D 向量的内置类型。
运行场景就可以看到 Godot 头像在绕圈圈。
备注
使用这样的方法不会考虑与墙壁和地面的碰撞。在 您的第一个 2D 游戏 中,你会学到另一种移动对象的方法,可以检测碰撞。
我们的节点目前是自行移动的。在下一部分 监听玩家的输入 中,我们会让玩家的输入来控制它。
完整脚本
Here is the complete sprite_2d.gd file for reference.
extends
Sprite2D
var speed = 400
var angular_speed = PI
func _process(delta):
rotation += angular_speed * delta
var velocity = Vector2.UP.rotated(rotation) * speed
position += velocity * delta
using Godot;
public partial class MySprite2D : Sprite2D
{
private int _speed = 400;
private float _angularSpeed = Mathf.Pi;
public override void _Process(double delta)
{
Rotation += _angularSpeed * (float)delta;
var velocity = Vector2.Up.Rotated(Rotation) * _speed;

Position += velocity * (float)delta;
}
}