Attention: Here be dragons
This is the latest
(unstable) version of this documentation, which may document features
not available in or compatible with released stable versions of Godot.
Checking the stable version of the documentation...
创建敌人
是时候去做一些玩家必须躲避的敌人了. 它们的行为很简单: 怪物将随机生成在屏幕的边缘, 沿着随机的方向直线移动.
我们将创建一个 Mob 的怪物场景,以便在游戏中独立实例化出任意数量的怪物。
节点设置
Click Scene -> New Scene from the top menu and add the following nodes:
RigidBody2D(名为
Mob)
别忘了设置子项,使其无法被选中,就像你对 Player 场景所做的那样。
In the RigidBody2D properties, set Gravity Scale
to 0, so the mob will not fall downward. In addition, under the
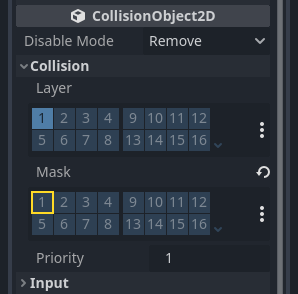
CollisionObject2D section, uncheck the 1 inside the Mask property.
This will ensure the mobs do not collide with each other.
Set up the AnimatedSprite2D like you did for the
player. This time, we have 3 animations: fly, swim, and walk. There
are two images for each animation in the art folder.
The Animation Speed property has to be set for each individual animation. Adjust it to 3 for all 3 animations.
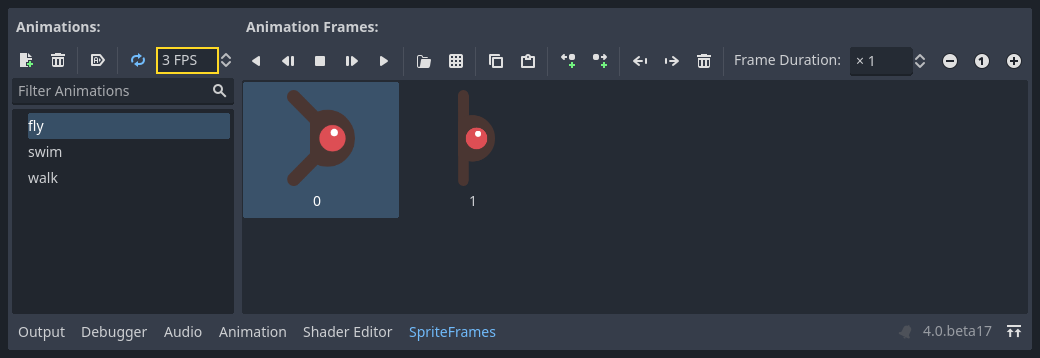
You can use the "Play Animation" buttons on the right of the Animation Speed input field to preview your animations.
我们将随机选择其中一个动画,以便小怪有一些变化。
Like the player images, these mob images need to be scaled down. Set the
AnimatedSprite2D's Scale property to (0.75, 0.75).
像在 Player 场景中一样,为碰撞添加一个 CapsuleShape2D。为了使形状与图像对齐,您需要将 Rotation Degrees 属性设为 90(在“检查器”的“Transorm”下)。
保存该场景。
敌人的脚本
像这样将脚本添加到 Mob 上:
extends RigidBody2D
using Godot;

public partial class Mob : RigidBody2D
{
    // Don't forget to rebuild the project.
}
// Copy `player.gdns` to `mob.gdns` and replace `Player` with `Mob`.
// Attach the `mob.gdns` file to the Mob node.

// Create two files `mob.cpp` and `mob.hpp` next to `entry.cpp` in `src`.
// This code goes in `mob.hpp`. We also define the methods we'll be using here.
#ifndef MOB_H
#define MOB_H

#include <AnimatedSprite2D.hpp>
#include <Godot.hpp>
#include <RigidBody2D.hpp>

class Mob : public godot::RigidBody2D {
    GODOT_CLASS(Mob, godot::RigidBody2D)

    godot::AnimatedSprite2D *_animated_sprite;

public:
    void _init() {}
    void _ready();
    void _on_visible_on_screen_notifier_2d_screen_exited();

    static void _register_methods();
};

#endif // MOB_H
现在让我们看一下脚本的其余部分。在 _ready() 中,我们从三个动画类型中随机选择一个播放:
func _ready():
    var mob_types = $AnimatedSprite2D.sprite_frames.get_animation_names()
    $AnimatedSprite2D.play(mob_types[randi() % mob_types.size()])
public override void _Ready()
{
    var animatedSprite2D = GetNode<AnimatedSprite2D>("AnimatedSprite2D");
    string[] mobTypes = animatedSprite2D.SpriteFrames.GetAnimationNames();
    animatedSprite2D.Play(mobTypes[GD.Randi() % mobTypes.Length]);
}
// This code goes in `mob.cpp`.
#include "mob.hpp"

#include <RandomNumberGenerator.hpp>
#include <SpriteFrames.hpp>

void Mob::_ready() {
    godot::Ref<godot::RandomNumberGenerator> random = godot::RandomNumberGenerator::_new();
    _animated_sprite = get_node<godot::AnimatedSprite2D>("AnimatedSprite2D");
    _animated_sprite->set_playing(true);
    godot::PoolStringArray mob_types = _animated_sprite->get_sprite_frames()->get_animation_names();
    _animated_sprite->set_animation(mob_types[random->randi() % mob_types.size()]);
}
First, we get the list of animation names from the AnimatedSprite2D's frames
property. This returns an Array containing all three animation names: ["walk",
"swim", "fly"].
然后我们需要在 0 和 2 之间选取一个随机的数字, 以在列表中选择一个名称(数组索引以 0 起始). randi() % n 会在 0 and n-1 之中选择一个随机整数.
The last piece is to make the mobs delete themselves when they leave the screen.
Connect the screen_exited() signal of the VisibleOnScreenNotifier2D node
to the Mob and add this code:
func _on_visible_on_screen_notifier_2d_screen_exited():
    queue_free()
private void OnVisibleOnScreenNotifier2DScreenExited()
{
    QueueFree();
}
// This code goes in `mob.cpp`.
void Mob::_on_visible_on_screen_notifier_2d_screen_exited() {
    queue_free();
}
这样就完成了 Mob 场景。
玩家和敌人已经准备就绪,接下来,我们将在一个新的场景中把他们放到一起。我们将使敌人在游戏板上随机生成并前进,我们的项目将变成一个能玩的游戏。