Attention: Here be dragons
This is the latest
(unstable) version of this documentation, which may document features
not available in or compatible with released stable versions of Godot.
Checking the stable version of the documentation...
跳跃与踩扁怪物
In this part, we'll add the ability to jump and squash the monsters. In the next lesson, we'll make the player die when a monster hits them on the ground.
首先我们要修改一些物理交互相关的设置。请进入物理层的世界。
控制物理交互
物理实体可以访问两个互补的属性:层和遮罩。层(Layer)定义的是该对象位于哪些物理层上。
遮罩(Mask)控制的是该实体会监听并检测的层,会影响碰撞检测。希望两个实体能够发生交互时,你需要让其中至少一个的遮罩与另一个(的层)相对应。
可能有点绕,但请别担心,我们马上就会看到三个例子。
重要的知识点是,你能够使用层和遮罩来过滤物理交互、控制性能、让代码中不需要再做额外的条件检测。
By default, all physics bodies and areas are set to both layer and mask 1.
This means they all collide with each other.
物理层由数字表示,但我们也可以为它们命名,记录什么是什么。
设置层名称
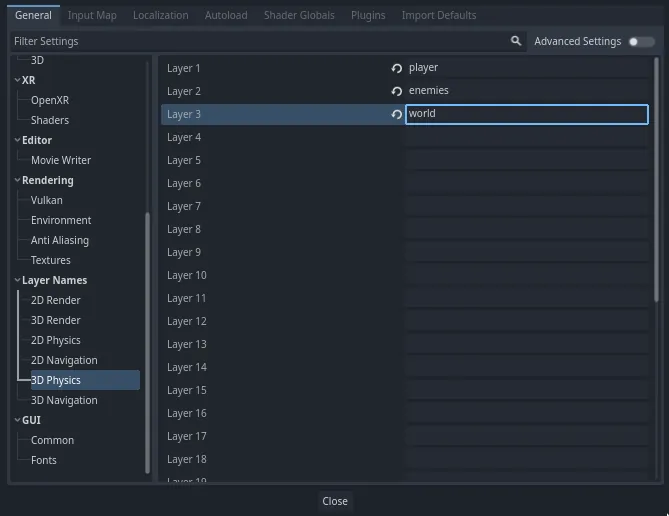
让我们来为物理层命名。打开项目 -> 项目设置。

在左侧的菜单中,找到 Layer Names -> 3D Physics(层名称 -> 3D 物理)。你可以在右侧看到层的列表,每一层右侧都有一个字段,可以用来设置名称。将前三层分别命名为“player”“enemies”“world”(玩家、敌人、世界)。
现在,我们就可以将它们分配给我们的物理节点了。
层和遮罩的分配
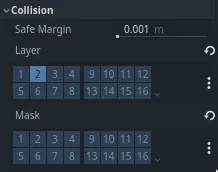
In the Main scene, select the Ground node. In the Inspector, expand the
Collision section. There, you can see the node's layers and masks as a grid of
buttons.
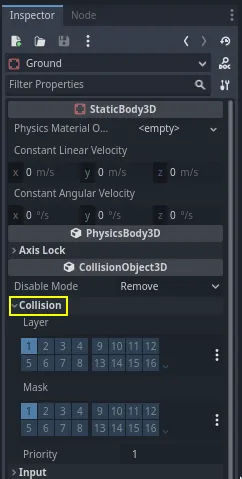
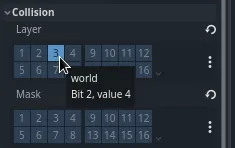
The ground is part of the world, so we want it to be part of the third layer. Click the lit button to toggle off the first Layer and toggle on the third one. Then, toggle off the Mask by clicking on it.
As mentioned before, the Mask property allows a node to listen to interaction
with other physics objects, but we don't need it to have collisions. Ground doesn't need to listen to anything; it's just there to prevent
creatures from falling.
请注意,点击右侧的“...”按钮会将该属性以带名称的复选框的形式展示。

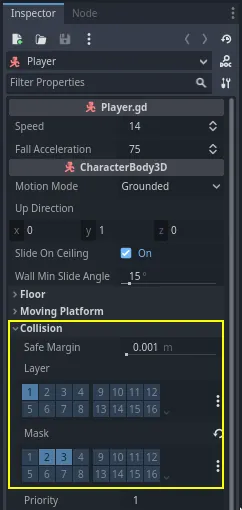
Next up are the Player and the Mob. Open player.tscn by double-clicking
the file in the FileSystem dock.
Select the Player node and set its Collision -> Mask to both "enemies" and "world". You can leave the default Layer property as it is, because the first layer is the "player" layer.
Then, open the Mob scene by double-clicking on mob.tscn and select the
Mob node.
将其 Collision -> Layer 设为“enemies”,然后取消 Collision -> Mask 的设置,让遮罩为空。
These settings mean the monsters will move through one another. If you want the monsters to collide with and slide against each other, turn on the "enemies" mask.
备注
小怪并不需要遮罩“world”层,因为它们只会沿着 XZ 平面移动。我们是故意不去为它们添加重力影响的。
跳跃
跳跃机制本身只需要两行代码。打开 Player 脚本。我们需要一个值来控制跳跃的强度,并更新 _physics_process() 来对跳跃进行编码。
在定义 fall_acceleration 这一行之后,在脚本的顶部,添加 jump_impulse。
#...
# Vertical impulse applied to the character upon jumping in meters per second.
@export var jump_impulse = 20
// Don't forget to rebuild the project so the editor knows about the new export variable.

// ...
// Vertical impulse applied to the character upon jumping in meters per second.
[Export]
public int JumpImpulse { get; set; } = 20;
Inside _physics_process(), add the following code before the move_and_slide() codeblock.
func _physics_process(delta):
    #...

    # Jumping.
    if is_on_floor() and Input.is_action_just_pressed("jump"):
        target_velocity.y = jump_impulse

    #...
public override void _PhysicsProcess(double delta)
{
    // ...

    // Jumping.
    if (IsOnFloor() && Input.IsActionJustPressed("jump"))
    {
        _targetVelocity.Y = JumpImpulse;
    }

    // ...
}
这就是跳跃所需的所有东西!
The is_on_floor() method is a tool from the CharacterBody3D class. It
returns true if the body collided with the floor in this frame. That's why
we apply gravity to the Player: so we collide with the floor instead of
floating over it like the monsters.
If the character is on the floor and the player presses "jump", we instantly give them a lot of vertical speed. In games, you really want controls to be responsive and giving instant speed boosts like these, while unrealistic, feels great.
Notice that the Y axis is positive upwards. That's unlike 2D, where the Y axis is positive downwards.
踩扁怪物
接下来让我们来添加踩扁机制。我们会让玩家在怪物身上弹起,并同时消灭它们。
我们需要检测与怪物的碰撞,并和与地板的碰撞相区分。要这么做,我们可以使用 Godot 的分组标签功能。
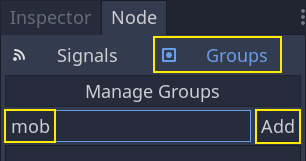
Open the scene mob.tscn again and select the Mob node. Go to the Node
dock on the right to see a list of signals. The Node dock has two tabs:
Signals, which you've already used, and Groups, which allows you to assign
tags to nodes.
单击这个选项卡就会出现一个输入框,可以填写标签的名称。在这个输入框中输入“mob”(小怪)并单击添加按钮。
场景面板中会出现一个图标,表示该节点至少处在一个分组之中。
![]()
我们现在就可以在代码中使用分组来区分与怪物的碰撞和与地板的碰撞了。
编写踩扁机制
回到 Player 脚本来编写踩扁和弹跳。
在脚本顶部,我们需要添加一个属性 bounce_impulse。踩扁敌人时,我们不必让角色弹得比跳跃一样高。
# Vertical impulse applied to the character upon bouncing over a mob in
# meters per second.
@export var bounce_impulse = 16
// Don't forget to rebuild the project so the editor knows about the new export variable.

// Vertical impulse applied to the character upon bouncing over a mob in meters per second.
[Export]
public int BounceImpulse { get; set; } = 16;
Then, after the Jumping codeblock we added above in _physics_process(), add the following loop. With
move_and_slide(), Godot makes the body move sometimes multiple times in a
row to smooth out the character's motion. So we have to loop over all collisions
that may have happened.
在循环的每次迭代中,我们会检查是否落在了小怪身上。如果是的话,我们就消灭它并进行弹跳。
如果某一帧没有发生碰撞,那么这段代码中的循环就不会执行。
func _physics_process(delta):
   #...

   # Iterate through all collisions that occurred this frame
   for index in range(get_slide_collision_count()):
       # We get one of the collisions with the player
       var collision = get_slide_collision(index)

       # If the collision is with ground
       if (collision.get_collider() == null):
           continue

       # If the collider is with a mob
       if collision.get_collider().is_in_group("mob"):
           var mob = collision.get_collider()
           # we check that we are hitting it from above.
           if Vector3.UP.dot(collision.get_normal()) > 0.1:
               # If so, we squash it and bounce.
               mob.squash()
               target_velocity.y = bounce_impulse
public override void _PhysicsProcess(double delta)
{
    // ...

    // Iterate through all collisions that occurred this frame.
    for (int index = 0; index < GetSlideCollisionCount(); index++)
    {
        // We get one of the collisions with the player.
        KinematicCollision3D collision = GetSlideCollision(index);

        // If the collision is with a mob.
        if (collision.GetCollider() is Mob mob)
        {
            // We check that we are hitting it from above.
            if (Vector3.Up.Dot(collision.GetNormal()) > 0.1f)
            {
                // If so, we squash it and bounce.
                mob.Squash();
                _targetVelocity.Y = BounceImpulse;
            }
        }
    }
}
新函数很多。下面我们来进一步介绍一下。
The functions get_slide_collision_count() and get_slide_collision() both come from
the CharacterBody3D class and are related to
move_and_slide().
get_slide_collision() returns a
KinematicCollision3D object that holds
information about where and how the collision occurred. For example, we use its
get_collider property to check if we collided with a "mob" by calling
is_in_group() on it: collision.get_collider().is_in_group("mob").
备注
每一个 Node 都可以使用 is_in_group() 方法。
To check that we are landing on the monster, we use the vector dot product:
Vector3.UP.dot(collision.get_normal()) > 0.1. The collision normal is a 3D vector
that is perpendicular to the plane where the collision occurred. The dot product
allows us to compare it to the up direction.
点积结果大于 0 时,两个向量的夹角小于 90 度。大于 0.1 表示我们大概位于怪物上方。
We are calling one undefined function, mob.squash(), so we have to add it to
the Mob class.
在文件系统面板中双击打开 Mob.gd 脚本。在脚本顶部,我们要定义一个新的信号叫作 squashed(被踩扁)。你可以在底部添加 squash 函数,在里面发出这个信号并销毁这个小怪。
# Emitted when the player jumped on the mob.
signal squashed

# ...


func squash():
    squashed.emit()
    queue_free()
// Don't forget to rebuild the project so the editor knows about the new signal.

// Emitted when the player jumped on the mob.
[Signal]
public delegate void SquashedEventHandler();

// ...

public void Squash()
{
    EmitSignal(SignalName.Squashed);
    QueueFree();
}
下一节课中,我们会使用这个信号来加分数。
With that, you should be able to kill monsters by jumping on them. You can press
F5 to try the game and set main.tscn as your project's main scene.
不过玩家现在还不会死。我们会在下一部分实现。