Attention: Here be dragons
This is the latest
(unstable) version of this documentation, which may document features
not available in or compatible with released stable versions of Godot.
Checking the stable version of the documentation...
编写玩家代码
在这一课中,我们将添加玩家的动作、动画,并将其设置为检测碰撞。
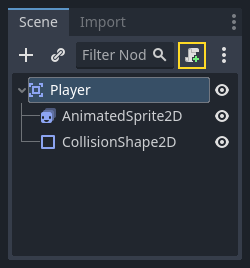
现在我们需要添加一些内置节点所不具备的功能,因此要添加一个脚本。点击 Player 节点然后点击“附加脚本”按钮:
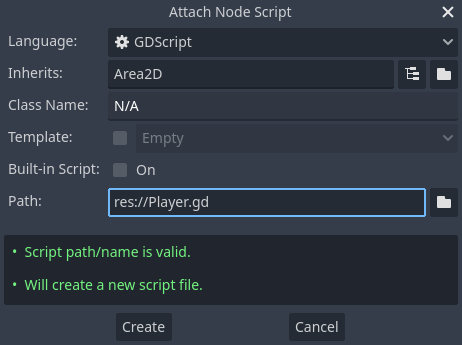
在脚本设置窗口中,你可以维持默认设置。点击“创建”即可:
备注
如果你要创建 C# 脚本或者其他语言的脚本,那就在创建之前在语言下拉菜单中选择语言。
备注
如果这是你第一次接触 GDScript,请在继续之前阅读 脚本语言。
首先声明该对象将需要的成员变量:
extends Area2D

@export var speed = 400 # How fast the player will move (pixels/sec).
var screen_size # Size of the game window.
using Godot;

public partial class Player : Area2D
{
    [Export]
    public int Speed { get; set; } = 400; // How fast the player will move (pixels/sec).

    public Vector2 ScreenSize; // Size of the game window.
}
// A `player.gdns` file has already been created for you. Attach it to the Player node.

// Create two files `player.cpp` and `player.hpp` next to `entry.cpp` in `src`.
// This code goes in `player.hpp`. We also define the methods we'll be using here.
#ifndef PLAYER_H
#define PLAYER_H

#include <AnimatedSprite2D.hpp>
#include <Area2D.hpp>
#include <CollisionShape2D.hpp>
#include <Godot.hpp>
#include <Input.hpp>

class Player : public godot::Area2D {
    GODOT_CLASS(Player, godot::Area2D)

    godot::AnimatedSprite2D *_animated_sprite;
    godot::CollisionShape2D *_collision_shape;
    godot::Input *_input;
    godot::Vector2 _screen_size; // Size of the game window.

public:
    real_t speed = 400; // How fast the player will move (pixels/sec).

    void _init() {}
    void _ready();
    void _process(const double p_delta);
    void start(const godot::Vector2 p_position);
    void _on_body_entered(godot::Node2D *_body);

    static void _register_methods();
};

#endif // PLAYER_H
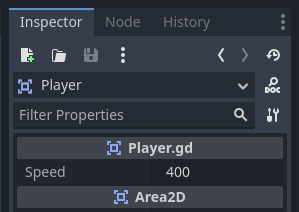
在第一个变量 speed 上使用 export 关键字,这样我们就可以在“检查器”中设置其值。对于希望能够像节点的内置属性一样进行调整的值,这可能很方便。点击 Player 节点,您将看到该属性现在显示在“检查器”的“Script Variables”(脚本变量)部分。请记住,如果您在此处更改值,它将覆盖脚本中所写的值。
警告
If you're using C#, you need to (re)build the project assemblies whenever you want to see new export variables or signals. This build can be manually triggered by clicking the "Build" button at the top right of the editor.

A manual build can also be triggered from the MSBuild Panel. Click the word "MSBuild" at the bottom of the editor window to reveal the MSBuild Panel, then click the "Build" button.
当节点进入场景树时,_ready() 函数被调用,这是查看游戏窗口大小的好时机:
func _ready():
    screen_size = get_viewport_rect().size
public override void _Ready()
{
    ScreenSize = GetViewportRect().Size;
}
// This code goes in `player.cpp`.
#include "player.hpp"

void Player::_ready() {
    _animated_sprite = get_node<godot::AnimatedSprite2D>("AnimatedSprite2D");
    _collision_shape = get_node<godot::CollisionShape2D>("CollisionShape2D");
    _input = godot::Input::get_singleton();
    _screen_size = get_viewport_rect().size;
}
现在我们可以使用 _process() 函数定义玩家将执行的操作。_process() 在每一帧都被调用,因此我们将使用它来更新我们希望会经常变化的游戏元素。对于玩家而言,我们需要执行以下操作:
检查输入。
沿给定方向移动。
播放合适的动画。
首先,我们需要检查输入——玩家是否正在按键?对于这个游戏,我们有 4 个方向的输入要检查。输入动作在项目设置中的“输入映射”下定义。在这里,您可以定义自定义事件,并为其分配不同的按键、鼠标事件、或者其他输入。对于此游戏,我们将把方向键映射给四个方向。
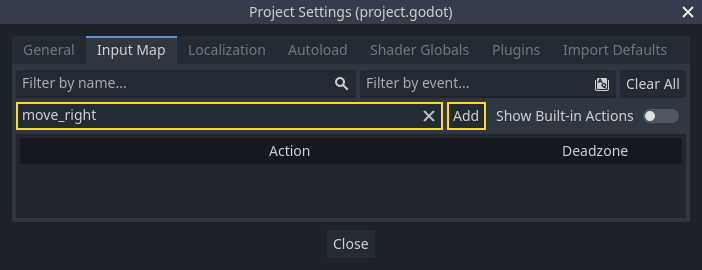
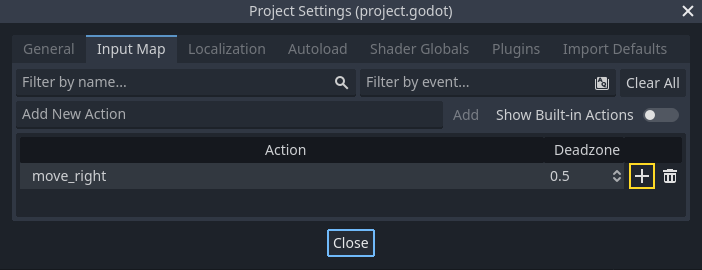
点击项目 -> 项目设置打开项目设置窗口,然后单击顶部的输入映射选项卡。在顶部栏中键入“move_right”,然后单击“添加”按钮以添加该 move_right 动作。
We need to assign a key to this action. Click the "+" icon on the right, to open the event manager window.
The "Listening for Input..." field should automatically be selected. Press the "right" key on your keyboard, and the menu should look like this now.
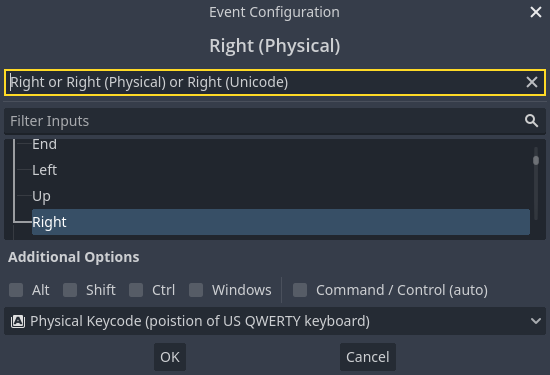
Select the "ok" button. The "right" key is now associated with the move_right action.
重复这些步骤以再添加三个映射:
move_left映射到左箭头键。move_up映射到向上箭头键。move_down映射到向下箭头键。
按键映射选项卡应该看起来类似这样:
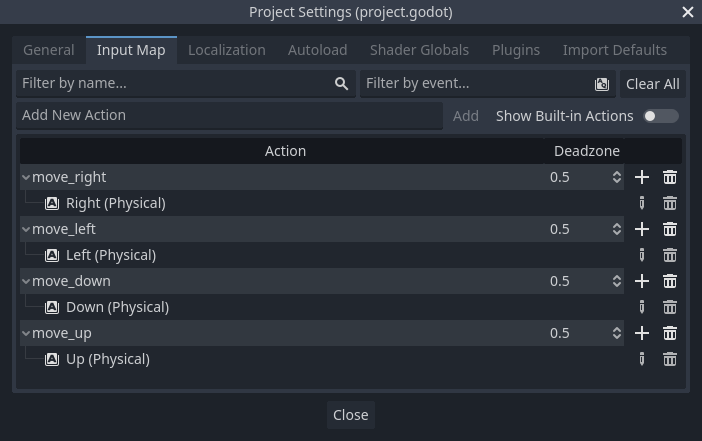
单击“关闭”按钮关闭项目设置。
备注
我们只将一个键映射到每个输入动作,但你可以将多个键、操纵杆按钮或鼠标按钮映射到同一个输入动作。
您可以使用 Input.is_action_pressed() 来检测是否按下了键, 如果按下会返回 true, 否则返回 false .
func _process(delta):
    var velocity = Vector2.ZERO # The player's movement vector.
    if Input.is_action_pressed("move_right"):
        velocity.x += 1
    if Input.is_action_pressed("move_left"):
        velocity.x -= 1
    if Input.is_action_pressed("move_down"):
        velocity.y += 1
    if Input.is_action_pressed("move_up"):
        velocity.y -= 1

    if velocity.length() > 0:
        velocity = velocity.normalized() * speed
        $AnimatedSprite2D.play()
    else:
        $AnimatedSprite2D.stop()
public override void _Process(double delta)
{
    var velocity = Vector2.Zero; // The player's movement vector.

    if (Input.IsActionPressed("move_right"))
    {
        velocity.X += 1;
    }

    if (Input.IsActionPressed("move_left"))
    {
        velocity.X -= 1;
    }

    if (Input.IsActionPressed("move_down"))
    {
        velocity.Y += 1;
    }

    if (Input.IsActionPressed("move_up"))
    {
        velocity.Y -= 1;
    }

    var animatedSprite2D = GetNode<AnimatedSprite2D>("AnimatedSprite2D");

    if (velocity.Length() > 0)
    {
        velocity = velocity.Normalized() * Speed;
        animatedSprite2D.Play();
    }
    else
    {
        animatedSprite2D.Stop();
    }
}
// This code goes in `player.cpp`.
void Player::_process(const double p_delta) {
    godot::Vector2 velocity(0, 0);

    velocity.x = _input->get_action_strength("move_right") - _input->get_action_strength("move_left");
    velocity.y = _input->get_action_strength("move_down") - _input->get_action_strength("move_up");

    if (velocity.length() > 0) {
        velocity = velocity.normalized() * speed;
        _animated_sprite->play();
    } else {
        _animated_sprite->stop();
    }
}
我们首先将 velocity 设置为 (0, 0)——默认情况下玩家不应该移动。然后我们检查每个输入并从 velocity 中进行加/减以获得总方向。例如,如果您同时按住 右 和 下,则生成的 velocity 向量将为 (1, 1)。此时,由于我们同时向水平和垂直两个方向进行移动,玩家斜向移动的速度将会比水平移动要更快。
只要对速度进行归一化就可以防止这种情况,也就是将速度的长度设置为 1,然后乘以想要的速度。这样就不会有过快的斜向运动了。
小技巧
如果您以前从未使用过向量数学,或者需要复习,可以在 Godot 中的 向量数学 上查看向量用法的解释。最好了解一下,但对于本教程的其余部分而言,这不是必需的。
We also check whether the player is moving so we can call play() or
stop() on the AnimatedSprite2D.
小技巧
$ is shorthand for get_node(). So in the code above,
$AnimatedSprite2D.play() is the same as
get_node("AnimatedSprite2D").play().
In GDScript, $ returns the node at the relative path from the
current node, or returns null if the node is not found. Since
AnimatedSprite2D is a child of the current node, we can use
$AnimatedSprite2D.
现在我们有了一个运动方向,我们可以更新玩家的位置了。我们也可以使用 clamp() 来防止它离开屏幕。 clamp 一个值意味着将其限制在给定范围内。将以下内容添加到 _process 函数的底部:
position += velocity * delta
position = position.clamp(Vector2.ZERO, screen_size)
Position += velocity * (float)delta;
Position = new Vector2(
    x: Mathf.Clamp(Position.X, 0, ScreenSize.X),
    y: Mathf.Clamp(Position.Y, 0, ScreenSize.Y)
);
godot::Vector2 position = get_position();
position += velocity * (real_t)p_delta;
position.x = godot::Math::clamp(position.x, (real_t)0.0, _screen_size.x);
position.y = godot::Math::clamp(position.y, (real_t)0.0, _screen_size.y);
set_position(position);
小技巧
_process() 函数的 delta 参数是 帧长度 ——完成上一帧所花费的时间. 使用这个值的话, 可以保证你的移动不会被帧率的变化所影响.
点击“运行场景”(F6,macOS 上为 Cmd + R)并确认您能够在屏幕中沿任一方向移动玩家。
警告
如果在“调试器”面板中出现错误
Attempt to call function 'play' in base 'null instance' on a null instance(尝试调用空实例在基类“空实例”上的“play”函数)
this likely means you spelled the name of the AnimatedSprite2D node
wrong. Node names are case-sensitive and $NodeName must match
the name you see in the scene tree.
选择动画
Now that the player can move, we need to change which animation the
AnimatedSprite2D is playing based on its direction. We have the "walk" animation,
which shows the player walking to the right. This animation should be flipped
horizontally using the flip_h property for left movement. We also have the
"up" animation, which should be flipped vertically with flip_v for downward
movement. Let's place this code at the end of the _process() function:
if velocity.x != 0:
    $AnimatedSprite2D.animation = "walk"
    $AnimatedSprite2D.flip_v = false
    # See the note below about boolean assignment.
    $AnimatedSprite2D.flip_h = velocity.x < 0
elif velocity.y != 0:
    $AnimatedSprite2D.animation = "up"
    $AnimatedSprite2D.flip_v = velocity.y > 0
if (velocity.X != 0)
{
    animatedSprite2D.Animation = "walk";
    animatedSprite2D.FlipV = false;
    // See the note below about boolean assignment.
    animatedSprite2D.FlipH = velocity.X < 0;
}
else if (velocity.Y != 0)
{
    animatedSprite2D.Animation = "up";
    animatedSprite2D.FlipV = velocity.Y > 0;
}
if (velocity.x != 0) {
    _animated_sprite->set_animation("walk");
    _animated_sprite->set_flip_v(false);
    // See the note below about boolean assignment.
    _animated_sprite->set_flip_h(velocity.x < 0);
} else if (velocity.y != 0) {
    _animated_sprite->set_animation("up");
    _animated_sprite->set_flip_v(velocity.y > 0);
}
备注
上面代码中的布尔赋值是程序员常用的缩写. 在做布尔比较同时, 同时可 赋 一个布尔值. 参考这段代码与上面的单行布尔赋值:
if velocity.x < 0:
    $AnimatedSprite2D.flip_h = true
else:
    $AnimatedSprite2D.flip_h = false
if (velocity.X < 0)
{
    animatedSprite2D.FlipH = true;
}
else
{
    animatedSprite2D.FlipH = false;
}
再次播放场景并检查每个方向上的动画是否正确.
小技巧
这里一个常见错误是打错了动画的名字。“动画帧”面板中的动画名称必须与在代码中键入的内容匹配。如果你将动画命名成了 "Walk",就必须在代码中也使用大写的“W”。
当您确定移动正常工作时, 请将此行添加到 _ready() 中,在游戏开始时隐藏玩家:
hide()
Hide();
hide();
准备碰撞
我们希望 Player 能够检测到何时被敌人击中, 但是我们还没有任何敌人!没关系, 因为我们将使用Godot的 信号 功能来使其正常工作.
Add the following at the top of the script. If you're using GDScript, add it after
extends Area2D. If you're using C#, add it after public partial class Player : Area2D:
signal hit
// Don't forget to rebuild the project so the editor knows about the new signal.

[Signal]
public delegate void HitEventHandler();
// This code goes in `player.cpp`.
// We need to register the signal here, and while we're here, we can also
// register the other methods and register the speed property.
void Player::_register_methods() {
    godot::register_method("_ready", &Player::_ready);
    godot::register_method("_process", &Player::_process);
    godot::register_method("start", &Player::start);
    godot::register_method("_on_body_entered", &Player::_on_body_entered);
    godot::register_property("speed", &Player::speed, (real_t)400.0);
    // This below line is the signal.
    godot::register_signal<Player>("hit", godot::Dictionary());
}
这定义了一个叫作“hit”的自定义信号,当玩家与敌人碰撞时,我们会让他发出这个信号。我们将使用 Area2D 来检测碰撞。选中 Player 节点,然后点击“检查器”选项卡旁边的“节点”选项卡,就可以查看玩家可以发出的信号列表:
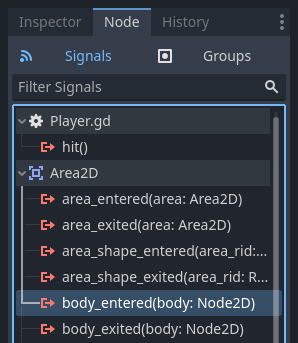
Notice our custom "hit" signal is there as well! Since our enemies are going to
be RigidBody2D nodes, we want the body_entered(body: Node2D) signal. This
signal will be emitted when a body contacts the player. Click "Connect.." and
the "Connect a Signal" window appears. We don't need to change any of these
settings so click "Connect" again. Godot will automatically create a function in
your player's script.

请注意函数名旁的绿色图标, 这表示信号已经连接到这个函数. 将以下代码添加到函数体中:
func _on_body_entered(body):
    hide() # Player disappears after being hit.
    hit.emit()
    # Must be deferred as we can't change physics properties on a physics callback.
    $CollisionShape2D.set_deferred("disabled", true)
private void OnBodyEntered(PhysicsBody2D body)
{
    Hide(); // Player disappears after being hit.
    EmitSignal(SignalName.Hit);
    // Must be deferred as we can't change physics properties on a physics callback.
    GetNode<CollisionShape2D>("CollisionShape2D").SetDeferred(CollisionShape2D.PropertyName.Disabled, true);
}
// This code goes in `player.cpp`.
void Player::_on_body_entered(godot::Node2D *_body) {
    hide(); // Player disappears after being hit.
    emit_signal("hit");
    // Must be deferred as we can't change physics properties on a physics callback.
    _collision_shape->set_deferred("disabled", true);
}
敌人每次击中 玩家时都会发出一个信号。我们需要禁用玩家的碰撞检测,确保我们不会多次触发 hit 信号。
备注
如果在引擎的碰撞处理过程中禁用区域的碰撞形状可能会导致错误。使用 set_deferred() 告诉 Godot 等待可以安全地禁用形状时再这样做。
最后再为玩家添加一个函数,用于在开始新游戏时调用来重置玩家。
func start(pos):
    position = pos
    show()
    $CollisionShape2D.disabled = false
public void Start(Vector2 position)
{
    Position = position;
    Show();
    GetNode<CollisionShape2D>("CollisionShape2D").Disabled = false;
}
// This code goes in `player.cpp`.
void Player::start(const godot::Vector2 p_position) {
    set_position(p_position);
    show();
    _collision_shape->set_disabled(false);
}
在玩家部分的工作完成后,我们将在下一课中研究敌人。