Attention: Here be dragons
This is the latest
(unstable) version of this documentation, which may document features
not available in or compatible with released stable versions of Godot.
Checking the stable version of the documentation...
游戏主场景
现在是时候将我们所做的一切整合到一个可玩的游戏场景中了。
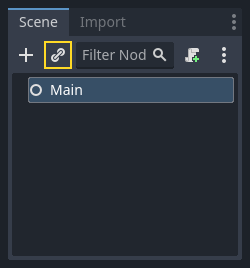
创建新场景并添加一个 Node 节点,命名为 Main。(我们之所以使用 Node 而不是 Node2D,是因为这个节点会作为处理游戏逻辑的容器使用。本身是不需要 2D 功能的。)
Click the Instance button (represented by a chain link icon) and select your saved
player.tscn.
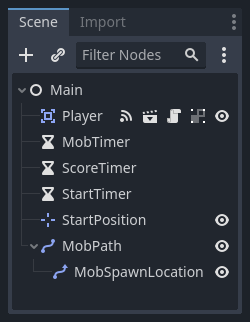
现在, 将以下节点添加为 Main 的子节点, 并按如下所示对其进行命名(值以秒为单位):
Timer(名为
MobTimer)——控制怪物产生的频率Timer(名为
ScoreTimer)——每秒增加分数Timer(名为
StartTimer)——在开始之前给出延迟Marker2D (named
StartPosition) - to indicate the player's start position
如下设置每个 Timer 节点的 Wait Time 属性:
MobTimer:0.5ScoreTimer:1StartTimer:2
此外,将 StartTimer 的 One Shot 属性设置为“启用”,并将 StartPosition 节点的 Position 设置为 (240, 450)。
生成怪物
Main 节点将产生新的生物, 我们希望它们出现在屏幕边缘的随机位置. 添加一个名为 MobPath 的 Path2D 节点作为 Main 的子级. 当你选择 Path2D 时, 你将在编辑器顶部看到一些新按钮:

Select the middle one ("Add Point") and draw the path by clicking to add the points at the corners shown. To have the points snap to the grid, make sure "Use Grid Snap" and "Use Smart Snap" are both selected. These options can be found to the left of the "Lock" button, appearing as a magnet next to some dots and intersecting lines, respectively.

重要
以顺时针的顺序绘制路径,否则小怪会向外而非向内生成!

在图像上放置点 4 后, 点击 闭合曲线 按钮, 你的曲线将完成.
现在已经定义了路径, 添加一个 PathFollow2D 节点作为 MobPath 的子节点, 并将其命名为 MobSpawnLocation. 该节点在移动时, 将自动旋转并沿着该路径, 因此我们可以使用它沿路径来选择随机位置和方向.
您的场景应如下所示:
Main 脚本
Add a script to Main. At the top of the script, we use
@export var mob_scene: PackedScene to allow us to choose the Mob scene we want
to instance.
extends Node

@export var mob_scene: PackedScene
var score
using Godot;

public partial class Main : Node
{
    // Don't forget to rebuild the project so the editor knows about the new export variable.

    [Export]
    public PackedScene MobScene { get; set; }

    private int _score;
}
// Copy `player.gdns` to `main.gdns` and replace `Player` with `Main`.
// Attach the `main.gdns` file to the Main node.

// Create two files `main.cpp` and `main.hpp` next to `entry.cpp` in `src`.
// This code goes in `main.hpp`. We also define the methods we'll be using here.
#ifndef MAIN_H
#define MAIN_H

#include <AudioStreamPlayer.hpp>
#include <CanvasLayer.hpp>
#include <Godot.hpp>
#include <Node.hpp>
#include <PackedScene.hpp>
#include <PathFollow2D.hpp>
#include <RandomNumberGenerator.hpp>
#include <Timer.hpp>

#include "hud.hpp"
#include "player.hpp"

class Main : public godot::Node {
    GODOT_CLASS(Main, godot::Node)

    int score;
    HUD *_hud;
    Player *_player;
    godot::Node2D *_start_position;
    godot::PathFollow2D *_mob_spawn_location;
    godot::Timer *_mob_timer;
    godot::Timer *_score_timer;
    godot::Timer *_start_timer;
    godot::AudioStreamPlayer *_music;
    godot::AudioStreamPlayer *_death_sound;
    godot::Ref<godot::RandomNumberGenerator> _random;

public:
    godot::Ref<godot::PackedScene> mob_scene;

    void _init() {}
    void _ready();
    void game_over();
    void new_game();
    void _on_MobTimer_timeout();
    void _on_ScoreTimer_timeout();
    void _on_StartTimer_timeout();

    static void _register_methods();
};

#endif // MAIN_H

// This code goes in `main.cpp`.
#include "main.hpp"

#include <SceneTree.hpp>

#include "mob.hpp"

void Main::_ready() {
    _hud = get_node<HUD>("HUD");
    _player = get_node<Player>("Player");
    _start_position = get_node<godot::Node2D>("StartPosition");
    _mob_spawn_location = get_node<godot::PathFollow2D>("MobPath/MobSpawnLocation");
    _mob_timer = get_node<godot::Timer>("MobTimer");
    _score_timer = get_node<godot::Timer>("ScoreTimer");
    _start_timer = get_node<godot::Timer>("StartTimer");
    // Uncomment these after adding the nodes in the "Sound effects" section of "Finishing up".
    //_music = get_node<godot::AudioStreamPlayer>("Music");
    //_death_sound = get_node<godot::AudioStreamPlayer>("DeathSound");
    _random = (godot::Ref<godot::RandomNumberGenerator>)godot::RandomNumberGenerator::_new();
}
单击 Main 节点,就可以在“检查器”的“Script Variables”(脚本变量)下看到 Mob Scene 属性。
有两种方法来给这个属性赋值:
Drag
mob.tscnfrom the "FileSystem" dock and drop it in the Mob Scene property.Click the down arrow next to "[empty]" and choose "Load". Select
mob.tscn.
Next, select the instance of the Player scene under Main node in the Scene dock,
and access the Node dock on the sidebar. Make sure to have the Signals tab selected
in the Node dock.
You should see a list of the signals for the Player node. Find and
double-click the hit signal in the list (or right-click it and select
"Connect..."). This will open the signal connection dialog. We want to make a
new function named game_over, which will handle what needs to happen when a
game ends. Type "game_over" in the "Receiver Method" box at the bottom of the
signal connection dialog and click "Connect". You are aiming to have the hit signal
emitted from Player and handled in the Main script. Add the following code
to the new function, as well as a new_game function that will set
everything up for a new game:
func game_over():
    $ScoreTimer.stop()
    $MobTimer.stop()

func new_game():
    score = 0
    $Player.start($StartPosition.position)
    $StartTimer.start()
public void GameOver()
{
    GetNode<Timer>("MobTimer").Stop();
    GetNode<Timer>("ScoreTimer").Stop();
}

public void NewGame()
{
    _score = 0;

    var player = GetNode<Player>("Player");
    var startPosition = GetNode<Marker2D>("StartPosition");
    player.Start(startPosition.Position);

    GetNode<Timer>("StartTimer").Start();
}
// This code goes in `main.cpp`.
void Main::game_over() {
    _score_timer->stop();
    _mob_timer->stop();
}

void Main::new_game() {
    score = 0;
    _player->start(_start_position->get_position());
    _start_timer->start();
}
Now connect the timeout() signal of each of the Timer nodes (StartTimer,
ScoreTimer, and MobTimer) to the main script. StartTimer will start
the other two timers. ScoreTimer will increment the score by 1.
func _on_score_timer_timeout():
    score += 1

func _on_start_timer_timeout():
    $MobTimer.start()
    $ScoreTimer.start()
private void OnScoreTimerTimeout()
{
    _score++;
}

private void OnStartTimerTimeout()
{
    GetNode<Timer>("MobTimer").Start();
    GetNode<Timer>("ScoreTimer").Start();
}
// This code goes in `main.cpp`.
void Main::_on_ScoreTimer_timeout() {
    score += 1;
}

void Main::_on_StartTimer_timeout() {
    _mob_timer->start();
    _score_timer->start();
}

// Also add this to register all methods and the mob scene property.
void Main::_register_methods() {
    godot::register_method("_ready", &Main::_ready);
    godot::register_method("game_over", &Main::game_over);
    godot::register_method("new_game", &Main::new_game);
    godot::register_method("_on_MobTimer_timeout", &Main::_on_MobTimer_timeout);
    godot::register_method("_on_ScoreTimer_timeout", &Main::_on_ScoreTimer_timeout);
    godot::register_method("_on_StartTimer_timeout", &Main::_on_StartTimer_timeout);
    godot::register_property("mob_scene", &Main::mob_scene, (godot::Ref<godot::PackedScene>)nullptr);
}
In _on_mob_timer_timeout(), we will create a mob instance, pick a random
starting location along the Path2D, and set the mob in motion. The
PathFollow2D node will automatically rotate as it follows the path, so we
will use that to select the mob's direction as well as its position.
When we spawn a mob, we'll pick a random value between 150.0 and
250.0 for how fast each mob will move (it would be boring if they were
all moving at the same speed).
注意,必须使用 add_child() 将新实例添加到场景中。
func _on_mob_timer_timeout():
    # Create a new instance of the Mob scene.
    var mob = mob_scene.instantiate()

    # Choose a random location on Path2D.
    var mob_spawn_location = get_node("MobPath/MobSpawnLocation")
    mob_spawn_location.progress_ratio = randf()

    # Set the mob's direction perpendicular to the path direction.
    var direction = mob_spawn_location.rotation + PI / 2

    # Set the mob's position to a random location.
    mob.position = mob_spawn_location.position

    # Add some randomness to the direction.
    direction += randf_range(-PI / 4, PI / 4)
    mob.rotation = direction

    # Choose the velocity for the mob.
    var velocity = Vector2(randf_range(150.0, 250.0), 0.0)
    mob.linear_velocity = velocity.rotated(direction)

    # Spawn the mob by adding it to the Main scene.
    add_child(mob)
private void OnMobTimerTimeout()
{
    // Note: Normally it is best to use explicit types rather than the `var`
    // keyword. However, var is acceptable to use here because the types are
    // obviously Mob and PathFollow2D, since they appear later on the line.

    // Create a new instance of the Mob scene.
    Mob mob = MobScene.Instantiate<Mob>();

    // Choose a random location on Path2D.
    var mobSpawnLocation = GetNode<PathFollow2D>("MobPath/MobSpawnLocation");
    mobSpawnLocation.ProgressRatio = GD.Randf();

    // Set the mob's direction perpendicular to the path direction.
    float direction = mobSpawnLocation.Rotation + Mathf.Pi / 2;

    // Set the mob's position to a random location.
    mob.Position = mobSpawnLocation.Position;

    // Add some randomness to the direction.
    direction += (float)GD.RandRange(-Mathf.Pi / 4, Mathf.Pi / 4);
    mob.Rotation = direction;

    // Choose the velocity.
    var velocity = new Vector2((float)GD.RandRange(150.0, 250.0), 0);
    mob.LinearVelocity = velocity.Rotated(direction);

    // Spawn the mob by adding it to the Main scene.
    AddChild(mob);
}
// This code goes in `main.cpp`.
void Main::_on_MobTimer_timeout() {
    // Create a new instance of the Mob scene.
    godot::Node *mob = mob_scene->instance();

    // Choose a random location on Path2D.
    _mob_spawn_location->set_progress_ratio((real_t)_random->randf());

    // Set the mob's direction perpendicular to the path direction.
    real_t direction = _mob_spawn_location->get_rotation() + (real_t)Math_PI / 2;

    // Set the mob's position to a random location.
    mob->set("position", _mob_spawn_location->get_position());

    // Add some randomness to the direction.
    direction += _random->randf_range((real_t)-Math_PI / 4, (real_t)Math_PI / 4);
    mob->set("rotation", direction);

    // Choose the velocity for the mob.
    godot::Vector2 velocity = godot::Vector2(_random->randf_range(150.0, 250.0), 0.0);
    mob->set("linear_velocity", velocity.rotated(direction));

    // Spawn the mob by adding it to the Main scene.
    add_child(mob);
}
重要
Why PI? In functions requiring angles, Godot uses radians,
not degrees. Pi represents a half turn in radians, about
3.1415 (there is also TAU which is equal to 2 * PI).
If you're more comfortable working with degrees, you'll need to
use the deg_to_rad() and rad_to_deg() functions to
convert between the two.
测试场景
让我们测试这个场景,确保一切正常。请将对 new_game 的调用添加至 _ready():
func _ready():
    new_game()
public override void _Ready()
{
    NewGame();
}
// This code goes in `main.cpp`.
void Main::_ready() {
    new_game();
}
Let's also assign Main as our "Main Scene" - the one that runs automatically
when the game launches. Press the "Play" button and select main.tscn when
prompted.
小技巧
If you had already set another scene as the "Main Scene", you can right
click main.tscn in the FileSystem dock and select "Set As Main Scene".
你应该可以四处移动游戏角色,观察敌人的生成,以及玩家被敌人击中时会消失。
当你确定一切正常时,在 _ready() 中移除对 new_game() 的调用。
我们的游戏还缺点啥?缺用户界面。在下一课中,我们将会添加标题界面并且显示玩家的分数。