Attention: Here be dragons
This is the latest
(unstable) version of this documentation, which may document features
not available in or compatible with released stable versions of Godot.
Checking the stable version of the documentation...
2D sprite animation
前言
In this tutorial, you'll learn how to create 2D animated characters with the AnimatedSprite2D class and the AnimationPlayer. Typically, when you create or download an animated character, it will come in one of two ways: as individual images or as a single sprite sheet containing all the animation's frames. Both can be animated in Godot with the AnimatedSprite2D class.
First, we'll use AnimatedSprite2D to animate a collection of individual images. Then we will animate a sprite sheet using this class. Finally, we will learn another way to animate a sprite sheet with AnimationPlayer and the Animation property of Sprite2D.
备注
Art for the following examples by https://opengameart.org/users/ansimuz and tgfcoder.
Individual images with AnimatedSprite2D
在这个情况下, 你有一组图像, 每一个都包含你角色的动画的一帧. 对于这个例子, 我们将使用以下动画:

You can download the images here: 2d_sprite_animation_assets.zip
解压缩这些图像并将它们放在项目文件夹中. 使用以下节点布置场景树:
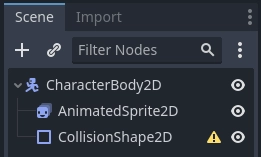
备注
根节点也可以是 Area2D 或 RigidBody2D。动画仍然会以同样的方式制作。一旦动画完成,你就可以为 CollisionShape2D 形状分配一个形状。更多信息请参见物理介绍。
Now select the AnimatedSprite2D and in its SpriteFrames property, select
"New SpriteFrames".
点击新的 SpriteFrames 资源,你会看到一个新的面板出现在编辑器窗口的底部:
将这 8 张独立的图片从左边的“文件系统”面板拖放到“动画帧”面板的中间部分。在左边,将动画名称从“default”更改为“run”。
Use the "Play" buttons on the top-right of the Filter Animations input to preview the animation. You should now see the animation playing in the viewport. However, it is a bit slow. To fix this, change the Speed (FPS) setting in the SpriteFrames panel to 10.
You can add additional animations by clicking the "Add Animation" button and adding additional images.
控制动画
动画完成后, 你可以通过代码中的 play() 和 stop() 方法控制动画. 这里有一个简单的例子, 按住右方向键播放动画, 松开后就停下.
extends CharacterBody2D

@onready var _animated_sprite = $AnimatedSprite2D

func _process(_delta):
    if Input.is_action_pressed("ui_right"):
        _animated_sprite.play("run")
    else:
        _animated_sprite.stop()
using Godot;

public partial class Character : CharacterBody2D
{
    private AnimatedSprite2D _animatedSprite;

    public override void _Ready()
    {
        _animatedSprite = GetNode<AnimatedSprite>("AnimatedSprite");
    }

    public override _Process(float _delta)
    {
        if (Input.IsActionPressed("ui_right"))
        {
            _animatedSprite.Play("run");
        }
        else
        {
            _animatedSprite.Stop();
        }
    }
}
Sprite sheet with AnimatedSprite2D
You can also easily animate from a sprite sheet with the class AnimatedSprite2D.
We will use this public domain sprite sheet:
右键单击图片,选择“图片另存为”来下载图片,然后将图片复制到项目文件夹中。
Set up your scene tree the same way you did previously when using individual images.
Select the AnimatedSprite2D and in its SpriteFrames property, select "New SpriteFrames".
点击创建出来的 SpriteFrames 资源。底部面板出现后,这次我们选择“从精灵表中添加帧”。
在弹出的打开文件对话框中,选择你的精灵表。
接下来会打开一个新的窗口,里面会显示刚才的精灵表。你首先需要修改精灵表中纵向和横向的图片数量,我们的这张精灵表里横向有四张图片、纵向有两张。
然后,在精灵表中选择动画中想要包含的帧。这里我们选中上面的四个,然后点击“添加 4 帧”来创建动画。
现在你就可以看到在底部面板的动画列表里看到这个动画了。双击 default(默认),然后把动画的名称改成 jump(跳跃)。
Finally, check the play button on the SpriteFrames editor to see your frog jump!
AnimationPlayer 与精灵表
Another way that you can animate when using a sprite sheet is to use a standard Sprite2D node to display the texture, and then animating the change from texture to texture with AnimationPlayer.
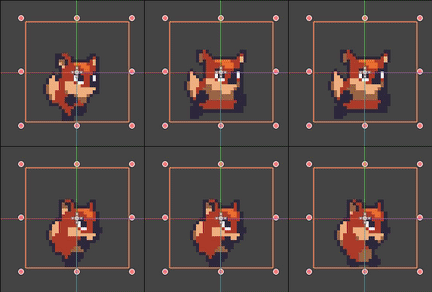
考虑一下这个包含 6 帧动画的精灵表:

右键单击图片,选择“图片另存为”下载图片,然后将图片复制到项目文件夹中。
我们的目的是, 循环着一个接一个地显示这些图像. 首先布置你的场景树:
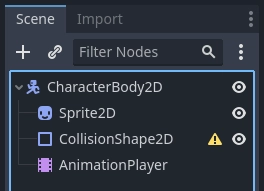
备注
根节点也可以是 Area2D 或 RigidBody2D。动画仍然会以同样的方式制作。一旦动画完成,你就可以为 CollisionShape2D 形状分配一个形状。更多信息请参见物理介绍。
将精灵表拖拽到 Sprite 的 Texture 属性里,你会看到整个清单显示在屏幕上。要把它分割成单独的帧,请在“检查器”中展开 Animation 部分,将 Hframes 设置为 6。Hframes 和 Vframes 是精灵表中水平和垂直帧的数量。
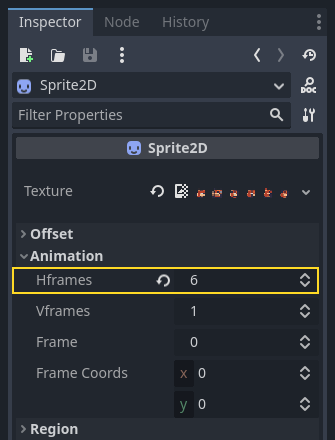
Now try changing the value of the Frame property. You'll see that it ranges
from 0 to 5 and the image displayed by the Sprite2D changes accordingly.
This is the property we'll be animating.
选中 AnimationPlayer , 然后点击 "动画" 按钮, 然后点击 "新建" 按钮. 将新动画命名为 "walk". 将动画长度设置为 0.6 , 点击 "Loop" 按钮, 让动画重复播放.
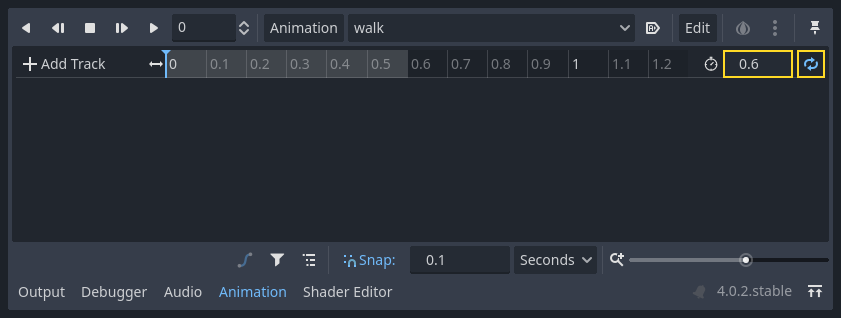
Now select the Sprite2D node and click the key icon to add a new track.

继续在时间轴的每一点添加帧(默认为 0.1 秒),直到你得到了从 0 到 5 的所有帧。你会看到这些帧出现在动画轨道上:
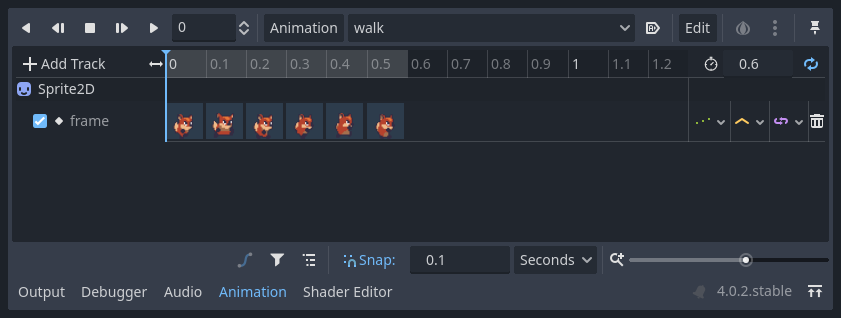
按下动画上的“播放”键,看看效果如何。
控制 AnimationPlayer 动画
Like with AnimatedSprite2D, you can control the animation via code using
the play() and stop() methods. Again, here is an example to play the
animation while the right arrow key is held, and stop it when the key is
released.
extends CharacterBody2D

@onready var _animation_player = $AnimationPlayer

func _process(_delta):
    if Input.is_action_pressed("ui_right"):
        _animation_player.play("walk")
    else:
        _animation_player.stop()
using Godot;

public partial class Character : CharacterBody2D
{
    private AnimationPlayer _animationPlayer;

    public override void _Ready()
    {
        _animationPlayer = GetNode<AnimationPlayer>("AnimationPlayer");
    }

    public override void _Process(float _delta)
    {
        if (Input.IsActionPressed("ui_right"))
        {
            _animationPlayer.Play("walk");
        }
        else
        {
            _animationPlayer.Stop();
        }
    }
}
备注
如果同时更新一个动画和一个其他的属性(比如说,平台跳跃游戏可能会更新精灵的 h_flip/v_flip 属性然后同时开始一个转身动画“turning”),要记住 play() 不是即时生效的。它会在下次 AnimationPlayer 被处理时生效。也就是说可能要到下一帧才行,导致现在这一帧变成“问题”帧——应用了属性的变化,但动画还没有开始。如果这会造成麻烦的话,在调用 play() 后,你可以调用 advance(0) 来立即开始播放动画。
总结
These examples illustrate the two classes you can use in Godot for 2D animation.
AnimationPlayer is a bit more complex than AnimatedSprite2D,
but it provides additional functionality, since you can also
animate other properties like position or scale.
The class AnimationPlayer can also be used with an AnimatedSprite2D.
Experiment to see what works best for your needs.